Building your own ChatGPT Graphical Client with NextJS and Wing

TL;DR
By the end of this article, you will build and deploy a ChatGPT Client using Wing and Next.js.
This application can run locally (in a local cloud simulator) or deploy it to your own cloud provider.

Introduction
Building a ChatGPT client and deploying it to your own cloud infrastructure is a good way to ensure control over your data.
Deploying LLMs to your own cloud infrastructure provides you with both privacy and security for your project.
Sometimes, you may have concerns about your data being stored or processed on remote servers when using proprietary LLM platforms like OpenAI’s ChatGPT, either due to the sensitivity of the data being fed into the platform or for other privacy reasons.
In this case, self-hosting an LLM to your cloud infrastructure or running it locally on your machine gives you greater control over the privacy and security of your data.
Wing is a cloud-oriented programming language that lets you build and deploy cloud-based applications without worrying about the underlying infrastructure. It simplifies the way you build on the cloud by allowing you to define and manage your cloud infrastructure and your application code within the same language. Wing is cloud agnostic - applications built with it can be compiled and deployed to various cloud platforms.
Let's get started!
To follow along, you need to:
- Have some understanding of Next.js
- Install Wing on your machine. Not to worry if you don’t know how to. We’ll go over it together in this project.
- Get your OpenAI API key.
Create Your Projects
To get started, you need to install Wing on your machine. Run the following command:
npm install -g winglang
Confirm the installation by checking the version:
wing --version
Create your Next.js and Wing apps.
mkdir assistant
cd assistant
npx create-next-app@latest frontend
mkdir backend && cd backend
wing new empty
We have successfully created our Wing and Next.js projects inside the assistant directory. The name of our ChatGPT Client is Assistant. Sounds cool, right?
The frontend and backend directories contain our Next and Wing apps, respectively. wing new empty creates three files: package.json, package-lock.json, and main.w. The latter is the app’s entry point.
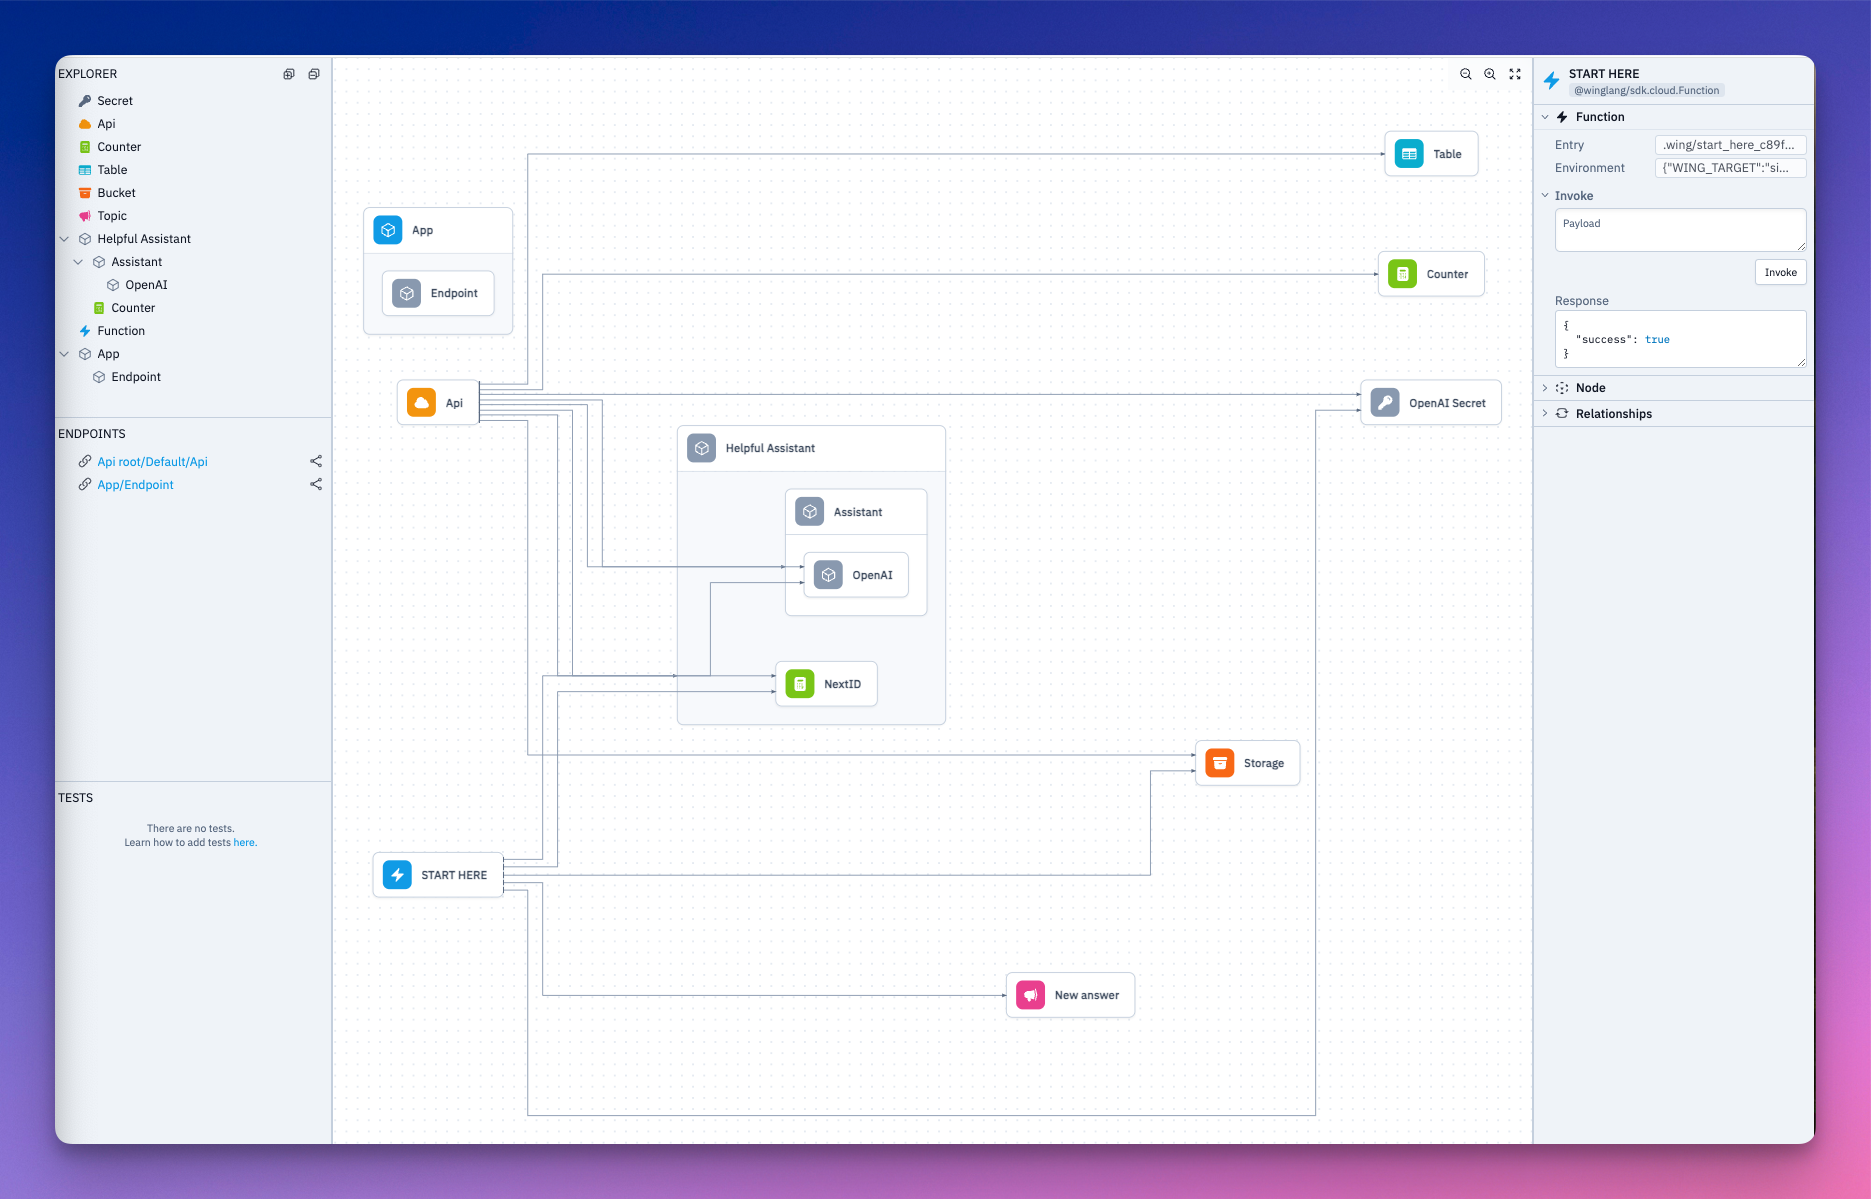
Run your application locally in the Wing simulator
The Wing simulator allows you to run your code, write unit tests, and debug your code inside your local machine without needing to deploy to an actual cloud provider, helping you iterate faster.
Use the following command to run your Wing app locally:
wing it
Your Wing app will run on localhost:3000.
Setting Up Your Backend
- Let’s install Wing’s OpenAI and React Libraries. The OpenAI library provides a standard interface to interact with the LLM. The React library allows you to connect your Wing backend to your Next app.
npm i @winglibs/openai @winglibs/react
- Import these packages in your
main.wfile. Let's also import all the other libraries we’ll need.
bring openai
bring react
bring cloud
bring ex
bring http
bring is the import statement in Wing. Think of it this way, Wing uses bring to achieve the same functionality as import in JavaScript.
cloud is Wing’s Cloud library. It exposes a standard interface for Cloud API, Bucket, Counter, Domain, Endpoint, Function and many more cloud resources. ex is a standard library for interfacing with Tables and cloud Redis database, and http is for calling different HTTP methods - sending and retrieving information from remote resources.
Get Your OpenAI API Key
We will use gpt-4-turbo for our app but you can use any OpenAI model.
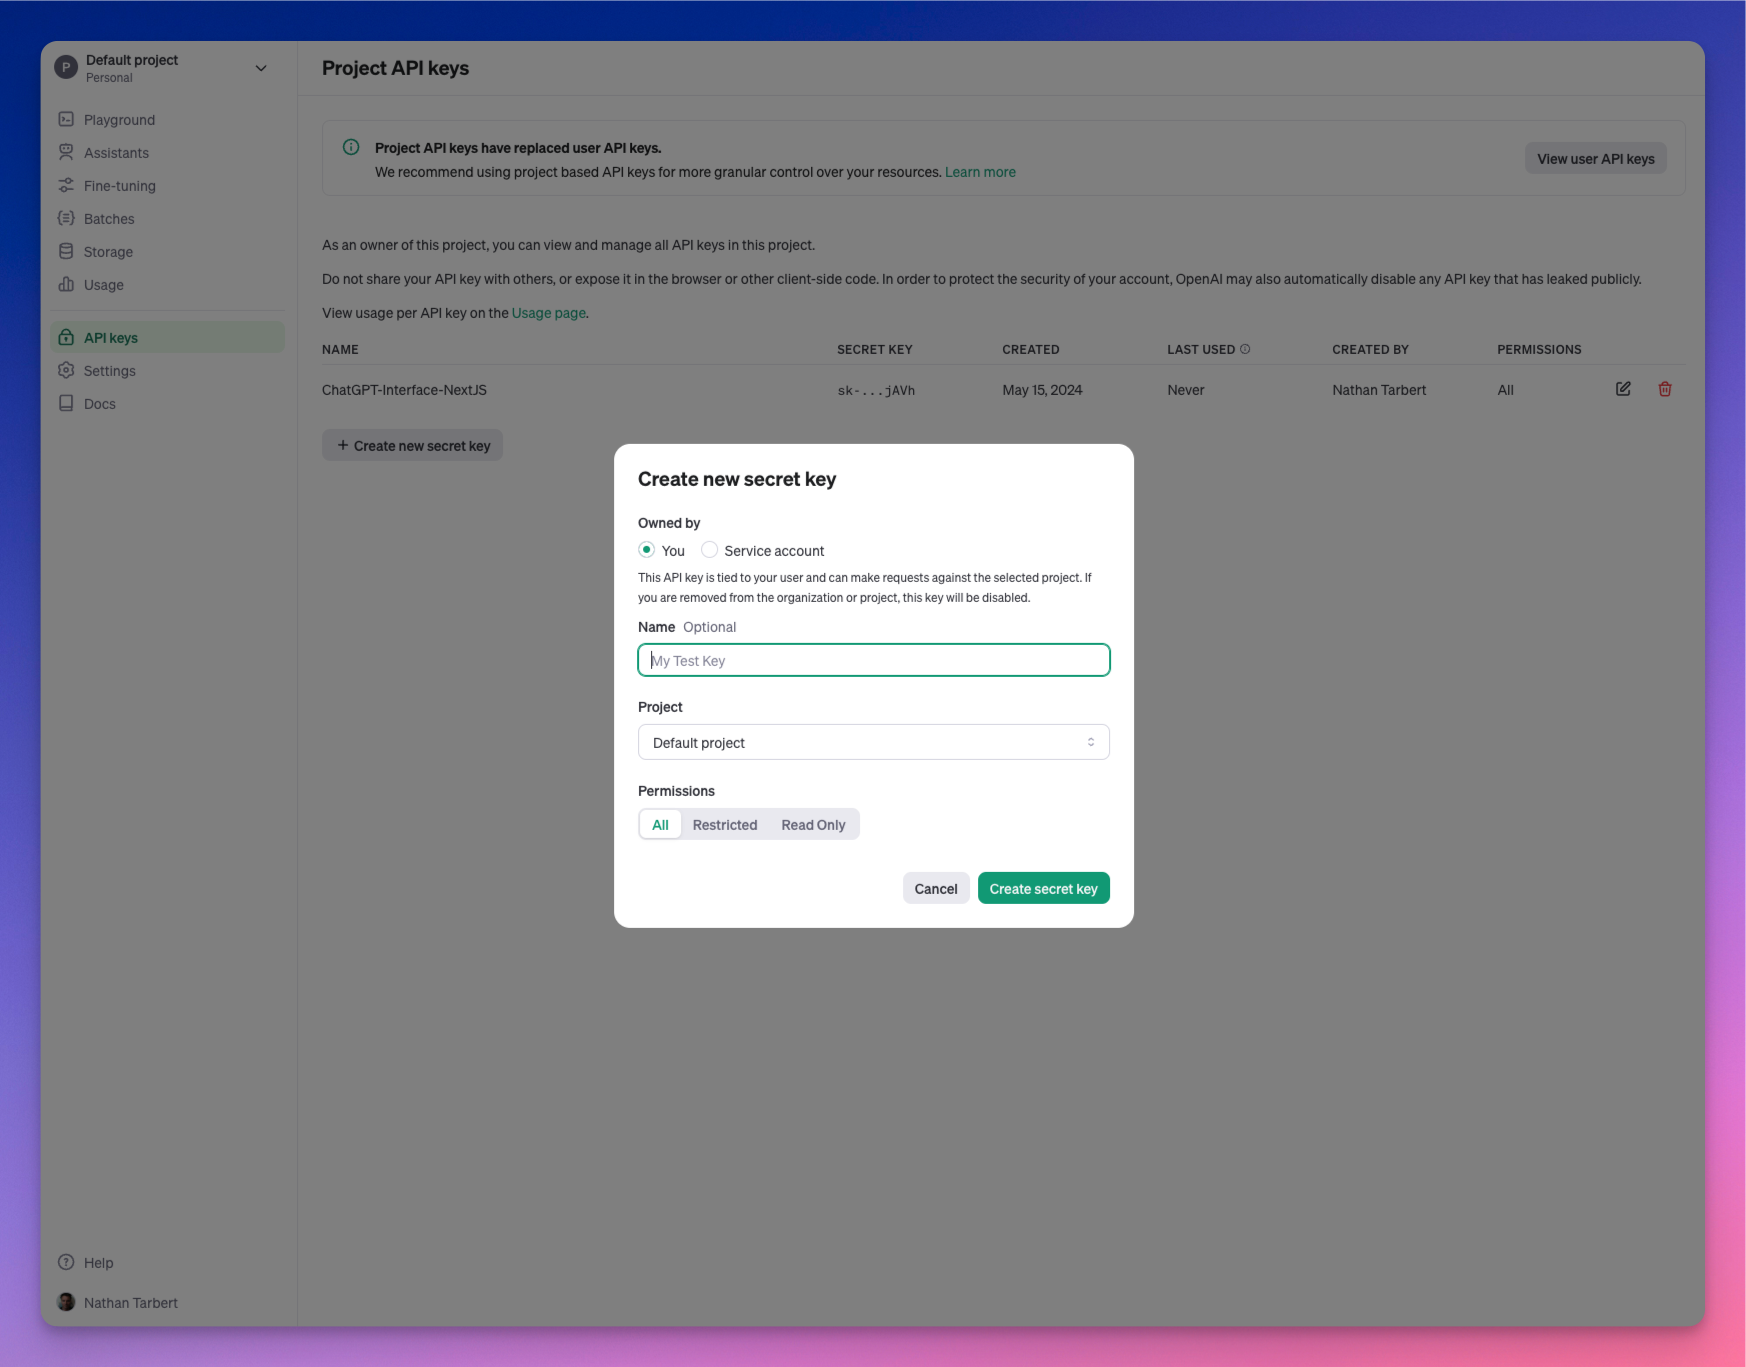
- Create an OpenAI account if you don’t have one yet. To create a new API key, Go to platform.openai.com/api-keys and select Create new secret key.
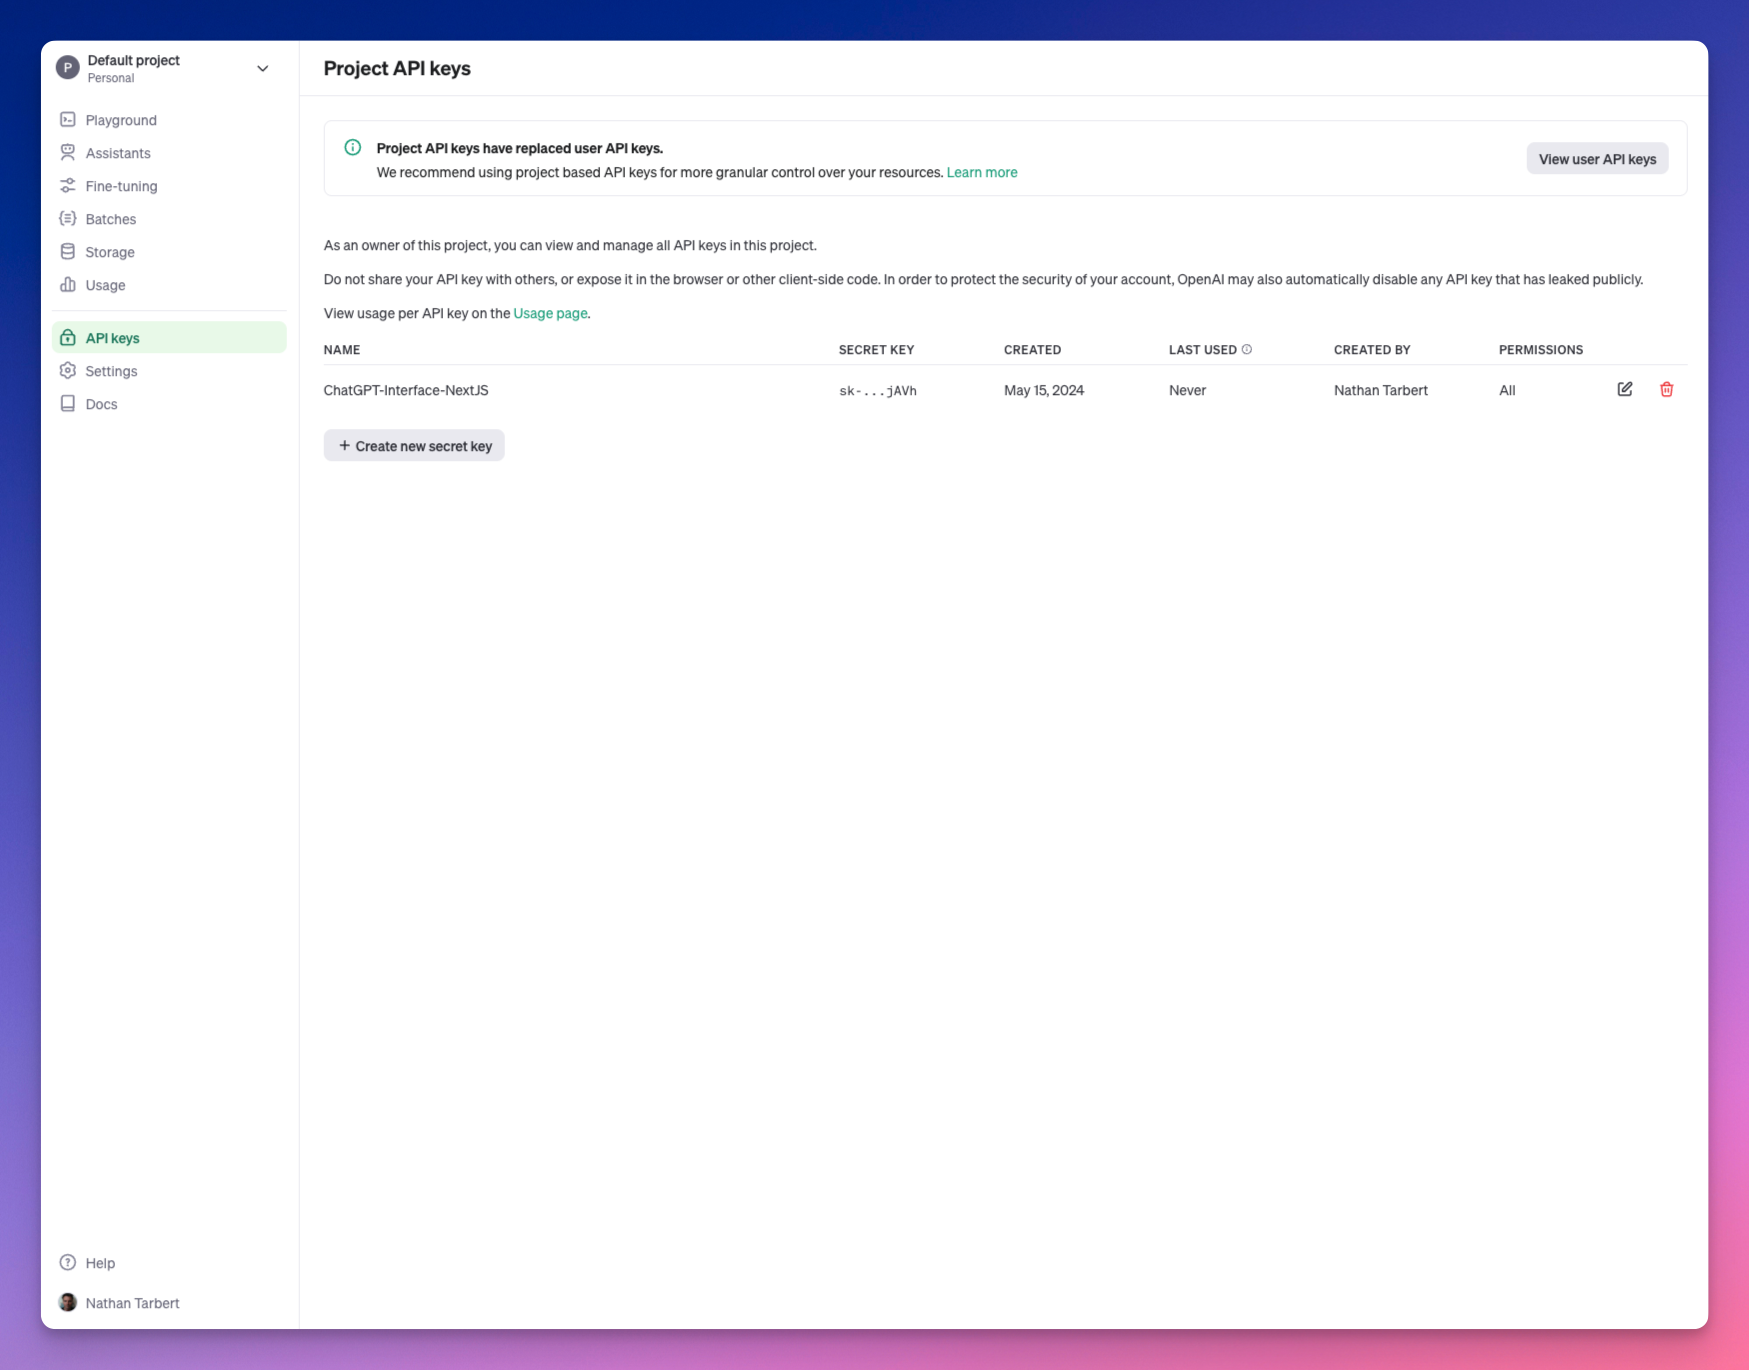
- Set the Name, Project, and Permissions, then click Create secret key.
Initializing OpenAI
Create a Class to initialize your OpenAI API. We want this to be reusable.
We will add a personality to our Assistant class so that we can dictate the personality of our AI assistant when passing a prompt to it.
let apiKeySecret = new cloud.Secret(name: "OAIAPIKey") as "OpenAI Secret";

class Assistant {
    personality: str;
    openai: openai.OpenAI;

    new(personality: str) {
        this.openai = new openai.OpenAI(apiKeySecret: apiKeySecret);
        this.personality = personality;
    }

    pub inflight ask(question: str): str {
        let prompt = `you are an assistant with the following personality: ${this.personality}. ${question}`;
        let response = this.openai.createCompletion(prompt, model: "gpt-4-turbo");
        return response.trim();
    }
}
Wing unifies infrastructure definition and application logic using the preflight and inflight concepts respectively.
Preflight code (typically infrastructure definitions) runs once at compile time, while inflight code will run at runtime to implement your app’s behavior.
Cloud storage buckets, queues, and API endpoints are some examples of preflight. You don’t need to add the preflight keyword when defining a preflight, Wing knows this by default. But for an inflight block, you need to add the word “inflight” to it.
We have an inflight block in the code above. Inflight blocks are where you write asynchronous runtime code that can directly interact with resources through their inflight APIs.
Testing and Storing The Cloud Secret
Let's walk through how we will secure our API keys because we definitely want to take security into account.
Let's create a .env file in our backend’s root and pass in our API Key:
OAIAPIKey = Your_OpenAI_API_key
We can test our OpenAI API keys locally referencing our .env file, and then since we are planning to deploy to AWS, we will walk through setting up the AWS Secrets Manager.
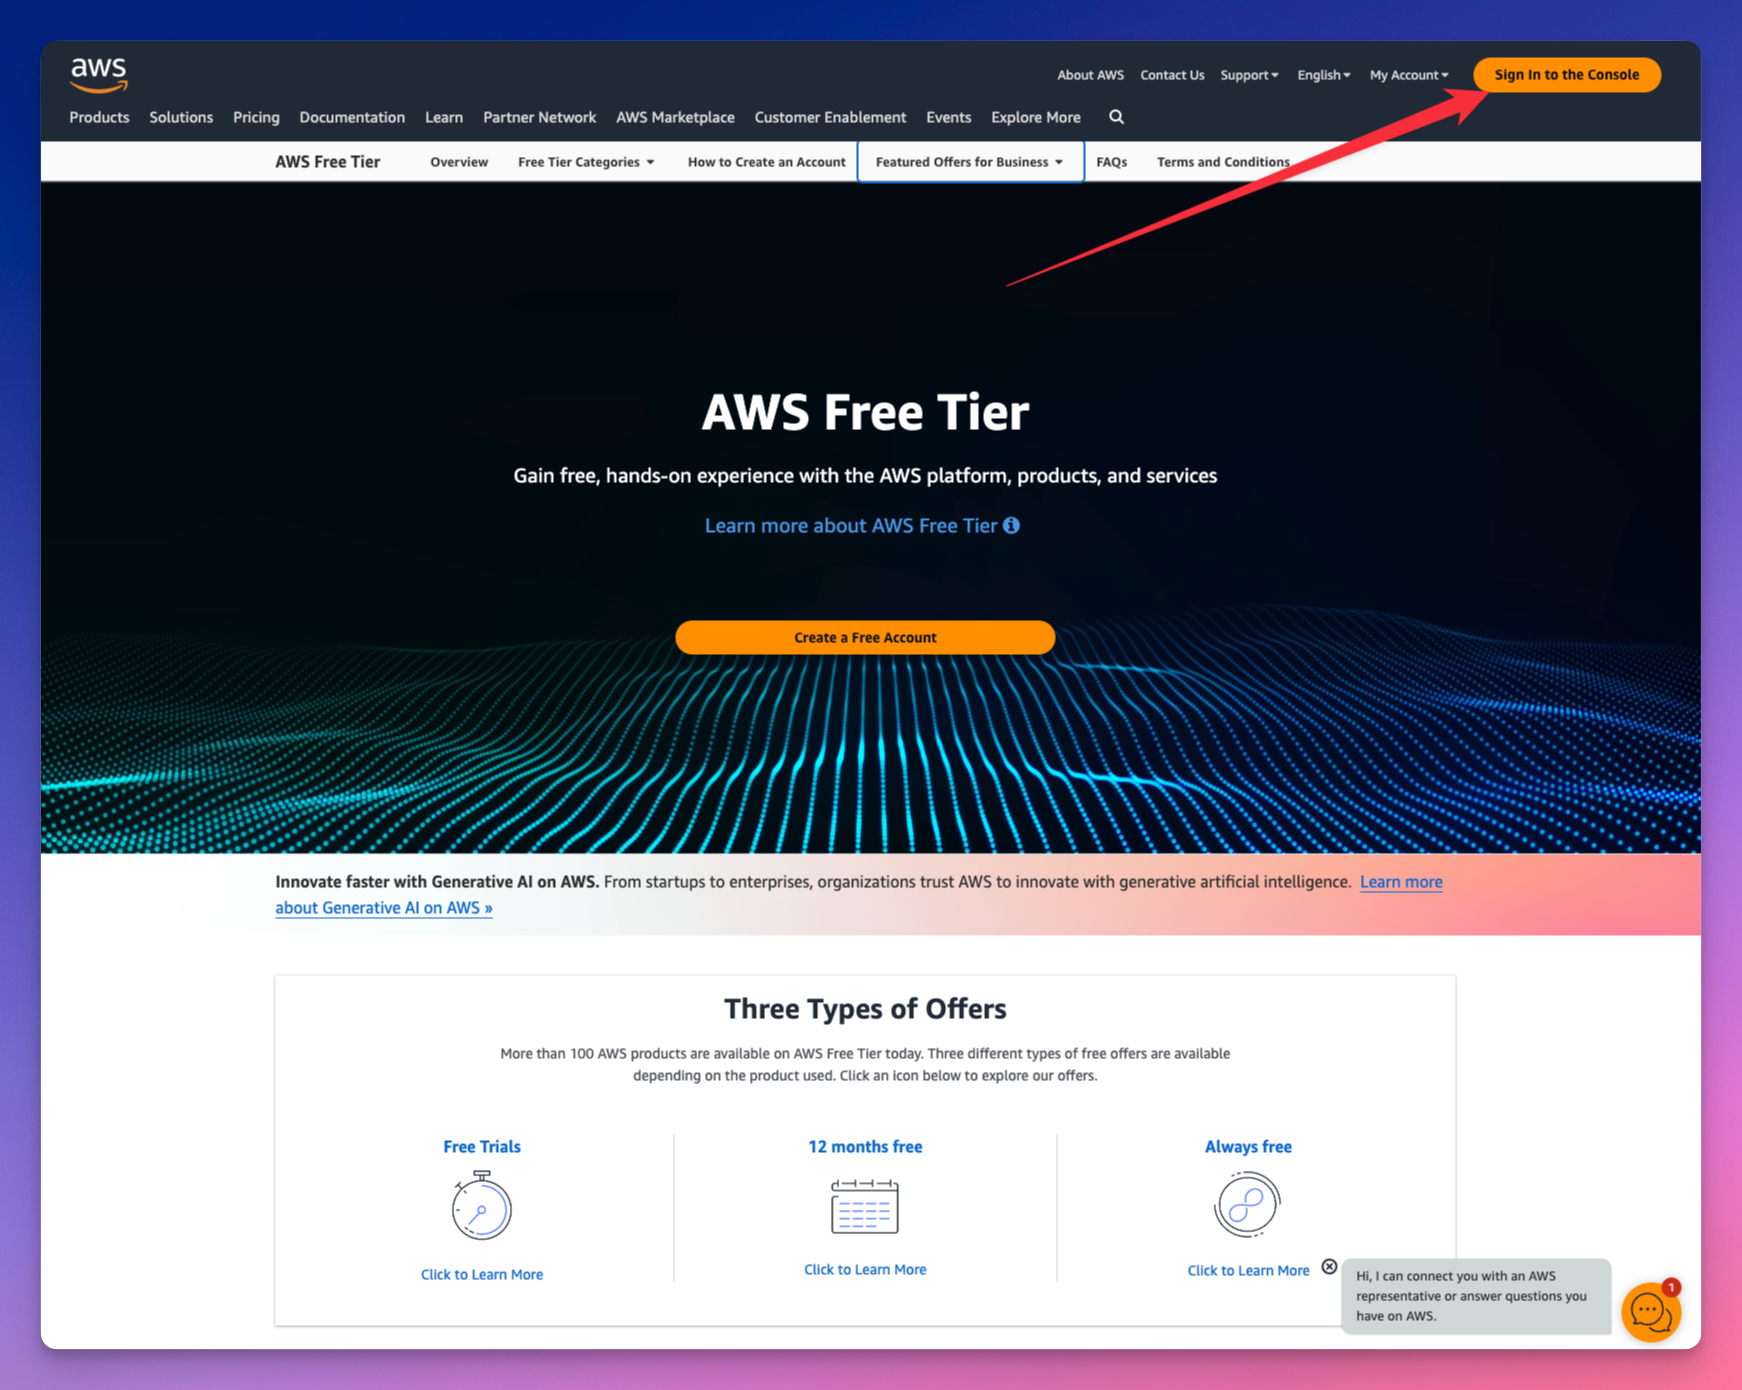
First, let's head over to AWS and sign into the Console. If you don't have an account, you can create one for free.
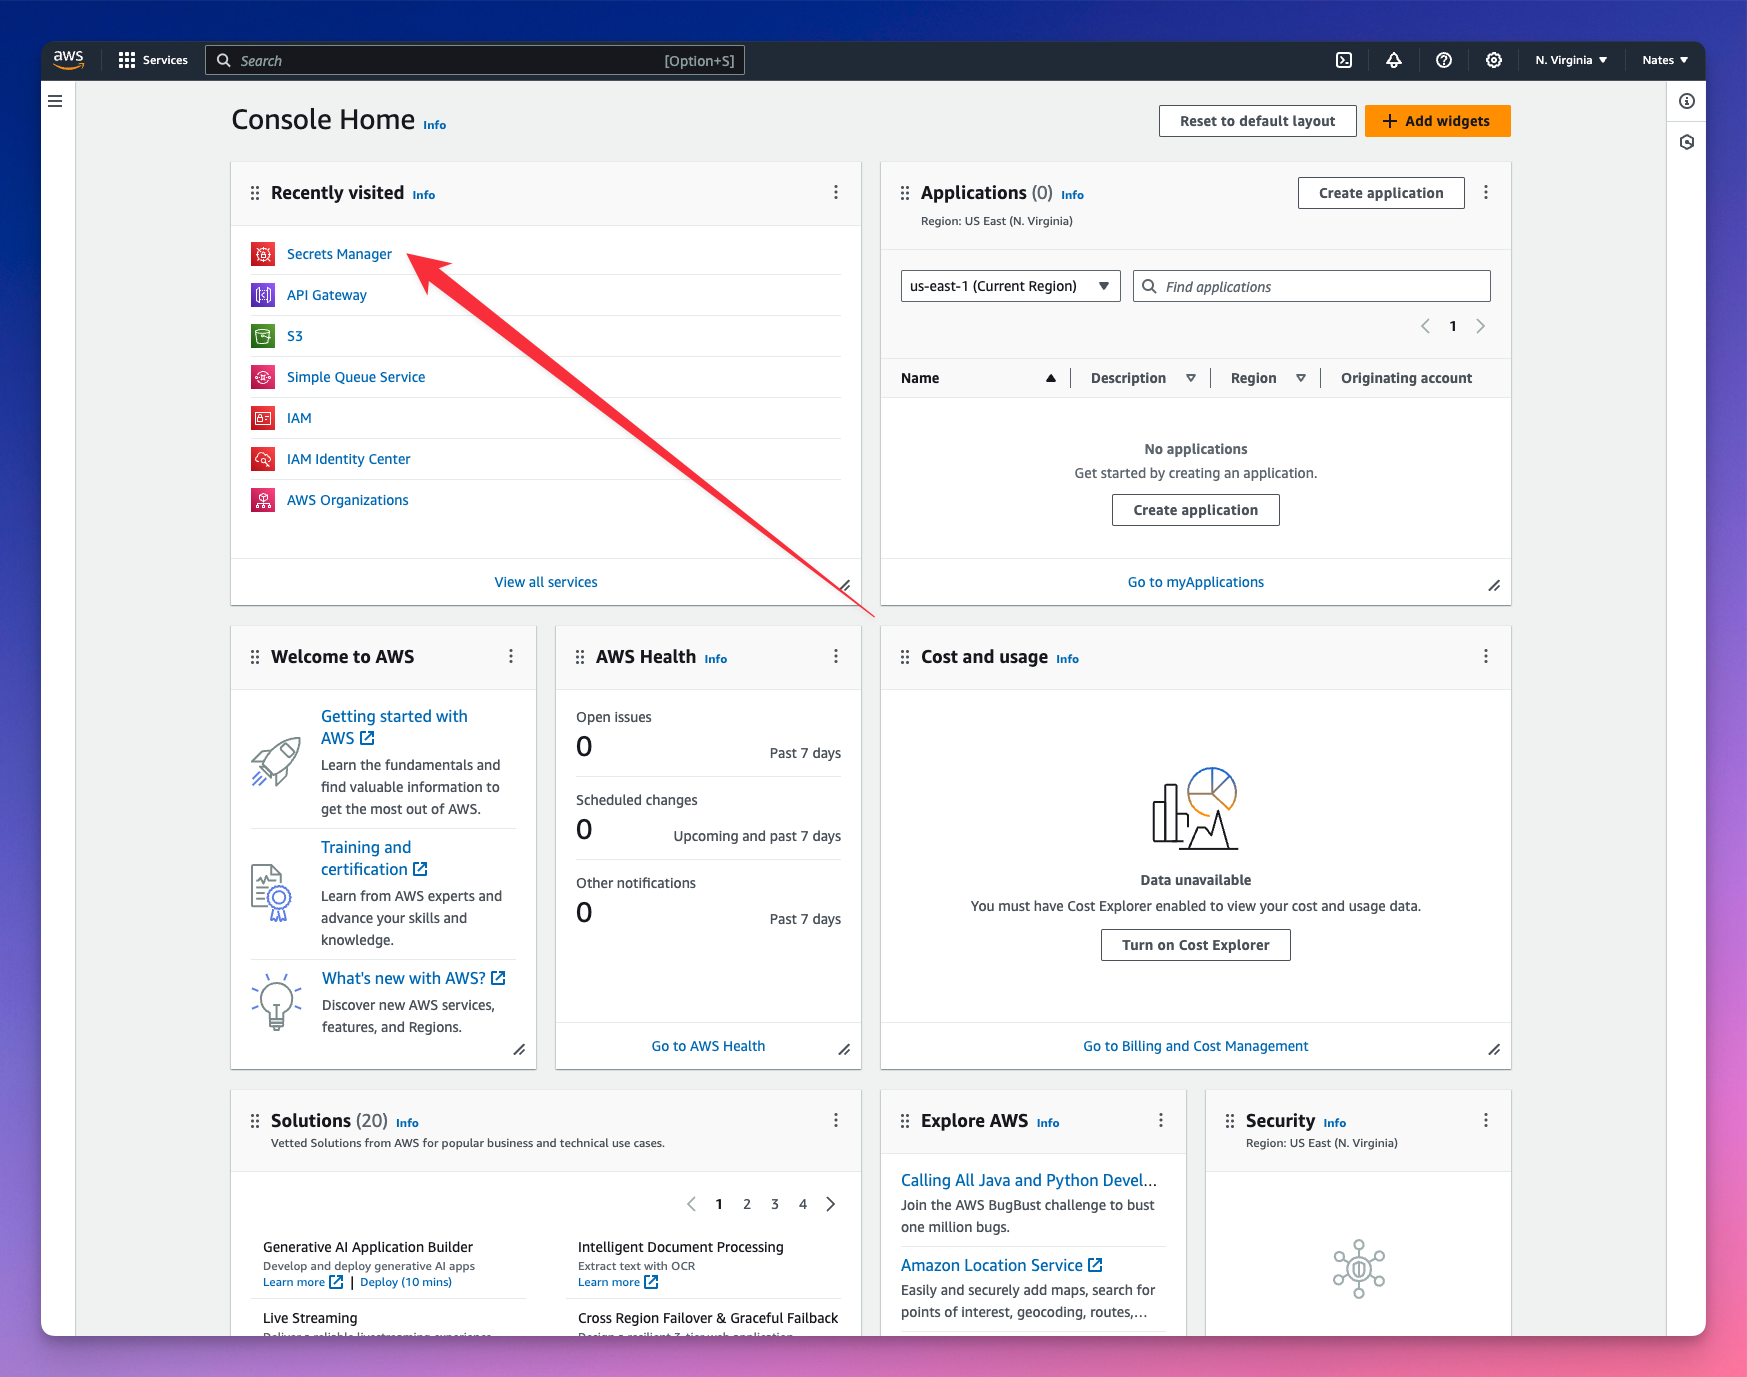
Navigate to the Secrets Manager and let's store our API key values.
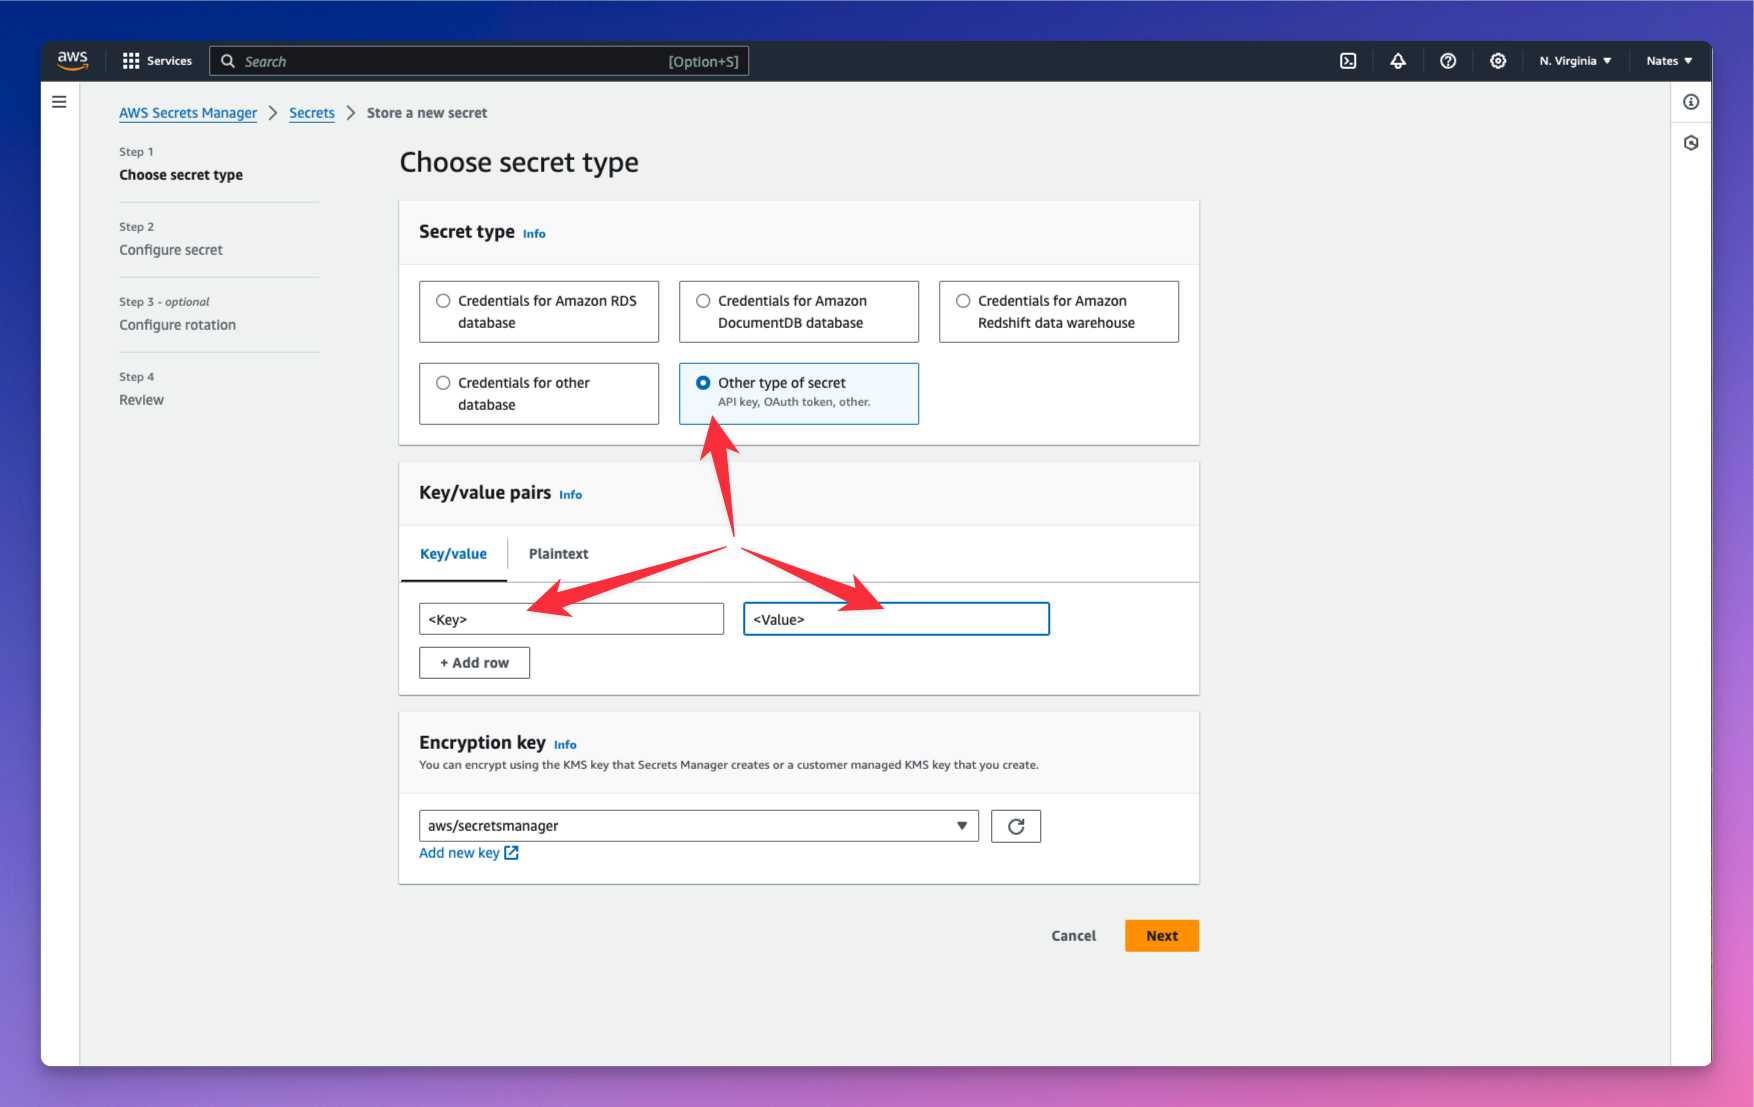
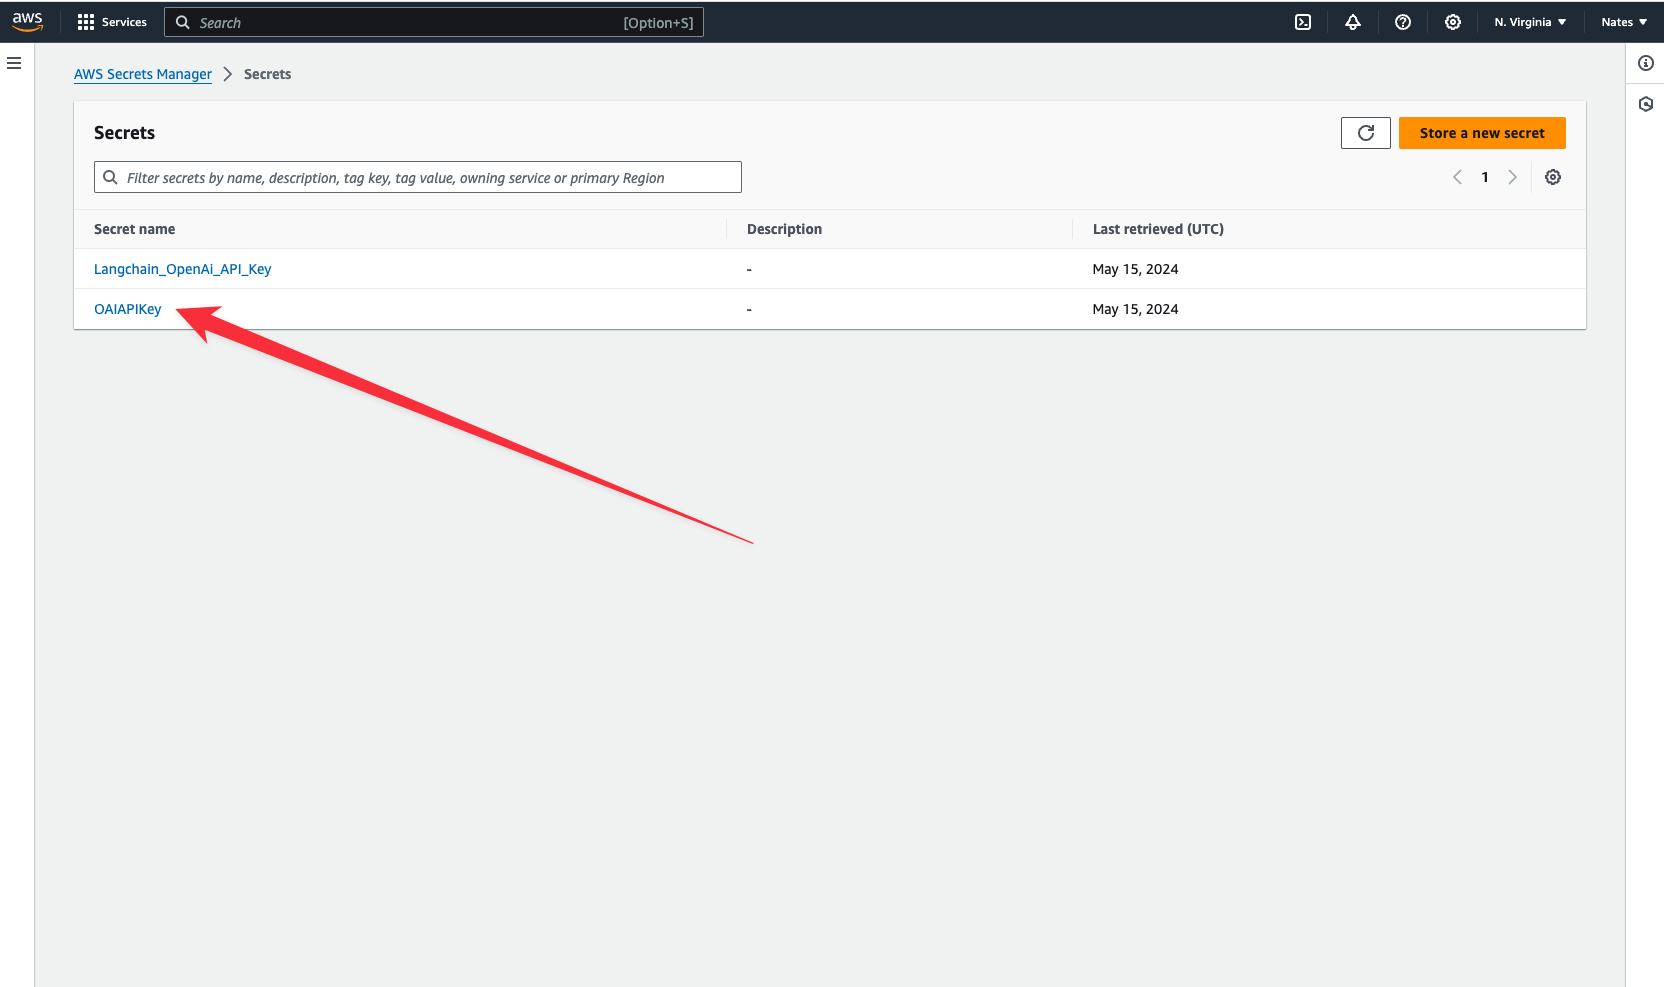
We have stored our API key in a cloud secret named OAIAPIKey. Copy your key and we will jump over to the terminal and connect to our secret that is now stored in the AWS Platform.
wing secrets
Now paste in your API Key as the value in the terminal. Your keys are now properly stored and we can start interacting with our app.
Storing The AI’s Responses in the Cloud.
Storing your AI's responses in the cloud gives you control over your data. It resides on your own infrastructure, unlike proprietary platforms like ChatGPT, where your data lives on third-party servers that you don’t have control over. You can also retrieve these responses whenever you need them.
Let’s create another class that uses the Assistant class to pass in our AI’s personality and prompt. We would also store each model’s responses as txt files in a cloud bucket.
let counter = new cloud.Counter();

class RespondToQuestions {
    id: cloud.Counter;
    gpt: Assistant;
    store: cloud.Bucket;

    new(store: cloud.Bucket) {
        this.gpt = new Assistant("Respondent");
        this.id = new cloud.Counter() as "NextID";
        this.store = store;
    }

    pub inflight sendPrompt(question: str): str {
        let reply = this.gpt.ask("{question}");
        let n = this.id.inc();
        this.store.put("message-{n}.original.txt", reply);
        return reply;
    }
}
We gave our Assistant the personality “Respondent.” We want it to respond to questions. You could also let the user on the frontend dictate this personality when sending in their prompts.
Every time it generates a response, the counter increments, and the value of the counter is passed into the n variable used to store the model’s responses in the cloud. However, what we really want is to create a database to store both the user prompts coming from the frontend and our model’s responses.
Let's define our database.
Defining Our Database
Wing has ex.Table built-in - a NoSQL database to store and query data.
let db = new ex.Table({
    name: "assistant",
    primaryKey: "id",
    columns: {
        question: ex.ColumnType.STRING,
        answer: ex.ColumnType.STRING
    }
});
We added two columns in our database definition - the first to store user prompts and the second to store the model’s responses.
Creating API Routes and Logic
We want to be able to send and receive data in our backend. Let’s create POST and GET routes.
let api = new cloud.Api({ cors: true });

api.post("/assistant", inflight((request) => {
    // POST request logic goes here
}));

api.get("/assistant", inflight(() => {
    // GET request logic goes here
}));
let myAssistant = new RespondToQuestions(store) as "Helpful Assistant";

api.post("/assistant", inflight((request) => {
    let prompt = request.body;
    let response = myAssistant.sendPrompt(JSON.stringify(prompt));
    let id = counter.inc();

    // Insert prompt and response in the database
    db.insert(id, { question: prompt, answer: response });

    return cloud.ApiResponse({
        status: 200
    });
}));
In the POST route, we want to pass the user prompt received from the frontend into the model and get a response. Both prompt and response will be stored in the database. cloud.ApiResponse allows you to send a response for a user’s request.
Add the logic to retrieve the database items when the frontend makes a GET request.
Add the logic to retrieve the database items when the frontend makes a GET request.
api.get("/assistant", inflight(() => {
    let questionsAndAnswers = db.list();

    return cloud.ApiResponse({
        body: JSON.stringify(questionsAndAnswers),
        status: 200
    });
}));
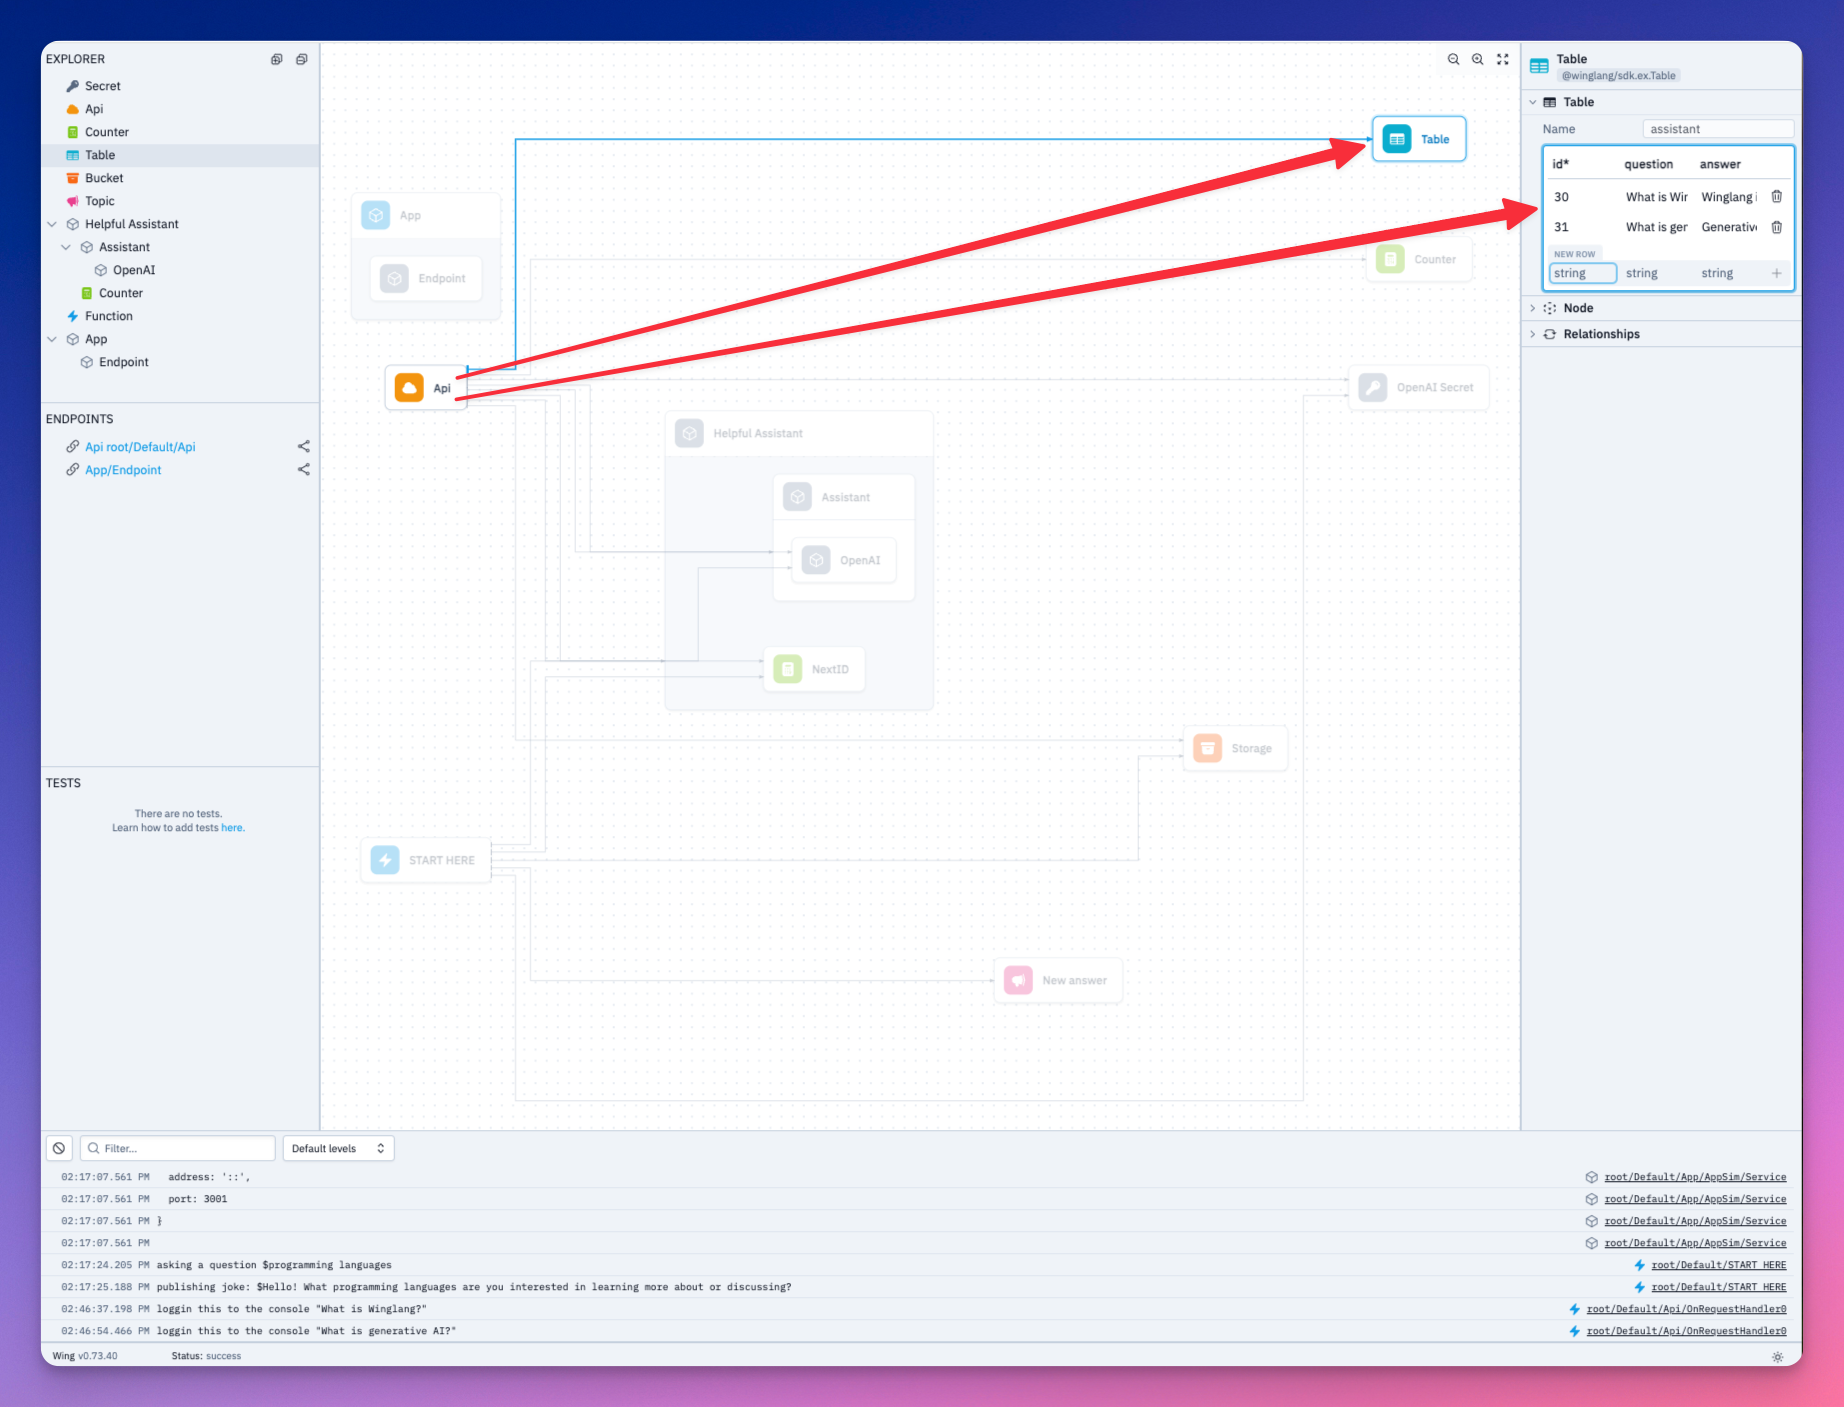
Our backend is ready. Let's test it out in the local cloud simulator.
Run wing it.
Lets go over to localhost:3000 and ask our Assistant a question.
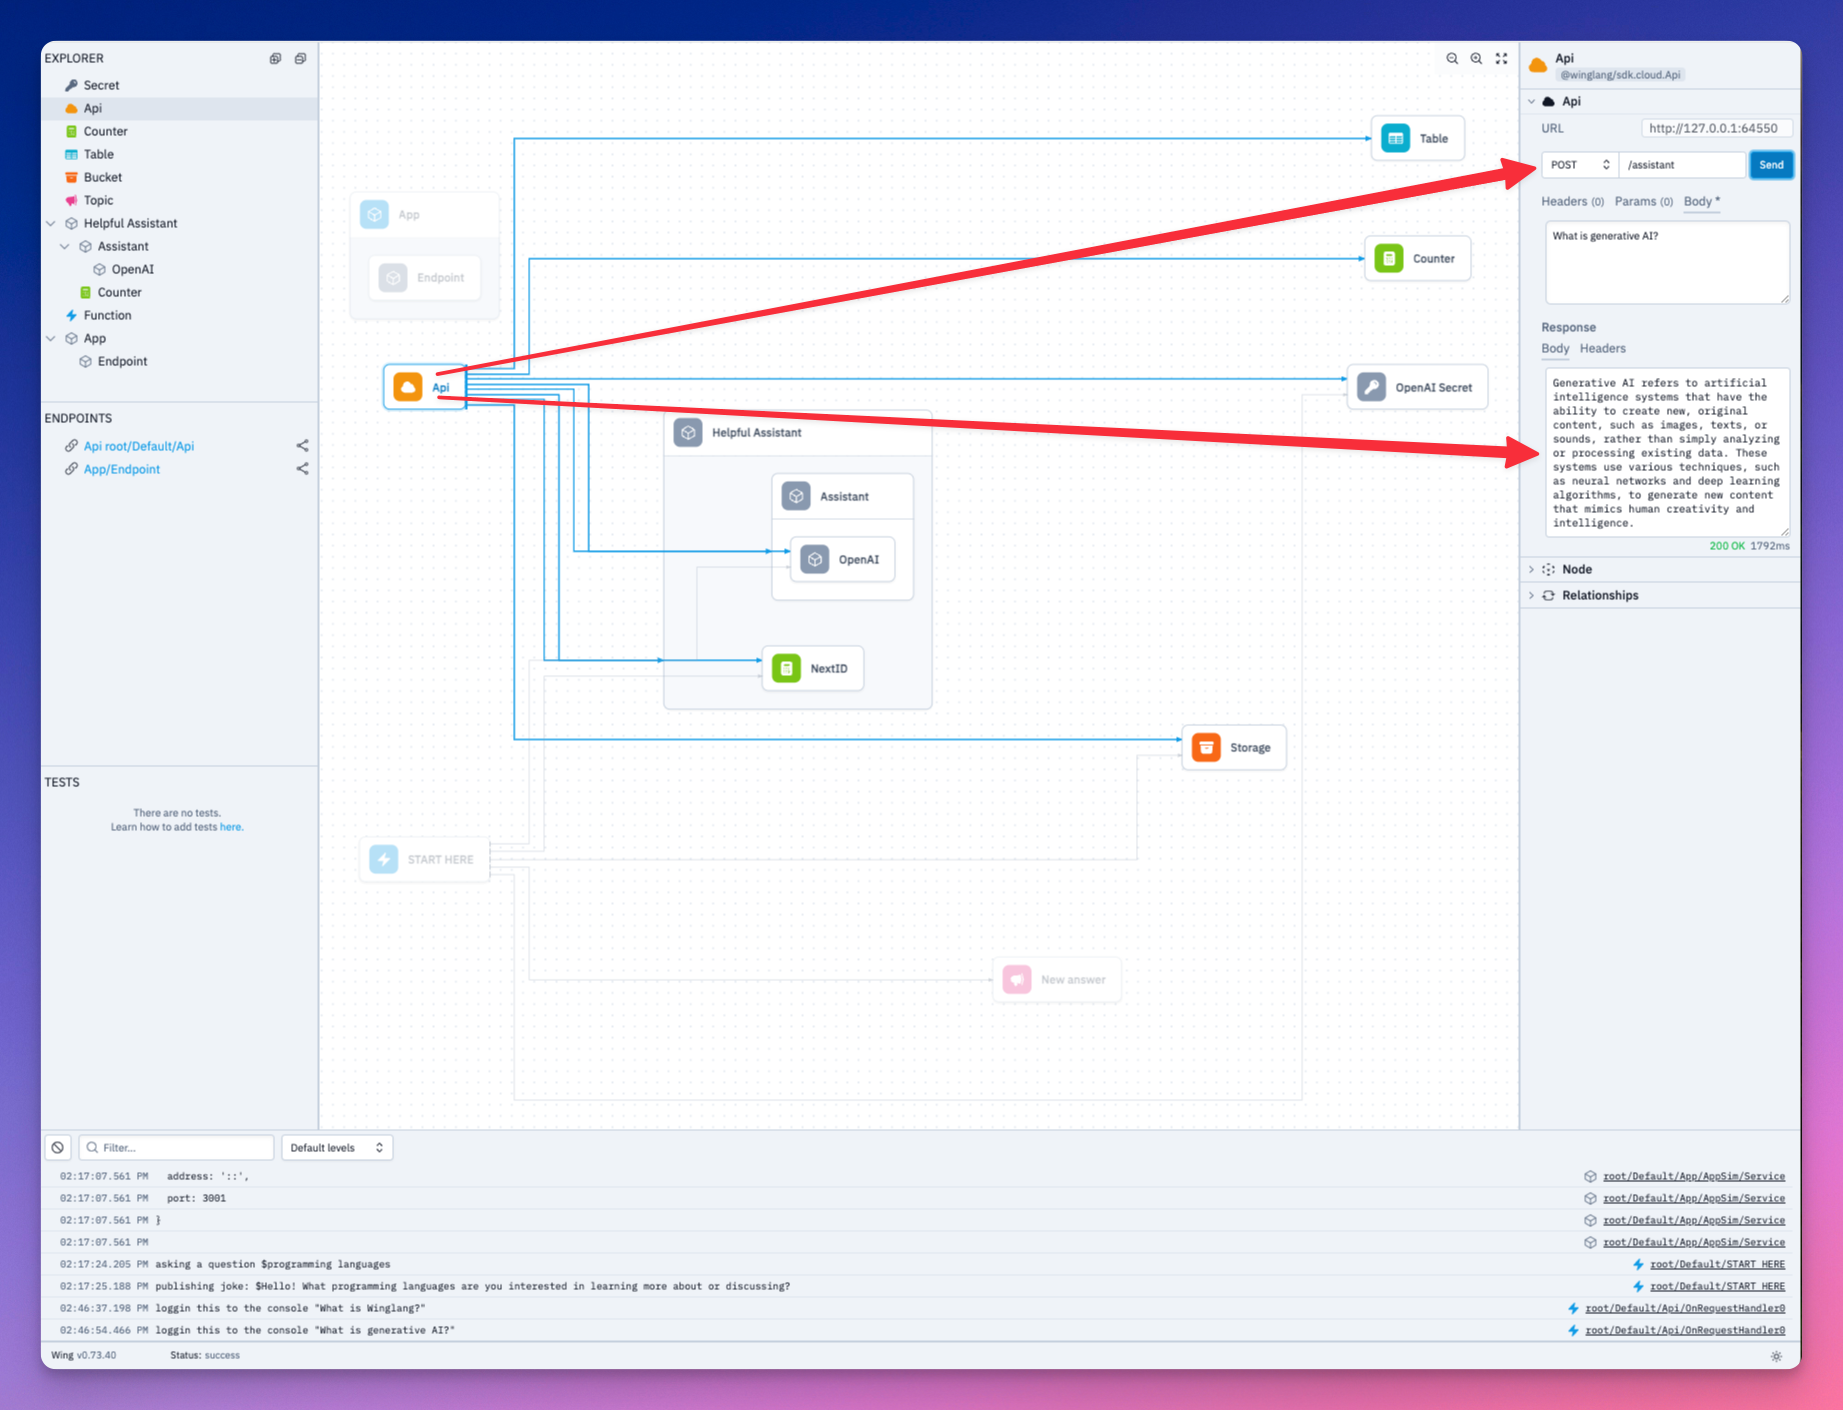
Both our question and the Assistant’s response has been saved to the database. Take a look.
Exposing Your API URL to The Frontend
We need to expose the API URL of our backend to our Next frontend. This is where the react library installed earlier comes in handy.
let website = new react.App({
    projectPath: "../frontend",
    localPort: 4000
});

website.addEnvironment("API_URL", api.url);
Add the following to the layout.js of your Next app.
import { Inter } from "next/font/google";
import "./globals.css";

const inter = Inter({ subsets: ["latin"] });

export const metadata = {
    title: "Create Next App",
    description: "Generated by create next app",
};

export default function RootLayout({ children }) {
    return (
        <html lang="en">
	        <head>
            <script src="./wing.js" defer></script>
           </head>
            <body className={inter.className}>{children}</body>
        </html>
    );
}
We now have access to API_URL in our Next application.
Implementing the Frontend Logic
Let’s implement the frontend logic to call our backend.
import { useEffect, useState, useCallback } from 'react';
import axios from 'axios';

function App() {

    const [isThinking, setIsThinking] = useState(false);
    const [input, setInput] = useState("");
    const [allInteractions, setAllInteractions] = useState([]);

    const retrieveAllInteractions = useCallback(async (api_url) => {
		    await axios ({
		      method: "GET",
		      url: `${api_url}/assistant`,
		    }).then(res => {
		      setAllInteractions(res.data)
		    })
  }, [])

    const handleSubmit = useCallback(async (e)=> {
	    e.preventDefault()

	    setIsThinking(!isThinking)


	    if(input.trim() === ""){
	      alert("Chat cannot be empty")
	      setIsThinking(true)

	    }

	      await axios({
	        method: "POST",
	        url: `${window.wingEnv.API_URL}/assistant`,
	        headers: {
	          "Content-Type": "application/json"
	        },
	        data: input
	      })
	      setInput("");
	      setIsThinking(false);
	      await retrieveAllInteractions(window.wingEnv.API_URL);

  })

    useEffect(() => {
        if (typeof window !== "undefined") {
            retrieveAllInteractions(window.wingEnv.API_URL);
        }
    }, []);

    // Here you would return your component's JSX
    return (
        // JSX content goes here
    );
}

export default App;
The retrieveAllInteractions function fetches all the questions and answers in the backend’s database. The handSubmit function sends the user’s prompt to the backend.
Let’s add the JSX implementation.
import { useEffect, useState } from 'react';
import axios from 'axios';
import './App.css';

function App() {
    // ...

    return (
        <div className="container">
            <div className="header">
                <h1>My Assistant</h1>
                <p>Ask anything...</p>
            </div>

            <div className="chat-area">
                <div className="chat-area-content">
                    {allInteractions.map((chat) => (
                        <div key={chat.id} className="user-bot-chat">
                            <p className='user-question'>{chat.question}</p>
                            <p className='response'>{chat.answer}</p>
                        </div>
                    ))}
                    <p className={isThinking ? "thinking" : "notThinking"}>Generating response...</p>
                </div>

                <div className="type-area">
                    <input
                        type="text"
                        placeholder="Ask me any question"
                        value={input}
                        onChange={(e) => setInput(e.target.value)}
                    />
                    <button onClick={handleSubmit}>Send</button>
                </div>
            </div>
        </div>
    );
}

export default App;
Running Your Project Locally
Navigate to your backend directory and run your Wing app locally using the following command
cd ~assistant/backend
wing it
Also run your Next.js frontend:
cd ~assistant/frontend
npm run dev
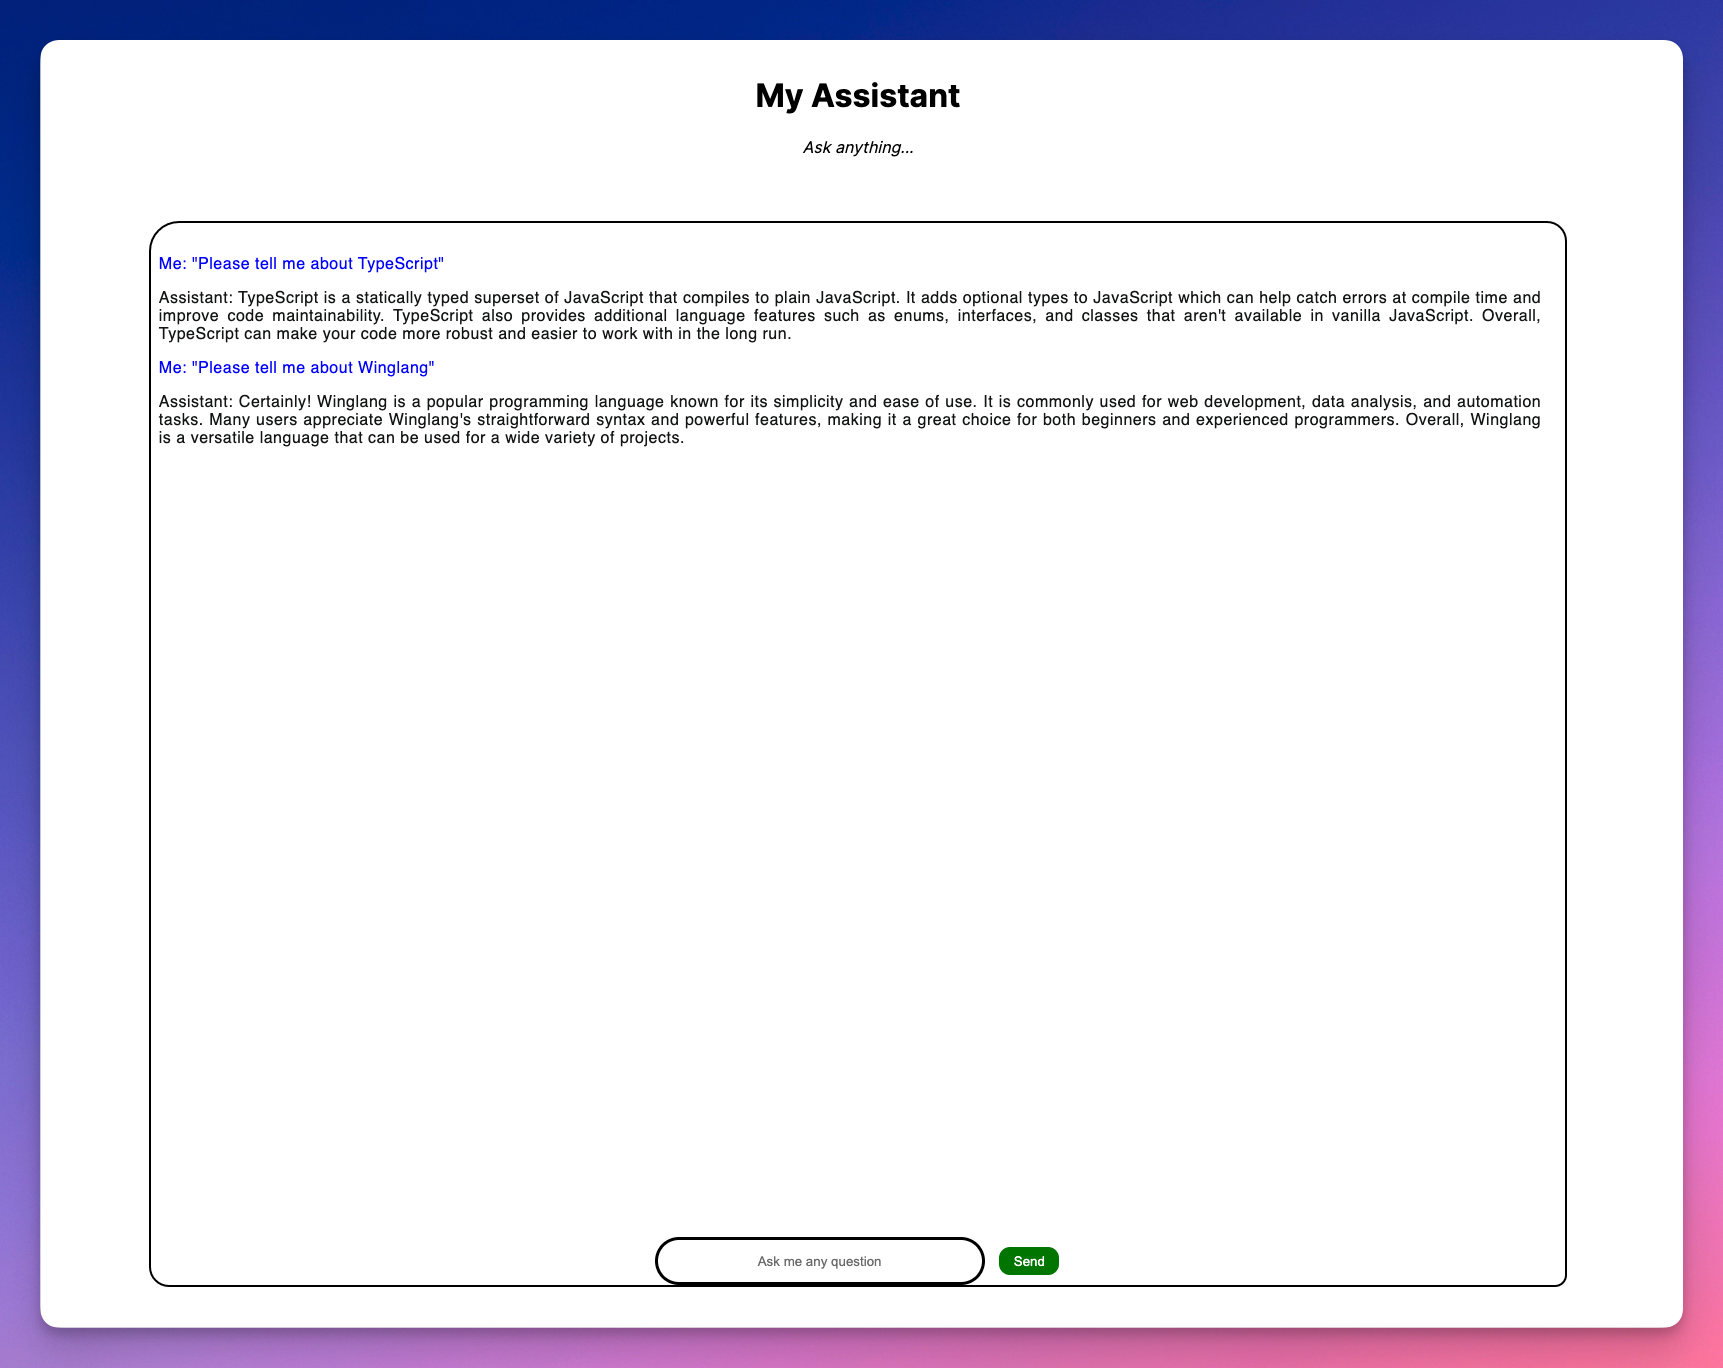
Let’s take a look at our application.
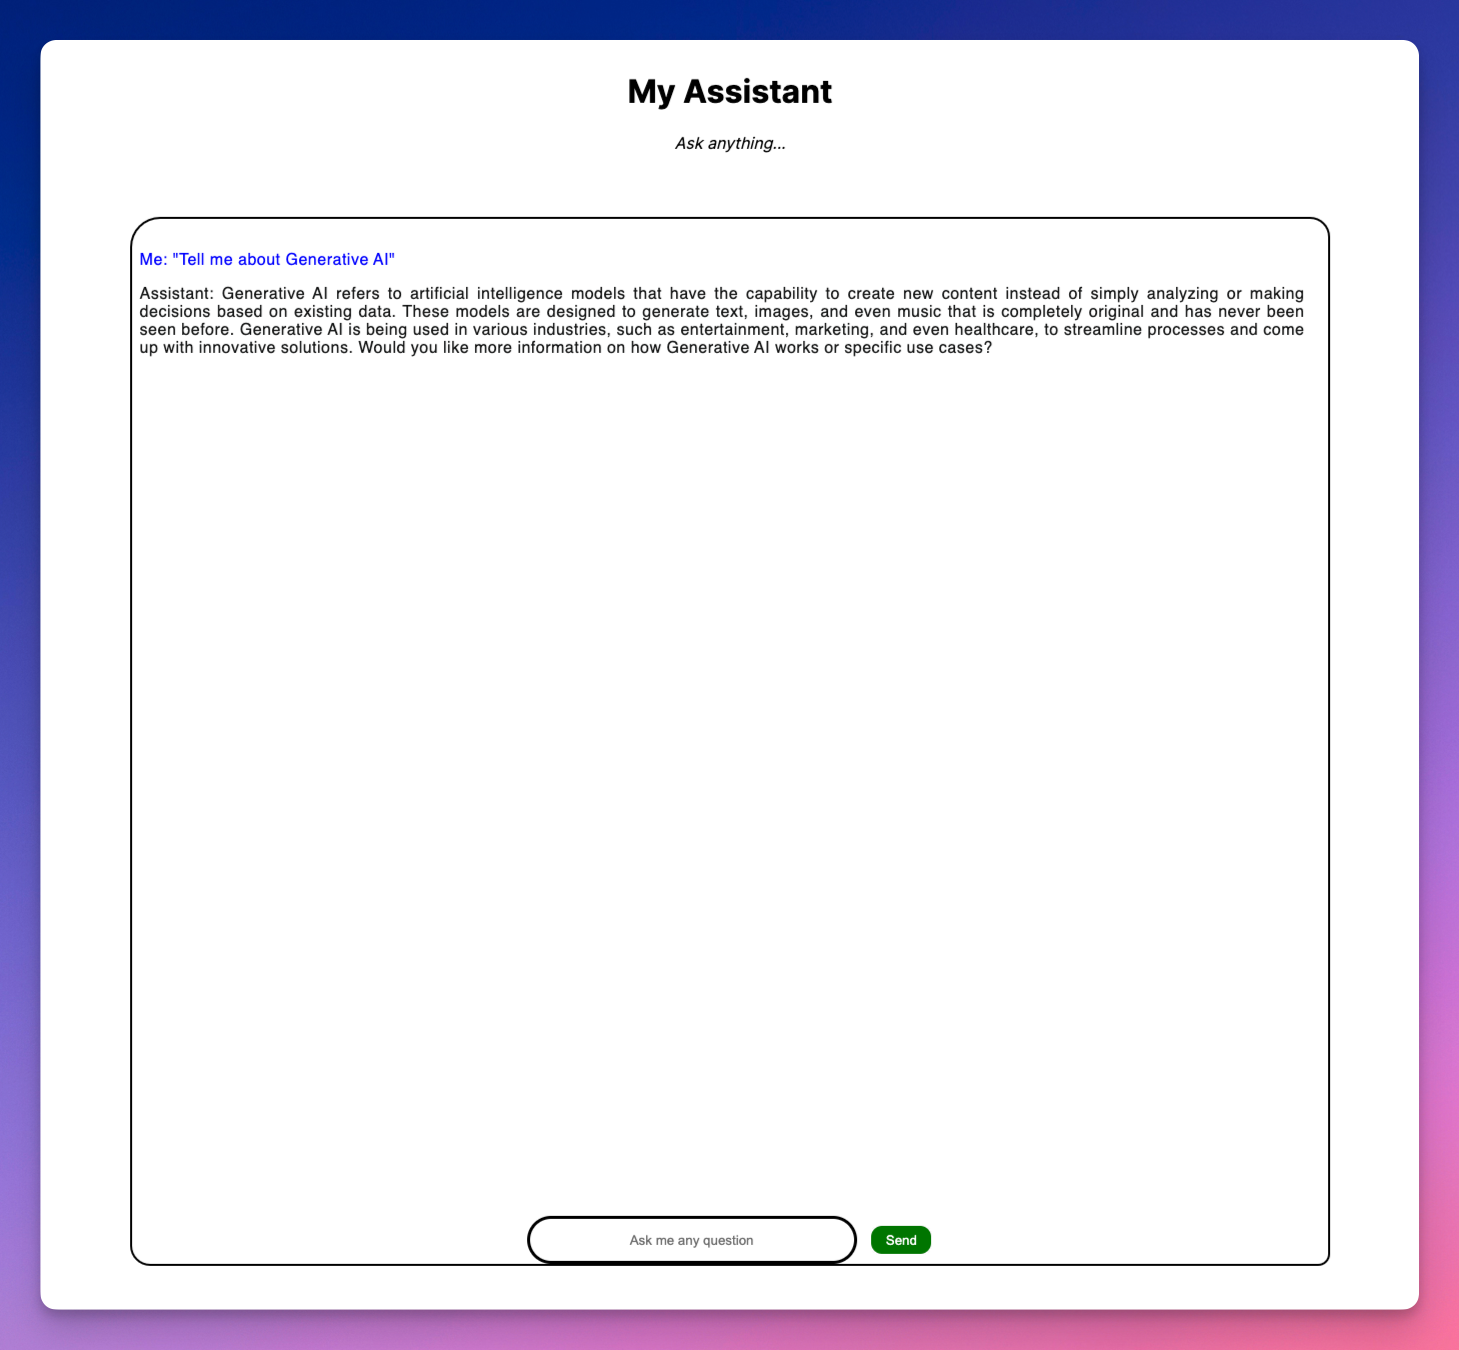
Let’s ask our AI Assistant a couple developer questions from our Next App.
Deploying Your Application to AWS
We’ve seen how our app can work locally. Wing also allows you to deploy to any cloud provider including AWS. To deploy to AWS, you need Terraform and AWS CLI configured with your credentials.
- Compile to Terraform/AWS using
tf-aws. The command instructs the compiler to use Terraform as the provisioning engine to bind all our resources to the default set of AWS resources.
cd ~/assistant/backend
wing compile --platform tf-aws main.w
- Run Terraform Init and Apply
cd ./target/main.tfaws
terraform init
terraform apply
Note: terraform apply takes some time to complete.
You can find the complete code for this tutorial here.
Wrapping It Up
As I mentioned earlier, we should all be concerned with our apps security, building your own ChatGPT client and deploying it to your cloud infrastructure gives your app some very good safeguards.
We have demonstrated in this tutorial how Wing provides a straightforward approach to building scalable cloud applications without worrying about the underlying infrastructure.
If you are interested in building more cool stuff, Wing has an active community of developers, partnering in building a vision for the cloud. We'd love to see you there.
Just head over to our Discord and say hi!