Inflight Magazine no. 11
The 11th issue of the Wing Inflight Magazine.
The 11th issue of the Wing Inflight Magazine.
Hello Wingnuts!
We recently updated the project's roadmap to share more details about our vision for the project. As the Wing language and toolchain has an ambitious goal, we're hoping this gives you a better idea of what to expect in the coming months.
We want to stabilize as many of the items below as possible and we're eagerly interested in you feedback and collaboration, either through GitHub or our Discord server.
We want to provide a robust CLI for people to compile, test, and perform other essential functions with their Wing code.
We want the CLI to be easy to install, update, and set up on a variety of systems.
Dependency management should be simple and insulated from problems specific to individual Node package managers (e.g npm, pnpm, yarn).
The Wing toolchain makes it easy to create and publish Wing libraries (winglibs) with automatically generated API docs, and it doesn't require existing knowledge of node package managers.
Wing Platforms allow you to specify a layer of infrastructure customizations that apply to all application code written in Wing. It should be simple to create new Wing platforms or extend existing platforms.
With Wing Platforms it's possible to specify both multi-cloud abstractions in Wing as well as the actual platform (for example, the implementation of cloud.Bucket) in Wing.
Wing lets you easily write tests that run both locally and on the cloud.
Wing test runner can be customized per platform.
Tests in Wing can be run in a variety of means -- via the CLI, via the Wing Console, and in CI/CD.
The design of the test system should make it easy for developers to write reproducible (or deterministic) tests, and also provide facilities for debugging.
Wing's syntax and type system is robust, well documented, and easy for developers to learn.
Developers coming from other mainstream languages with C-like syntax (Java, C++, TypeScript) should feel right at home.
Most Wing code is statically typed in order to support automatic permissions.
Wing should be able to interoperate with a vast majority of TypeScript libraries.
It should be straightforward to import libraries that are available on npm and automatically have corresponding Wing types generated for them based on the TypeScript type information.
The language also has mechanisms for more advanced users to use custom JavaScript code in Wing.
We want Wing to have friendly, easy to understand error messages that point users towards how to fix their problems.
Wing has a built-in language server that gives users a first-class editing and refactoring experience in their IDEs.
Wing provides a batteries-included experience for performing common programming tasks like working with data structures, file systems, calculations, random number generation, HTTP requests, and other common needs.
Wing also has a ecosystem of Wing libraries ("winglibs") that make it easy to write cloud applications by providing easy-to-use abstractions over popular cloud resources.
This includes a []cloud module](/docs/api/category/cloud) that is an opinionated set of resources for writing applications on the most popular public clouds.
The cloud primitives are designed to be cloud-agnostic (we aren't biased towards a specific cloud provider).
These cloud primitives all can be run to a high degree of fidelity and performance with the local simulator.
Not all winglibs may be fully stable when the language reaches 1.0.
We want to provide a first class local development experience for Wing that makes it easy and fast to test your applications locally.
It gives you observability into your running application and interact live with different components.
It gives you a clearer picture of your infrastructure graph and how preflight and inflight code are related.
It complements the experience of writing code in a dedicated editor.
We want it to be easy for people to get exposed to Wing code and have ways to try applications without having to install Wing locally.
The Wing docs should provide content appealing to different kinds of developers trying to acquire different kinds of information at different stages -- from tutorials to references to how-to-guides (documentation quadrants)
Wing docs need to have content for both the personas of developers writing their own applications and platform engineers aiming to provide simpler abstractions and tools for their teams.
We want to provide hundreds of examples and code snippets to make it easy to learn the syntax of the language and easy to see how to solve common use cases.
If you have any questions, would like to contribute feel free to reach out to us and join us on our mission to make cloud development easier for everyone.
- The Wing Team
The 10th issue of the Wing Inflight Magazine.
In this tutorial, we will build an AI-powered Q&A bot for your website documentation.
🌐 Create a user-friendly Next.js app to accept questions and URLs
🔧 Set up a Wing backend to handle all the requests
💡 Incorporate Langchain for AI-driven answers by scraping and analyzing documentation using RAG
🔄 Complete the connection between the frontend input and AI-processed responses.

Wing is an open-source framework for the cloud.
It allows you to create your application's infrastructure and code combined as a single unit and deploy them safely to your preferred cloud providers.
Wing gives you complete control over how your application's infrastructure is configured. In addition to its easy-to-learn programming language, Wing also supports Typescript.
In this tutorial, we'll use TypeScript. So, don't worry—your JavaScript and React knowledge is more than enough to understand this tutorial.

Here, you’ll create a simple form that accepts the documentation URL and the user’s question and then returns a response based on the data available on the website.
First, create a folder containing two sub-folders - frontend and backend. The frontend folder contains the Next.js app, and the backend folder is for Wing.
mkdir qa-bot && cd qa-bot
mkdir frontend backend
Within the frontend folder, create a Next.js project by running the following code snippet:
cd frontend
npx create-next-app ./

Copy the code snippet below into the app/page.tsx file to create the form that accepts the user’s question and the documentation URL:
"use client";
import { useState } from "react";

export default function Home() {
	const [documentationURL, setDocumentationURL] = useState<string>("");
	const [question, setQuestion] = useState<string>("");
	const [disable, setDisable] = useState<boolean>(false);
	const [response, setResponse] = useState<string | null>(null);

	const handleUserQuery = async (e: React.FormEvent) => {
		e.preventDefault();
		setDisable(true);
		console.log({ question, documentationURL });
	};

	return (
		<main className='w-full md:px-8 px-3 py-8'>
			<h2 className='font-bold text-2xl mb-8 text-center text-blue-600'>
				Documentation Bot with Wing & LangChain
			</h2>

			<form onSubmit={handleUserQuery} className='mb-8'>
				<label className='block mb-2 text-sm text-gray-500'>Webpage URL</label>
				<input
					type='url'
					className='w-full mb-4 p-4 rounded-md border text-sm border-gray-300'
					placeholder='https://www.winglang.io/docs/concepts/why-wing'
					required
					value={documentationURL}
					onChange={(e) => setDocumentationURL(e.target.value)}
				/>

				<label className='block mb-2 text-sm text-gray-500'>
					Ask any questions related to the page URL above
				</label>
				<textarea
					rows={5}
					className='w-full mb-4 p-4 text-sm rounded-md border border-gray-300'
					placeholder='What is Winglang? OR Why should I use Winglang? OR How does Winglang work?'
					required
					value={question}
					onChange={(e) => setQuestion(e.target.value)}
				/>

				<button
					type='submit'
					disabled={disable}
					className='bg-blue-500 text-white px-8 py-3 rounded'
				>
					{disable ? "Loading..." : "Ask Question"}
				</button>
			</form>

			{response && (
				<div className='bg-gray-100 w-full p-8 rounded-sm shadow-md'>
					<p className='text-gray-600'>{response}</p>
				</div>
			)}
		</main>
	);
}
The code snippet above displays a form that accepts the user’s question and the documentation URL, and logs them to the console for now.

Perfect! 🎉You’ve completed the application's user interface. Next, let’s set up the Wing backend.
Wing provides a CLI that enables you to perform various actions within your projects.
It also provides VSCode and IntelliJ extensions that enhance the developer experience with features like syntax highlighting, compiler diagnostics, code completion and snippets, and many others.
Before we proceed, stop your Next.js development server for now and install the Winglang CLI by running the code snippet below in your terminal.
npm install -g winglang@latest
Run the following code snippet to ensure that the Winglang CLI is installed and working as expected:
wing --version
Next, navigate to the backend folder and create an empty Wing Typescript project. Ensure you select the empty template and Typescript as the language.
wing new

Copy the code snippet below into the backend/main.ts file.
import { cloud, inflight, lift, main } from "@wingcloud/framework";

main((root, test) => {
	const fn = new cloud.Function(
		root,
		"Function",
		inflight(async () => {
			return "hello, world";
		})
	);
});
The main() function serves as the entry point to Wing.
It creates a cloud function and executes at compile time. The inflight function, on the other hand, runs at runtime and returns a Hello, world! text.
Start the Wing development server by running the code snippet below. It automatically opens the Wing Console in your browser at http://localhost:3000.
wing it

You've successfully installed Wing on your computer.
From the previous sections, you've created the Next.js frontend app within the frontend folder and the Wing backend within the backend folder.
In this section, you'll learn how to communicate and send data back and forth between the Next.js app and the Winglang backend.
First, install the Winglang React library within the backend folder by running the code below:
npm install @winglibs/react
Next, update the main.ts file as shown below:
import { main, cloud, inflight, lift } from "@wingcloud/framework";
import React from "@winglibs/react";

main((root, test) => {
	const api = new cloud.Api(root, "api", { cors: true })
	;

	//👇🏻 create an API route
	api.get(
		"/test",
		inflight(async () => {
			return {
				status: 200,
				body: "Hello world",
			};
		})
	);

	//👉🏻 placeholder for the POST request endpoint

	//👇🏻 connects to the Next.js project
	const react = new React.App(root, "react", { projectPath: "../frontend" });
	//👇🏻 an environment variable
	react.addEnvironment("api_url", api.url);
});
The code snippet above creates an API endpoint (/test) that accepts GET requests and returns a Hello world text. The main function also connects to the Next.js project and adds the api_url as an environment variable.
The API URL contained in the environment variable enables us to send requests to the Wing API route. Now, how do we retrieve the API URL within the Next.js app and make these requests?
Update the RootLayout component within the Next.js app/layout.tsx file as done below:
export default function RootLayout({
	children,
}: Readonly<{
	children: React.ReactNode;
}>) {
	return (
		<html lang='en'>
			<head>
				{/** ---👇🏻  Adds this script tag 👇🏻 ---*/}
				<script src='./wing.js' defer />
			</head>
			<body className={inter.className}>{children}</body>
		</html>
	);
}
Re-build the Next.js project by running npm run build.
Finally, start the Wing development server. It automatically starts the Next.js server, which can be accessed at http://localhost:3001 in your browser.

You've successfully connected the Next.js to Wing. You can also access data within the environment variables using window.wingEnv.<attribute_name>.

In this section, you'll learn how to send requests to Wing, process these requests with LangChain and OpenAI, and display the results on the Next.js frontend.
First, let's update the Next.js app/page.tsx file to retrieve the API URL and send user's data to a Wing API endpoint.
To do this, extend the JavaScript window object by adding the following code snippet at the top of the page.tsx file.
"use client";
import { useState } from "react";
interface WingEnv {
	api_url: string;
}
declare global {
	interface Window {
		wingEnv: WingEnv;
	}
}
Next, update the handleUserQuery function to send a POST request containing the user's question and website's URL to a Wing API endpoint.
//👇🏻 sends data to the api url
const [response, setResponse] = useState<string | null>(null);

	const handleUserQuery = async (e: React.FormEvent) => {
		e.preventDefault();
		setDisable(true);
		try {
			const request = await fetch(`${window.wingEnv.api_url}/api`, {
				method: "POST",
				headers: {
					"Content-Type": "application/json",
				},
				body: JSON.stringify({ question, pageURL: documentationURL }),
			});
			const response = await request.text();
			setResponse(response);
			setDisable(false);
		} catch (err) {
			console.error(err);
			setDisable(false);
		}
	};
Before you create the Wing endpoint that accepts the POST request, install the following packages within the backend folder:
npm install @langchain/community @langchain/openai langchain cheerio
Cheerio enables us to scrape the software documentation webpage, while the LangChain packages allow us to access its various functionalities.
The LangChain OpenAI integration package uses the OpenAI language model; therefore, you'll need a valid API key. You can get yours from the OpenAI Developer's Platform.

Next, let’s create the /api endpoint that handle incoming requests.
The endpoint will:
First, import the following into the main.ts file:
import { main, cloud, inflight, lift } from "@wingcloud/framework";
import { ChatOpenAI, OpenAIEmbeddings } from "@langchain/openai";
import { ChatPromptTemplate } from "@langchain/core/prompts";
import { createStuffDocumentsChain } from "langchain/chains/combine_documents";
import { CheerioWebBaseLoader } from "@langchain/community/document_loaders/web/cheerio";
import { RecursiveCharacterTextSplitter } from "langchain/text_splitter";
import { MemoryVectorStore } from "langchain/vectorstores/memory";
import { createRetrievalChain } from "langchain/chains/retrieval";
import React from "@winglibs/react";
Add the code snippet below within the main() function to create the /api endpoint:
	api.post(
		"/api",
		inflight(async (ctx, request) => {
			//👇🏻 accept user inputs from Next.js
			const { question, pageURL } = JSON.parse(request.body!);

			//👇🏻 initialize OpenAI Chat for LLM interactions
			const chatModel = new ChatOpenAI({
				apiKey: "<YOUR_OPENAI_API_KEY>",
				model: "gpt-3.5-turbo-1106",
			});
			//👇🏻 initialize OpenAI Embeddings for Vector Store data transformation
			const embeddings = new OpenAIEmbeddings({
				apiKey: "<YOUR_OPENAI_API_KEY>",
			});

			//👇🏻 creates a text splitter function that splits the OpenAI result chunk size
			const splitter = new RecursiveCharacterTextSplitter({
				chunkSize: 200, //👉🏻 characters per chunk
				chunkOverlap: 20,
			});

			//👇🏻 creates a document loader, loads, and scraps the page
			const loader = new CheerioWebBaseLoader(pageURL);
			const docs = await loader.load();

			//👇🏻 splits the document into chunks
			const splitDocs = await splitter.splitDocuments(docs);

			//👇🏻 creates a Vector store containing the split documents
			const vectorStore = await MemoryVectorStore.fromDocuments(
				splitDocs,
				embeddings //👉🏻 transforms the data to the Vector Store format
			);

			//👇🏻 creates a document retriever that retrieves results that answers the user's questions
			const retriever = vectorStore.asRetriever({
				k: 1, //👉🏻  number of documents to retrieve (default is 2)
			});

			//👇🏻 creates a prompt template for the request
			const prompt = ChatPromptTemplate.fromTemplate(`
				Answer this question.
				Context: {context}
				Question: {input}
				`);

			//👇🏻 creates a chain containing the OpenAI chatModel and prompt
			const chain = await createStuffDocumentsChain({
				llm: chatModel,
				prompt: prompt,
			});

			//👇🏻 creates a retrieval chain that combines the documents and the retriever function
			const retrievalChain = await createRetrievalChain({
				combineDocsChain: chain,
				retriever,
			});

			//👇🏻 invokes the retrieval Chain and returns the user's answer
			const response = await retrievalChain.invoke({
				input: `${question}`,
			});

			if (response) {
				return {
					status: 200,
					body: response.answer,
				};
			}

			return undefined;
		})
	);
The API endpoint accepts the user’s question and the page URL from the Next.js application, initialises ChatOpenAI and OpenAIEmbeddings, loads the documentation page, and retrieves the answers to the user’s query in the form of documents.
Then, splits the documents into chunks, saves the chunks in the MemoryVectorStore, and enables us to fetch answers to the question using LangChain retrievers.
From the code snippet above, the OpenAI API key is entered directly into the code; this could lead to security breaches, making the API key accessible to attackers. To prevent this data leak, Winglang allows you to save private keys and credentials in variables called secrets.
When you create a secret, Wing saves this data in a .env file, ensuring it is secured and accessible.
Update the main() function to fetch the OpenAI API key from the Wing Secret.
main((root, test) => {
	const api = new cloud.Api(root, "api", { cors: true });
	//👇🏻 creates the secret variable
	const secret = new cloud.Secret(root, "OpenAPISecret", {
		name: "open-ai-key",
	});

	api.post(
		"/api",
		lift({ secret })
			.grant({ secret: ["value"] })
			.inflight(async (ctx, request) => {
				const apiKey = await ctx.secret.value();

				const chatModel = new ChatOpenAI({
					apiKey,
					model: "gpt-3.5-turbo-1106",
				});

				const embeddings = new OpenAIEmbeddings({
					apiKey,
				});

				//👉🏻 other code snippets & configurations
	);

	const react = new React.App(root, "react", { projectPath: "../frontend" });
	react.addEnvironment("api_url", api.url);
});
secret variable declares a name for the secret (OpenAI API key).lift().grant() grants the API endpoint access to the secret value stored in the Wing Secret.inflight() function accepts the context and request object as parameters, makes a request to LangChain, and returns the result.apiKey using the ctx.secret.value() function.Finally, save the OpenAI API key as a secret by running this command in your terminal.

Great, now our secrets are stored and we can interact with our application. Let's take a look at it in action!
Here is a brief demo:

Let's dig a little bit deeper into the Winglang docs to see what data our AI bot can extract.

So far, we have gone over the following:
Wing aims to bring back your creative flow and close the gap between imagination and creation. Another great advantage of Wing is that it is open-source. Therefore, if you are looking forward to building distributed systems that leverage cloud services or contribute to the future of cloud development, Wing is your best choice.
Feel free to contribute to the GitHub repository, and share your thoughts with the team and the large community of developrs.
The source code for this tutorial is available here.
Thank you for reading! 🎉
Building Slack apps can be a daunting task for beginners. Between understanding the Slack API, setting up a server to handle incoming requests, and deploying the app to a cloud provider, there are many steps involved. For instance setting up a slack app locally on your machine is simple enough, but then deploying it to a cloud provider can be challenging and might require re-architecting your app.
In this tutorial, I'm going to show you how to build a Slack app using Wing, making use of the Wing Console for local simulation and then deploying it to AWS with a single command!
Wing is an open source programming language for the cloud, that also provides a powerful and fun local development experience.
Wing combines infrastructure and runtime code in one language, enabling developers to stay in their creative flow, and to deliver better software, faster and more securely.
To take a closer look at Wing checkout our Github repository.
First, you need to install Wing on your machine (you'll need Node.js >= 20.x installed):
npm i -g winglang
You can check the CLI version like this (the minimum version required by this tutorial is 0.75.0):
wing --version
0.75.0
Ok, now that we have the Wing CLI installed we can use the Slack quick-start template to start building our Slack app.
$ mkdir my-slack-app
$ cd my-slack-app
$ wing new slack
This will create the following project structure:
my-slack-app/
├── main.w
├── package-lock.json
└── package.json
Let's take a look at the main.w file, where we can see a code template for a simple Slack app that updates us on files uploaded to a bucket.
Note: your template will have more comments and explanations than the one below. I have removed them for brevity.
bring cloud;
bring slack;

let botToken = new cloud.Secret(name: "slack-bot-token");
let slackBot = new slack.App(token: botToken);
let inbox = new cloud.Bucket() as "file-process-inbox";

inbox.onCreate(inflight (key) => {
  let channel = slackBot.channel("INBOX_PROCESSING_CHANNEL");
  channel.post("New file: {key} was just uploaded to inbox!");
});

slackBot.onEvent("app_mention", inflight(ctx, event) => {
  let eventText = event["event"]["text"].asStr();
  log(eventText);
  if eventText.contains("list inbox") {
    let files = inbox.list();
    let message = new slack.Message();
    message.addSection({
      fields: [
        {
          type: slack.FieldType.mrkdwn,
          text: "*Current Inbox:*\n-{files.join("\n-")}"
        }
      ]
    });
    ctx.channel.postMessage(message);
  }
});
Note: Be sure to replace the
INBOX_PROCESSING_CHANNELwith the name of the slack channel you want to post to.
We can see above the very first resource defined is a cloud.Secret which is used to store the Slack bot token. This is a secure way to store sensitive information in Wing. So before we can get started we need to create a Slack app and get the bot token to use in our Wing app.
Create from Scratch and give your app a name and select the workspace you want to deploy it to.

app_mentions:readchat:writechat:write.public
to add these head over to the OAuth & Permissions section and add those permissions.


Once its installed you can copy the bot token and let's head back over to our Wing app.
Now that we have our bot token, we can add it to our application by running the wing secrets command and pasting the token when prompted:
❯ wing secrets
1 secret(s) found

? Enter the secret value for slack-bot-token: [hidden]
Now that our bot token is stored our application is ready to run!
To run the app locally we can use the Wing Console, which simulates the cloud environment on your local machine. To start the console run:
wing it
This will open a browser window showing the Wing Console. You should see something similar to this:

Now in order to see the Slack bot in action, let's add some more code to our main.w file. We will add a function that will make a new file each time it is called.
The following code can be appended to the main.w file:
let counter = new cloud.Counter();

new cloud.Function(inflight () => {
  let i = counter.inc();
  inbox.put("file-{i}.txt", "Hello, Slack!");
}) as "Add File";
Once you save the file, the Wing Console will hot reload and you should now see a function resource we can play with that looks like this:

So now we can click on the Add File function and interact with it in the right side panel. Go ahead and invoke the function a few times.

And BAM!! You should now be seeing messages in your Slack channel every time you invoke the function!

One thing we will notice is the Slack application is supposed to support the ability to list the files in the inbox. This is done by mentioning the Slack app and saying list inbox.
If you try this now you will see absolutely nothing happens :) —— this is because we need to enable events in our slack app.
To do this head over to the Event Subscriptions section in the Slack API dashboard and enable events. You will need to provide a URL for the Slack API to send events to. Luckily Wing makes providing this URL easy with builtin support for tunneling.
To get the tunnel URL go back to the Wing Console and Open a tunnel for this endpoint

After a moment the icon will change to a eye with a slash through it, now we can copy the url by right clicking the endpoint and selecting Copy URL.
Next let's head over to the Event Subscriptions section in the slack API dashboard and paste the URL in the Request URL field. However, we need to append slack/events to the end of the URL. So it should look something like this:

This should only take a few seconds to verify, and once its verified you can scroll down to the Subscribe to Bot Events section and add the app_mention event like so:

Lastly, don't forget to save your changes!
Now head back to your Slack channel where you received the messages earlier and mention your app and say list inbox. Our Slack apps may have different names so it wont be exactly the same as the example below:

You should now see a message in the channel with the files in the inbox!
Awesome! You have now built a Slack app using Wing and tested it locally. Now let's deploy it to AWS!
Before we start you will need the following to follow along:
Getting our code ready for AWS is as simple as running 2 commands. The first thing we need to do is prepare the cloud.Secret for the tf-aws platform. This is done by running the wing secrets command with the --platform flag:
❯ wing secrets --platform tf-aws
1 secret(s) found

? Enter the secret value for slack-bot-token: [hidden]
Storing secrets in AWS Secrets Manager
Secret slack-bot-token does not exist, creating it.
1 secret(s) stored AWS Secrets Manager
This will result in the same prompt as before, but this time the secret will be stored in AWS Secrets Manager.
Next let's compile the application for tf-aws:
❯ wing compile --platform tf-aws
This will compile the application and generate all the necessary Terraform files, and assets needed to deploy the application to AWS.
To deploy the code run the following commands:
terraform -chdir=./target/main.tfaws init
terraform -chdir=./target/main.tfaws apply -auto-approve
This will begin the deployment process and should only take about a minute to complete (barring internet connection issues). The result will show an output that contains a URL for the API Gateway endpoint and look something like this:
Apply complete! Resources: 30 added, 0 changed, 0 destroyed.

Outputs:

App_Api_Endpoint_Url_E233F0E8 = "https://p9y42fs0gg.execute-api.us-east-1.amazonaws.com/prod"
App_Slack_Request_Url_FF26641D = "https://p9y42fs0gg.execute-api.us-east-1.amazonaws.com/prod/slack/events"
The last step we need to do is to copy that App_Slack_Request_Url and paste it into the Request URL field in the Event Subscriptions section in the Slack API dashboard. This will tell Slack to now send events to our deployed applications API Gateway endpoint.
You should see the URL verified in a few seconds.
DONT FORGET TO SAVE YOUR CHANGES!

Let's first test adding a file to the inbox, which in AWS is an s3 bucket. Navigate to the S3 console in AWS and find the bucket with the name that contains file-process-inbox there will be some unique hashing to the end of it. For example, my bucket was named: file-process-inbox-c8419ccc-20240530151737187700000004
Upload any file on your machine to this bucket, and you should see a message in your Slack channel!

Lastly, let's test the list inbox command.

And there you have it! You have successfully built a Slack app using Wing, tested it locally, and deployed it to AWS!
If you find yourself wanting to learn more about Wing, or had any issues with this tutorial, or just wanna chat, feel free to join our Discord server!
By the end of this article, you will build and deploy a ChatGPT Client using Wing and Next.js.
This application can run locally (in a local cloud simulator) or deploy it to your own cloud provider.

Building a ChatGPT client and deploying it to your own cloud infrastructure is a good way to ensure control over your data.
Deploying LLMs to your own cloud infrastructure provides you with both privacy and security for your project.
Sometimes, you may have concerns about your data being stored or processed on remote servers when using proprietary LLM platforms like OpenAI’s ChatGPT, either due to the sensitivity of the data being fed into the platform or for other privacy reasons.
In this case, self-hosting an LLM to your cloud infrastructure or running it locally on your machine gives you greater control over the privacy and security of your data.
Wing is a cloud-oriented programming language that lets you build and deploy cloud-based applications without worrying about the underlying infrastructure. It simplifies the way you build on the cloud by allowing you to define and manage your cloud infrastructure and your application code within the same language. Wing is cloud agnostic - applications built with it can be compiled and deployed to various cloud platforms.
To follow along, you need to:
To get started, you need to install Wing on your machine. Run the following command:
npm install -g winglang
Confirm the installation by checking the version:
wing --version
mkdir assistant
cd assistant
npx create-next-app@latest frontend
mkdir backend && cd backend
wing new empty
We have successfully created our Wing and Next.js projects inside the assistant directory. The name of our ChatGPT Client is Assistant. Sounds cool, right?
The frontend and backend directories contain our Next and Wing apps, respectively. wing new empty creates three files: package.json, package-lock.json, and main.w. The latter is the app’s entry point.
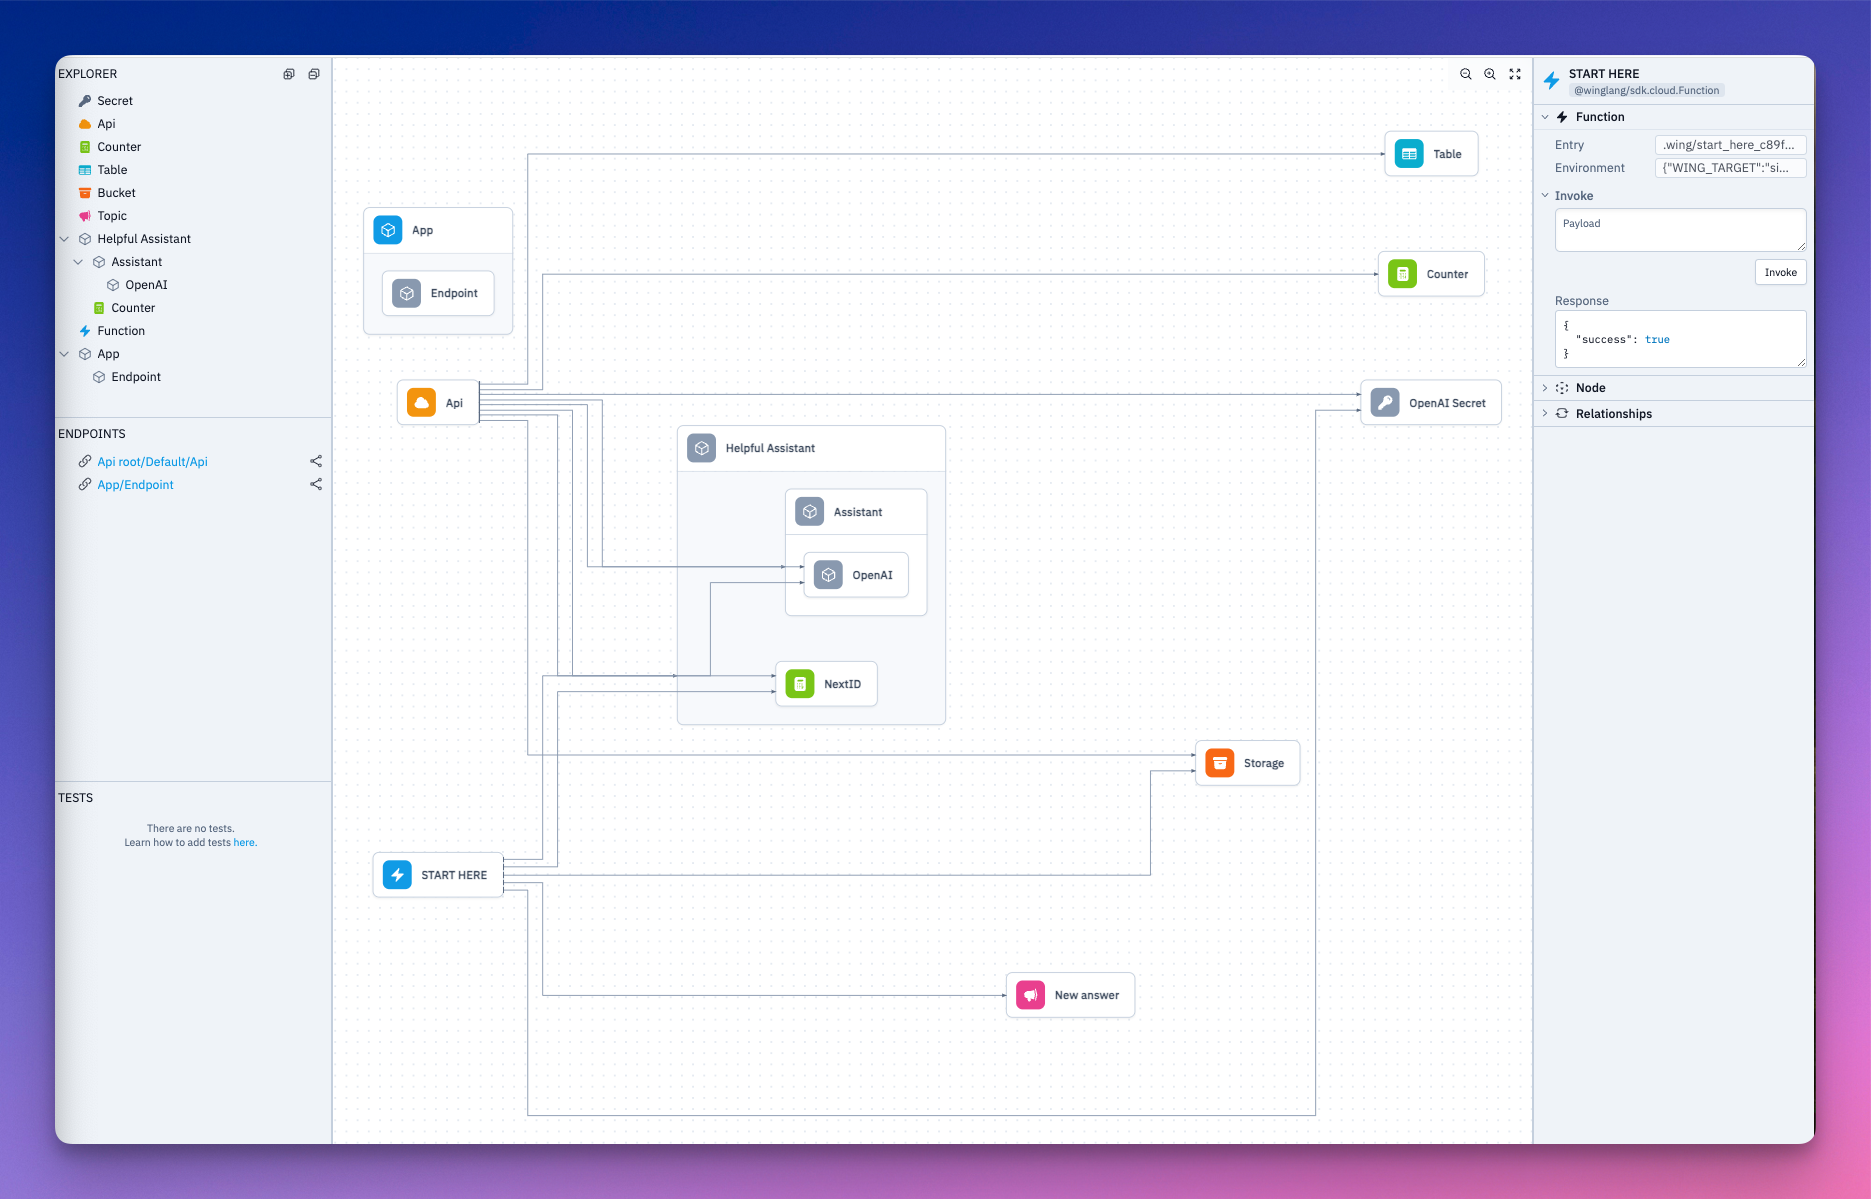
The Wing simulator allows you to run your code, write unit tests, and debug your code inside your local machine without needing to deploy to an actual cloud provider, helping you iterate faster.
Use the following command to run your Wing app locally:
wing it
Your Wing app will run on localhost:3000.
npm i @winglibs/openai @winglibs/react
main.w file. Let's also import all the other libraries we’ll need.bring openai
bring react
bring cloud
bring ex
bring http
bring is the import statement in Wing. Think of it this way, Wing uses bring to achieve the same functionality as import in JavaScript.
cloud is Wing’s Cloud library. It exposes a standard interface for Cloud API, Bucket, Counter, Domain, Endpoint, Function and many more cloud resources. ex is a standard library for interfacing with Tables and cloud Redis database, and http is for calling different HTTP methods - sending and retrieving information from remote resources.
We will use gpt-4-turbo for our app but you can use any OpenAI model.
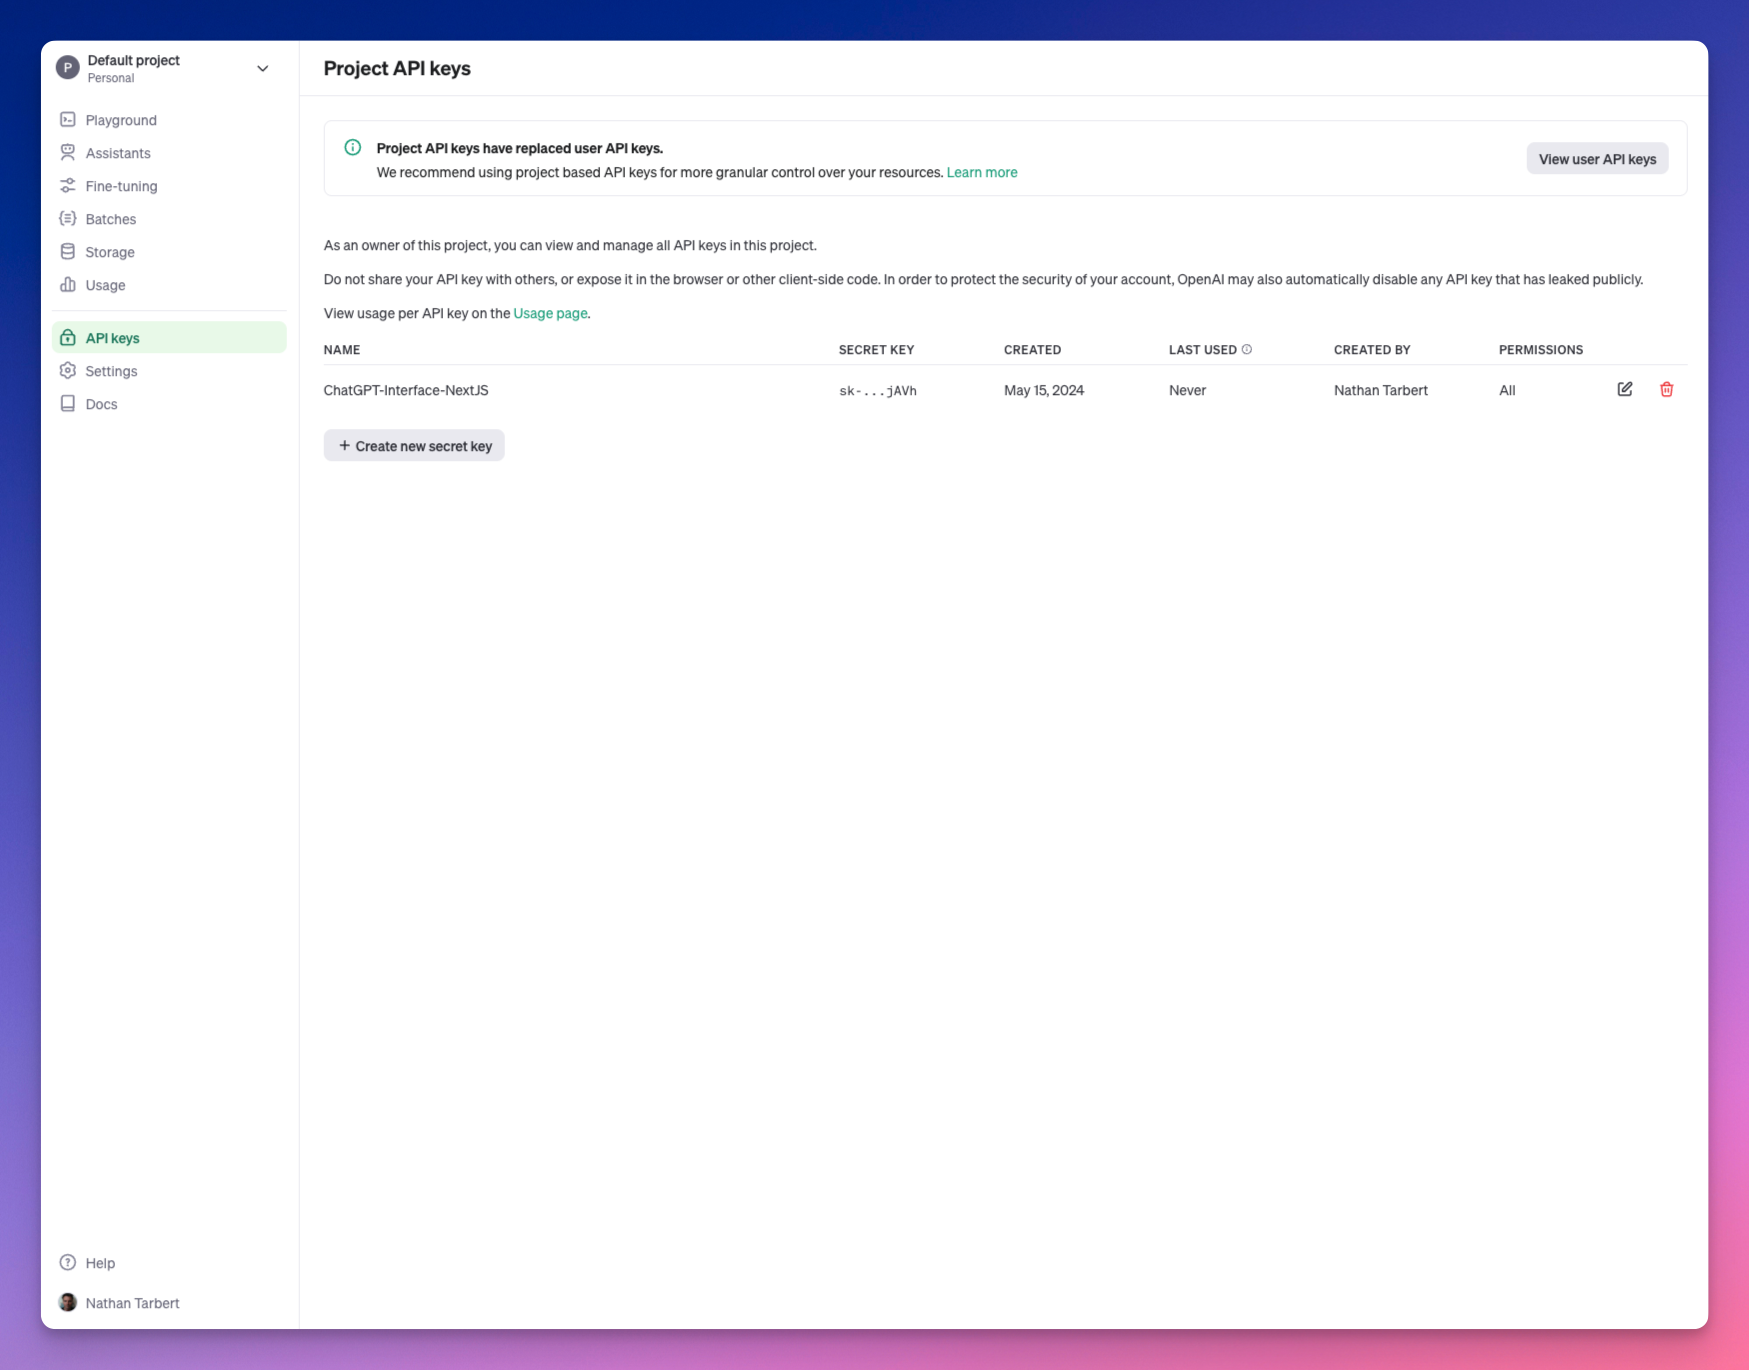
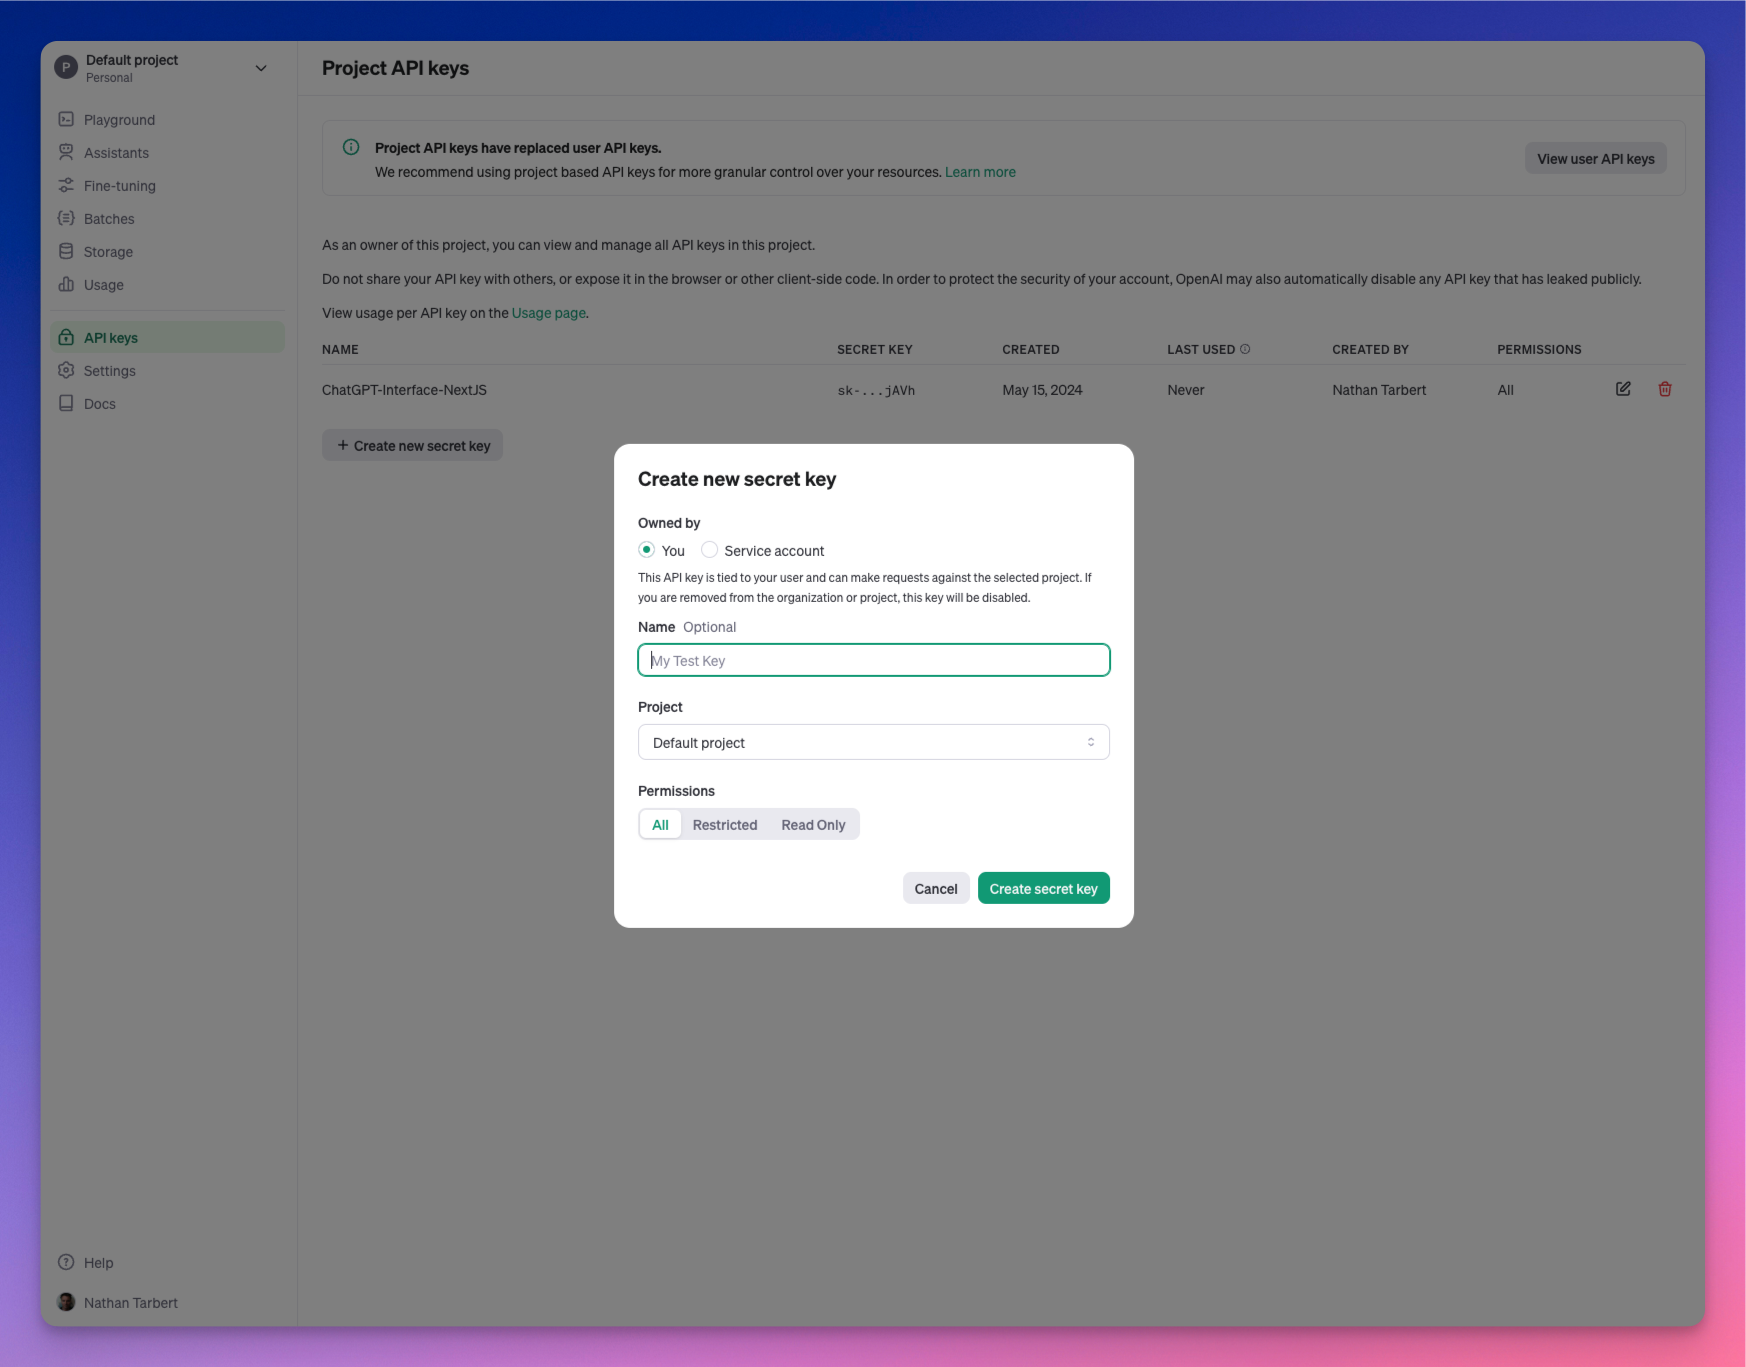
Create a Class to initialize your OpenAI API. We want this to be reusable.
We will add a personality to our Assistant class so that we can dictate the personality of our AI assistant when passing a prompt to it.
let apiKeySecret = new cloud.Secret(name: "OAIAPIKey") as "OpenAI Secret";

class Assistant {
    personality: str;
    openai: openai.OpenAI;

    new(personality: str) {
        this.openai = new openai.OpenAI(apiKeySecret: apiKeySecret);
        this.personality = personality;
    }

    pub inflight ask(question: str): str {
        let prompt = `you are an assistant with the following personality: ${this.personality}. ${question}`;
        let response = this.openai.createCompletion(prompt, model: "gpt-4-turbo");
        return response.trim();
    }
}
Wing unifies infrastructure definition and application logic using the preflight and inflight concepts respectively.
Preflight code (typically infrastructure definitions) runs once at compile time, while inflight code will run at runtime to implement your app’s behavior.
Cloud storage buckets, queues, and API endpoints are some examples of preflight. You don’t need to add the preflight keyword when defining a preflight, Wing knows this by default. But for an inflight block, you need to add the word “inflight” to it.
We have an inflight block in the code above. Inflight blocks are where you write asynchronous runtime code that can directly interact with resources through their inflight APIs.
Let's walk through how we will secure our API keys because we definitely want to take security into account.
Let's create a .env file in our backend’s root and pass in our API Key:
OAIAPIKey = Your_OpenAI_API_key
We can test our OpenAI API keys locally referencing our .env file, and then since we are planning to deploy to AWS, we will walk through setting up the AWS Secrets Manager.
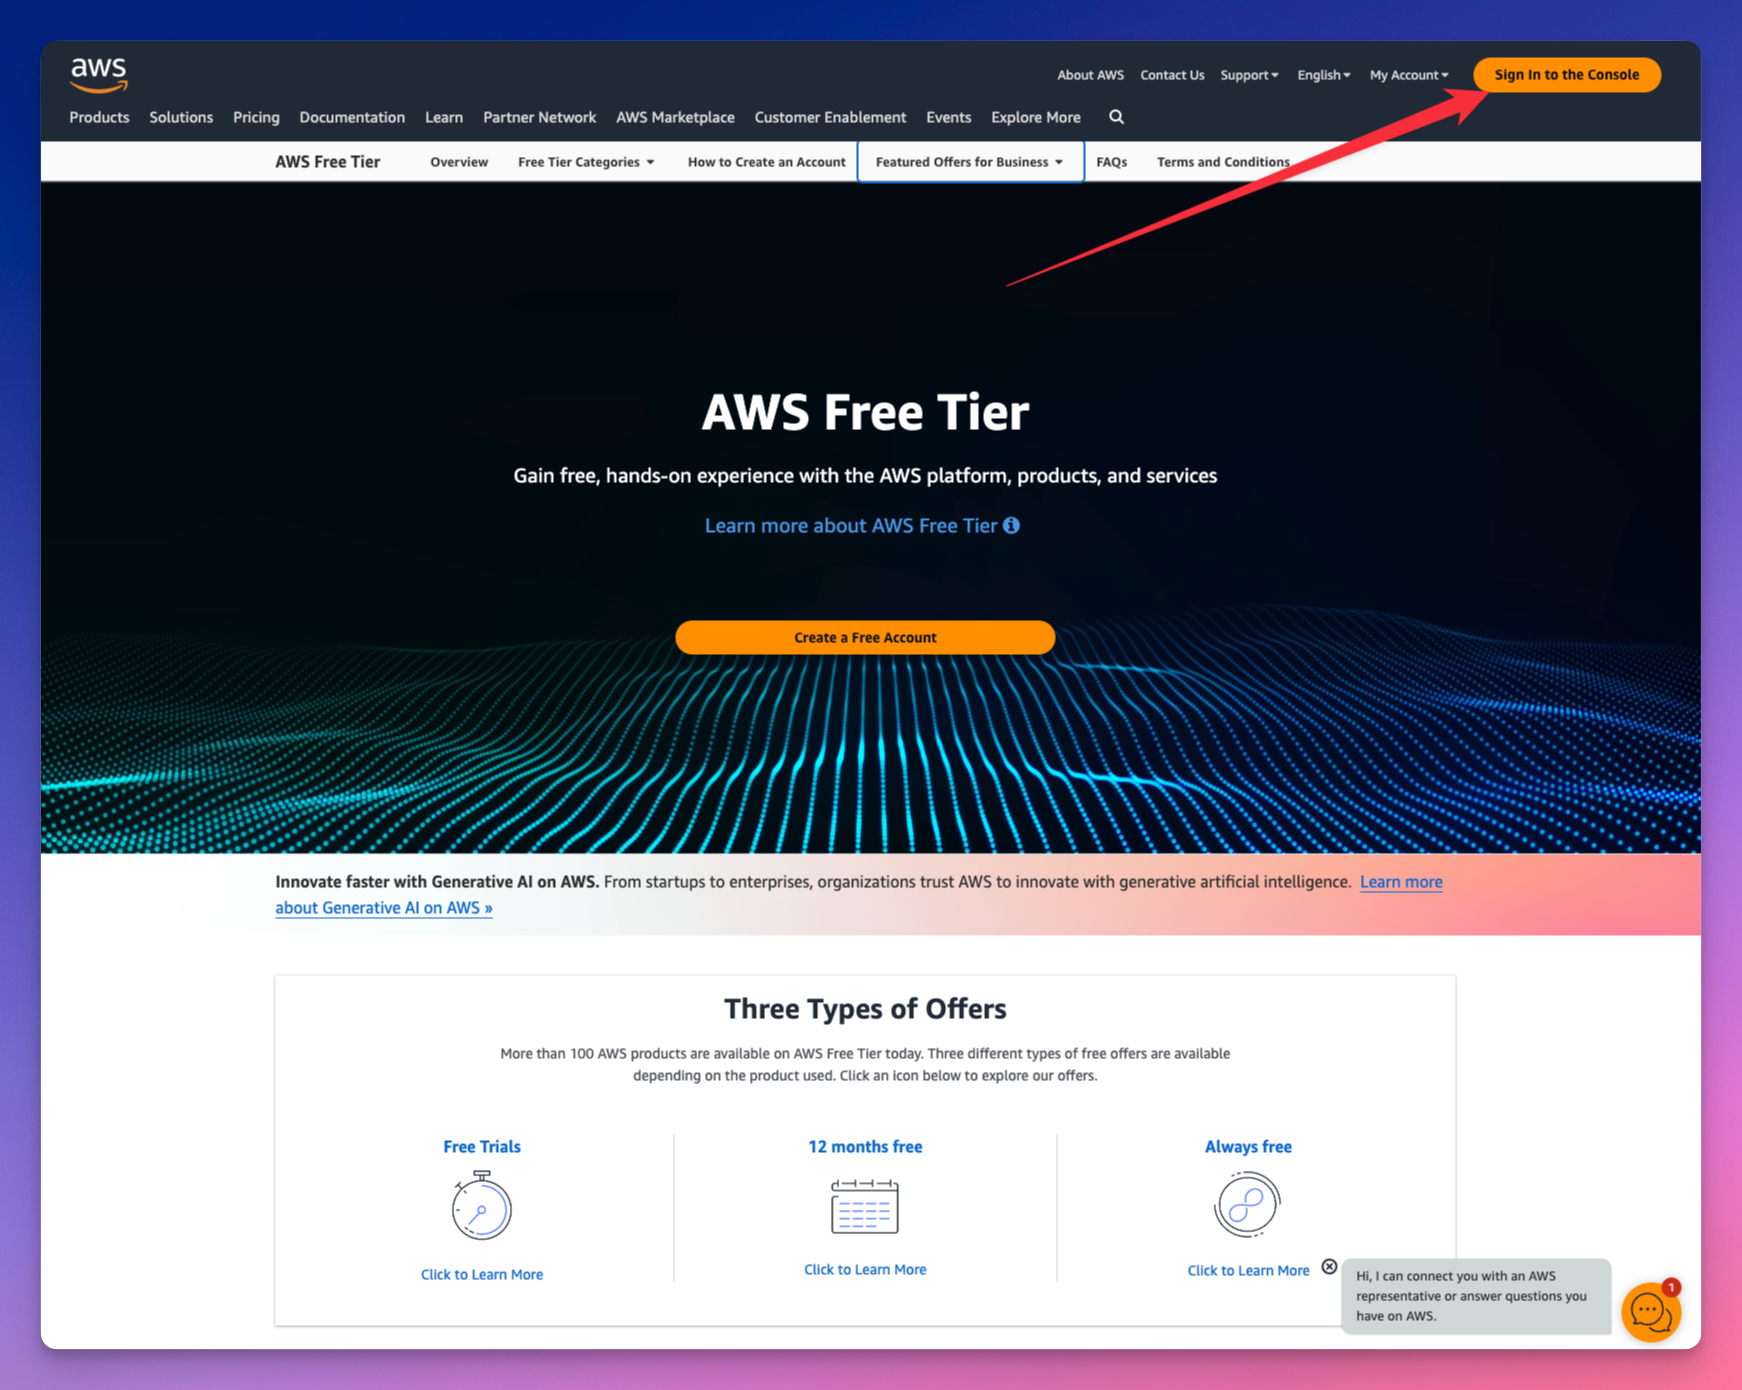
First, let's head over to AWS and sign into the Console. If you don't have an account, you can create one for free.
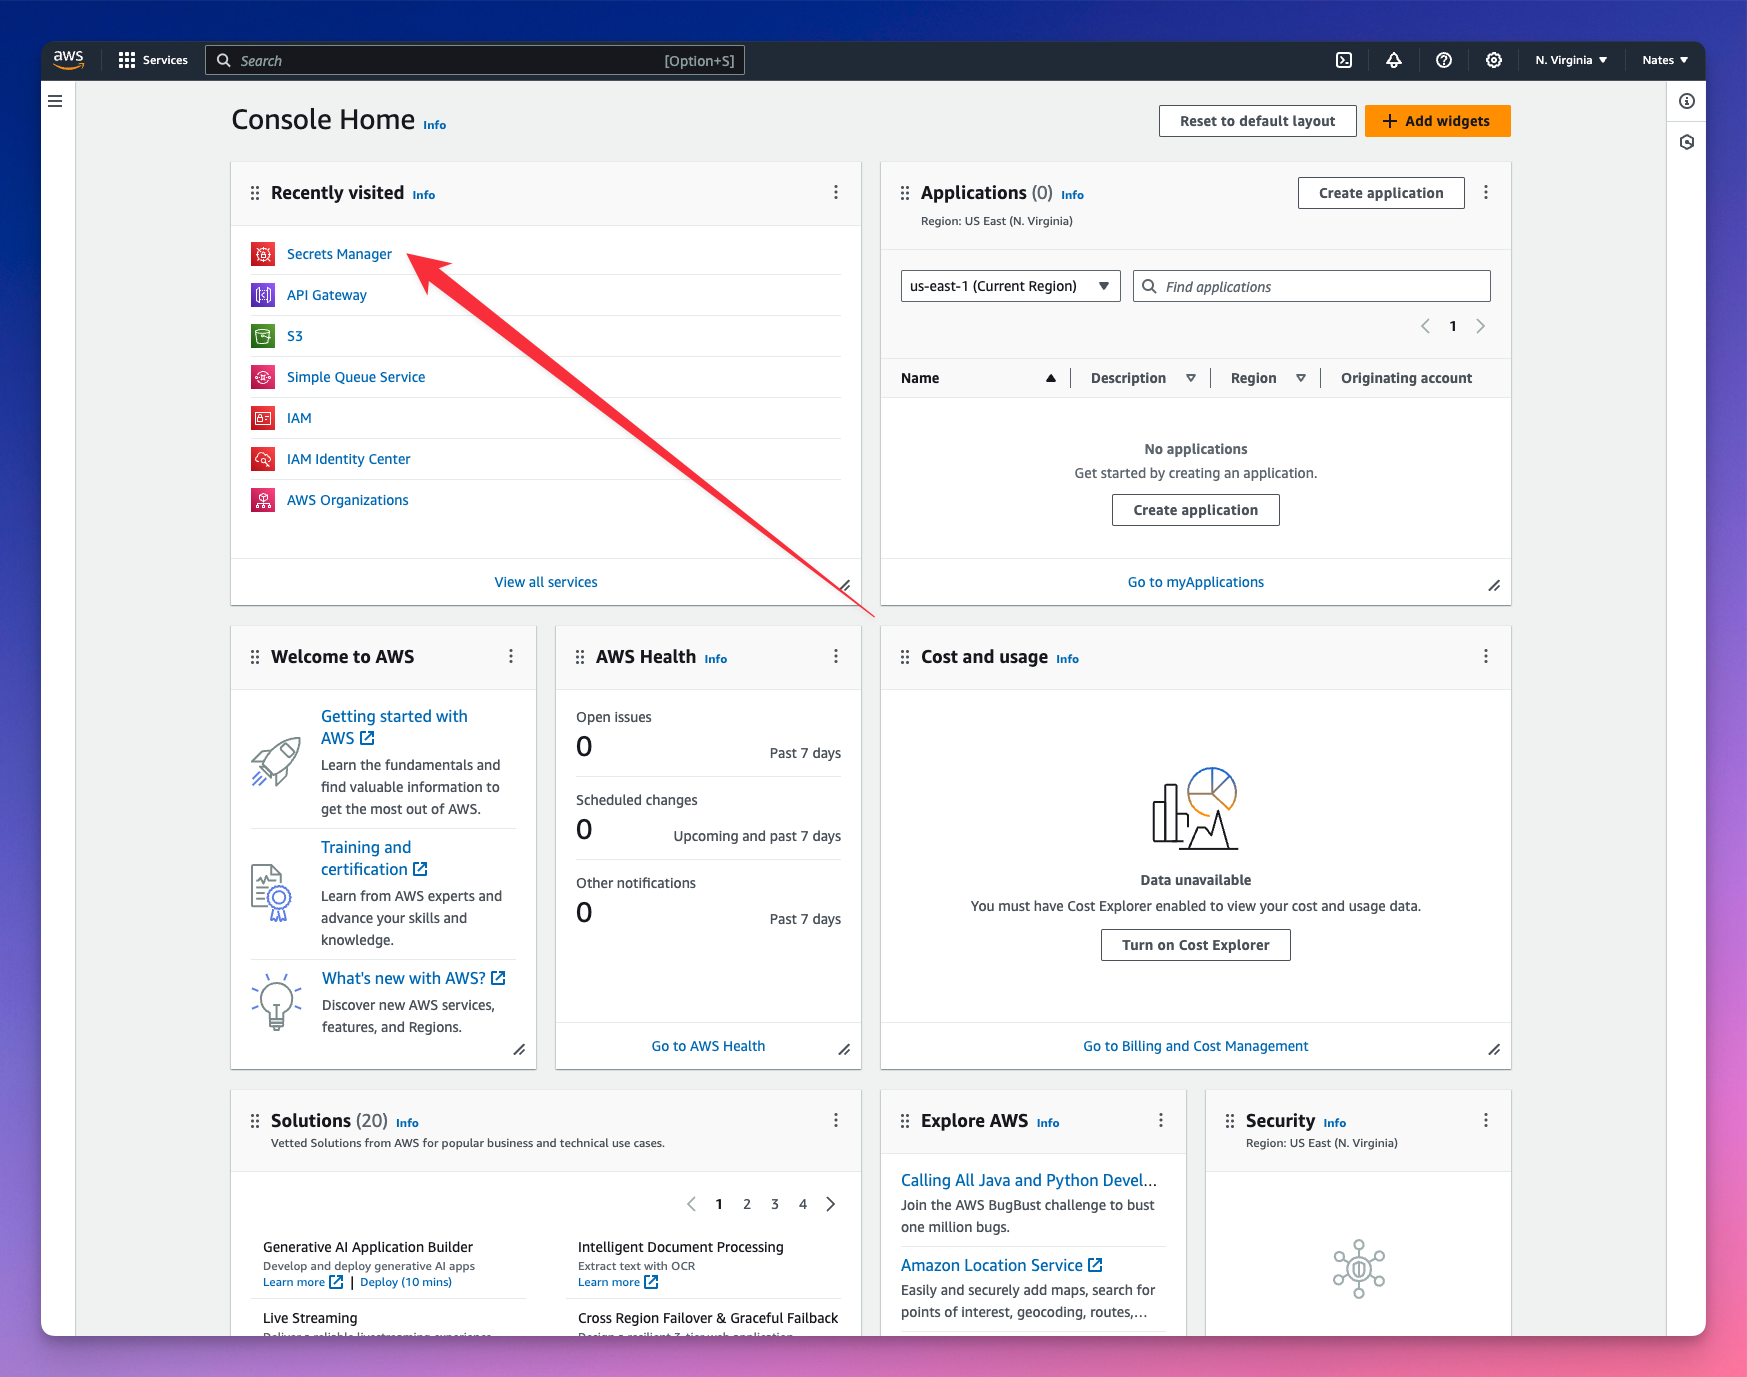
Navigate to the Secrets Manager and let's store our API key values.
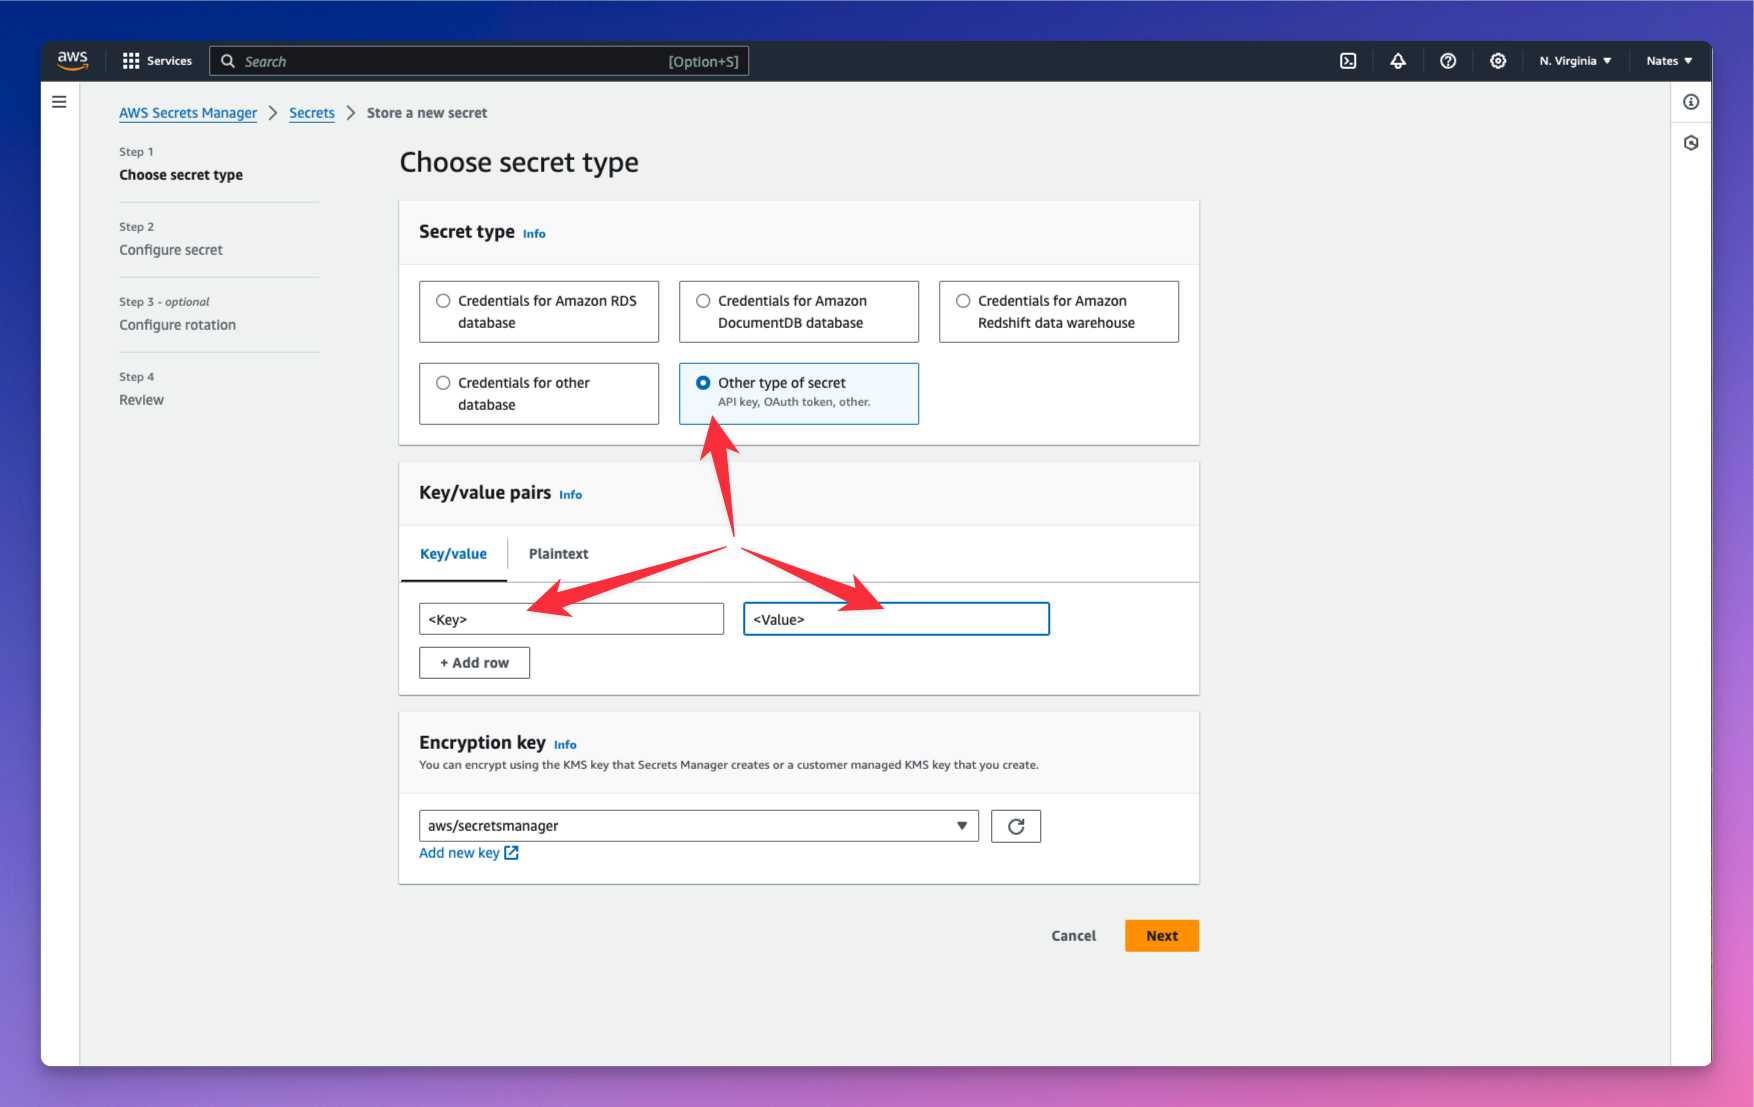
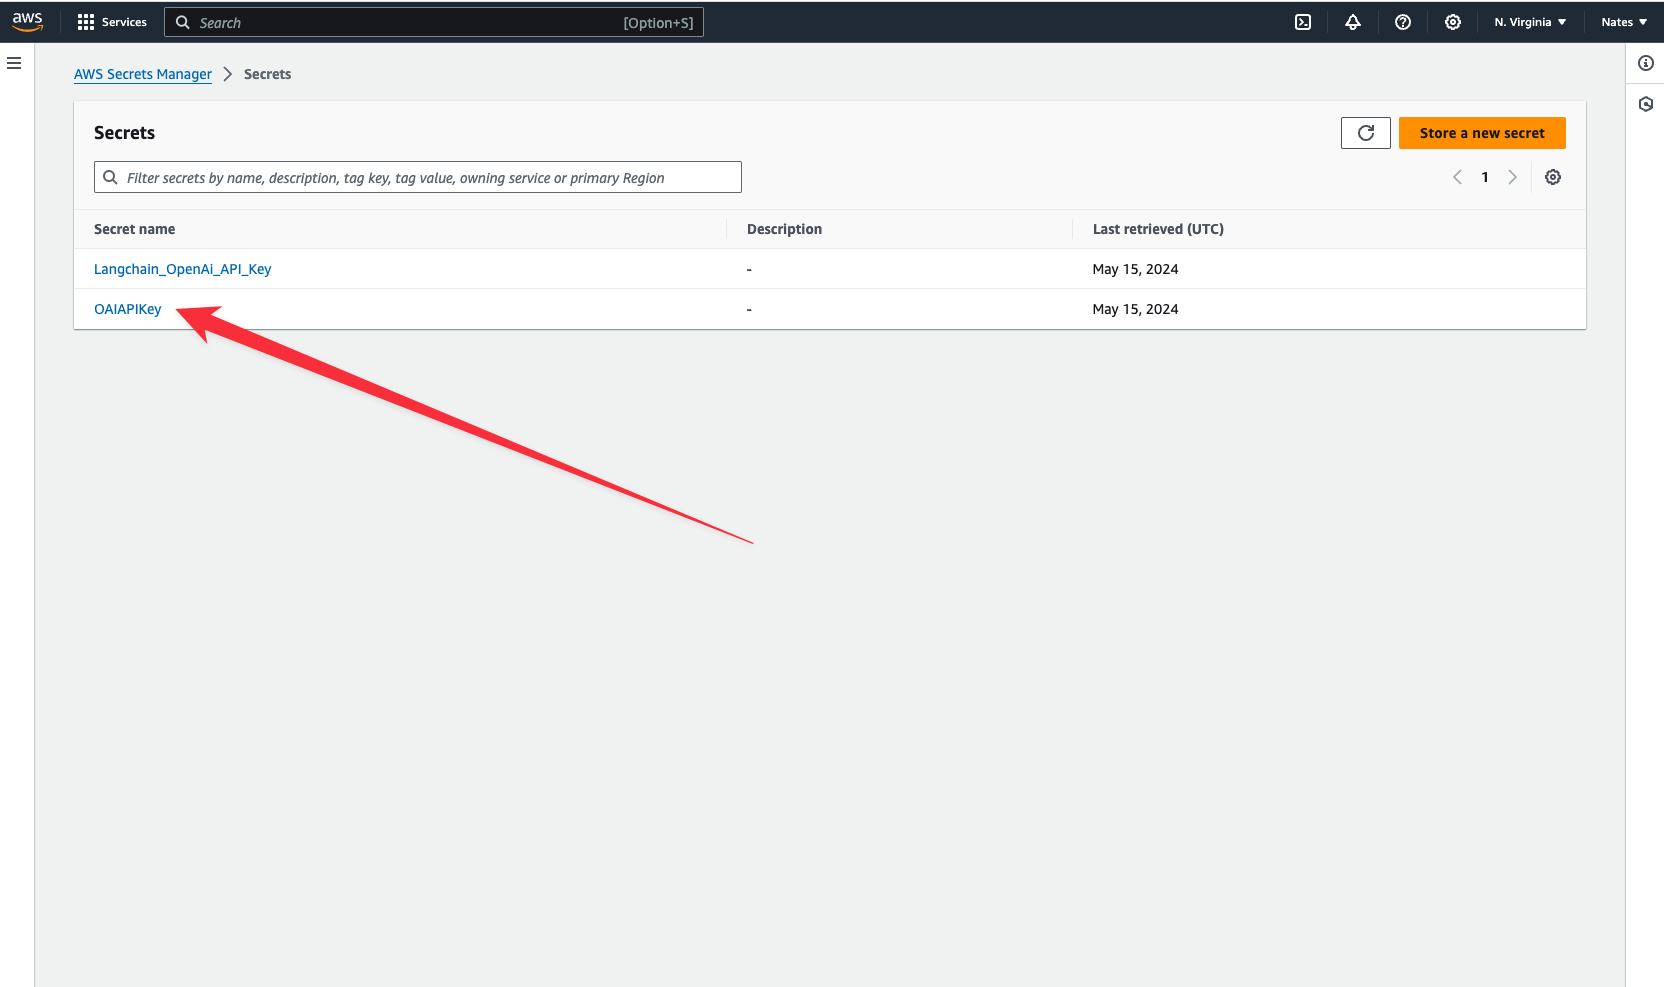
We have stored our API key in a cloud secret named OAIAPIKey. Copy your key and we will jump over to the terminal and connect to our secret that is now stored in the AWS Platform.
wing secrets
Now paste in your API Key as the value in the terminal. Your keys are now properly stored and we can start interacting with our app.
Storing your AI's responses in the cloud gives you control over your data. It resides on your own infrastructure, unlike proprietary platforms like ChatGPT, where your data lives on third-party servers that you don’t have control over. You can also retrieve these responses whenever you need them.
Let’s create another class that uses the Assistant class to pass in our AI’s personality and prompt. We would also store each model’s responses as txt files in a cloud bucket.
let counter = new cloud.Counter();

class RespondToQuestions {
    id: cloud.Counter;
    gpt: Assistant;
    store: cloud.Bucket;

    new(store: cloud.Bucket) {
        this.gpt = new Assistant("Respondent");
        this.id = new cloud.Counter() as "NextID";
        this.store = store;
    }

    pub inflight sendPrompt(question: str): str {
        let reply = this.gpt.ask("{question}");
        let n = this.id.inc();
        this.store.put("message-{n}.original.txt", reply);
        return reply;
    }
}
We gave our Assistant the personality “Respondent.” We want it to respond to questions. You could also let the user on the frontend dictate this personality when sending in their prompts.
Every time it generates a response, the counter increments, and the value of the counter is passed into the n variable used to store the model’s responses in the cloud. However, what we really want is to create a database to store both the user prompts coming from the frontend and our model’s responses.
Let's define our database.
Wing has ex.Table built-in - a NoSQL database to store and query data.
let db = new ex.Table({
    name: "assistant",
    primaryKey: "id",
    columns: {
        question: ex.ColumnType.STRING,
        answer: ex.ColumnType.STRING
    }
});
We added two columns in our database definition - the first to store user prompts and the second to store the model’s responses.
We want to be able to send and receive data in our backend. Let’s create POST and GET routes.
let api = new cloud.Api({ cors: true });

api.post("/assistant", inflight((request) => {
    // POST request logic goes here
}));

api.get("/assistant", inflight(() => {
    // GET request logic goes here
}));
let myAssistant = new RespondToQuestions(store) as "Helpful Assistant";

api.post("/assistant", inflight((request) => {
    let prompt = request.body;
    let response = myAssistant.sendPrompt(JSON.stringify(prompt));
    let id = counter.inc();

    // Insert prompt and response in the database
    db.insert(id, { question: prompt, answer: response });

    return cloud.ApiResponse({
        status: 200
    });
}));
In the POST route, we want to pass the user prompt received from the frontend into the model and get a response. Both prompt and response will be stored in the database. cloud.ApiResponse allows you to send a response for a user’s request.
Add the logic to retrieve the database items when the frontend makes a GET request.
Add the logic to retrieve the database items when the frontend makes a GET request.
api.get("/assistant", inflight(() => {
    let questionsAndAnswers = db.list();

    return cloud.ApiResponse({
        body: JSON.stringify(questionsAndAnswers),
        status: 200
    });
}));
Our backend is ready. Let's test it out in the local cloud simulator.
Run wing it.
Lets go over to localhost:3000 and ask our Assistant a question.
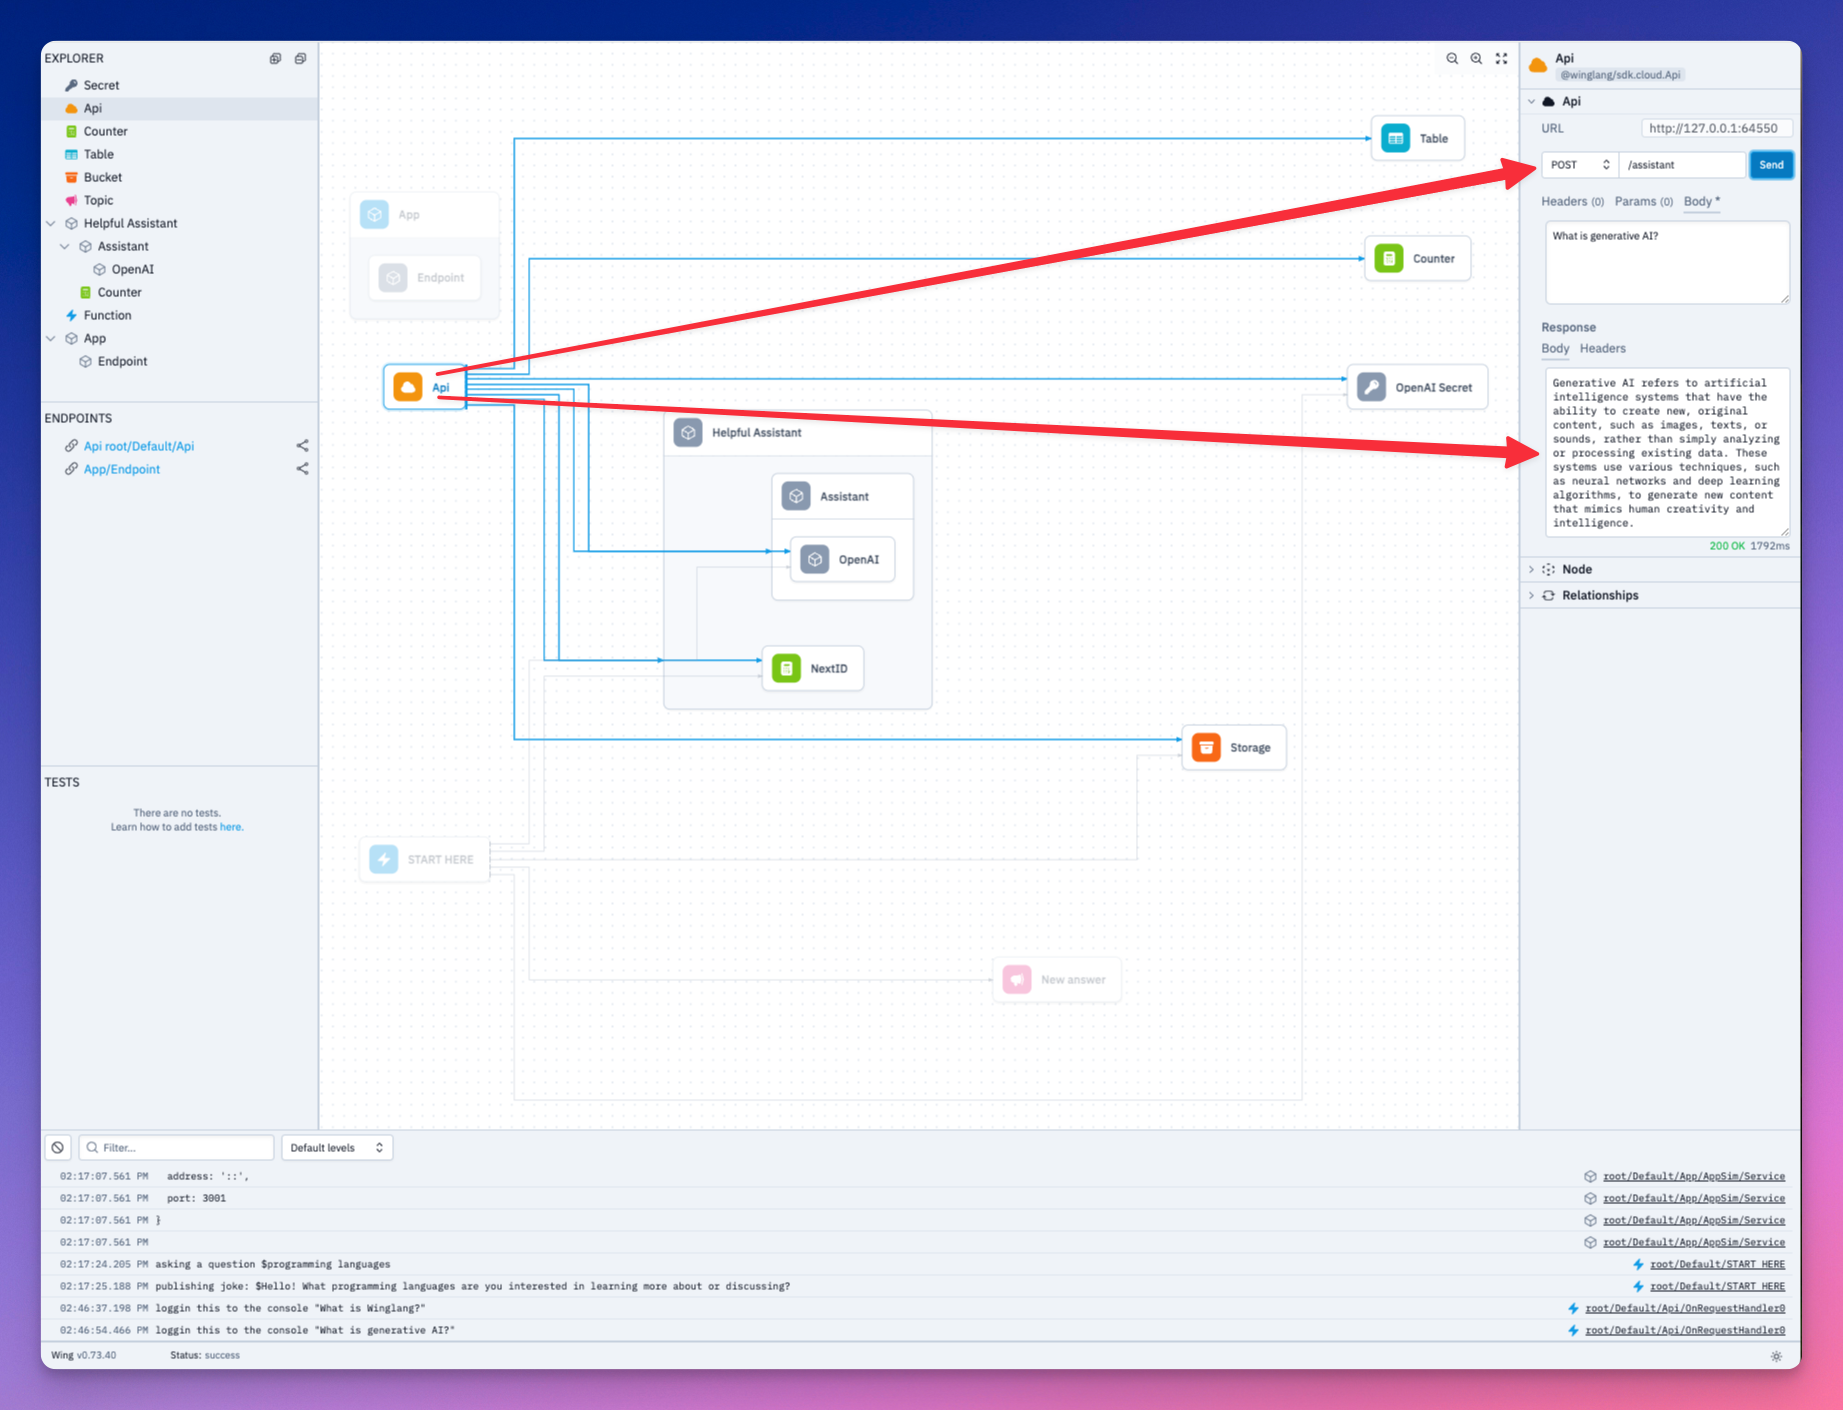
Both our question and the Assistant’s response has been saved to the database. Take a look.
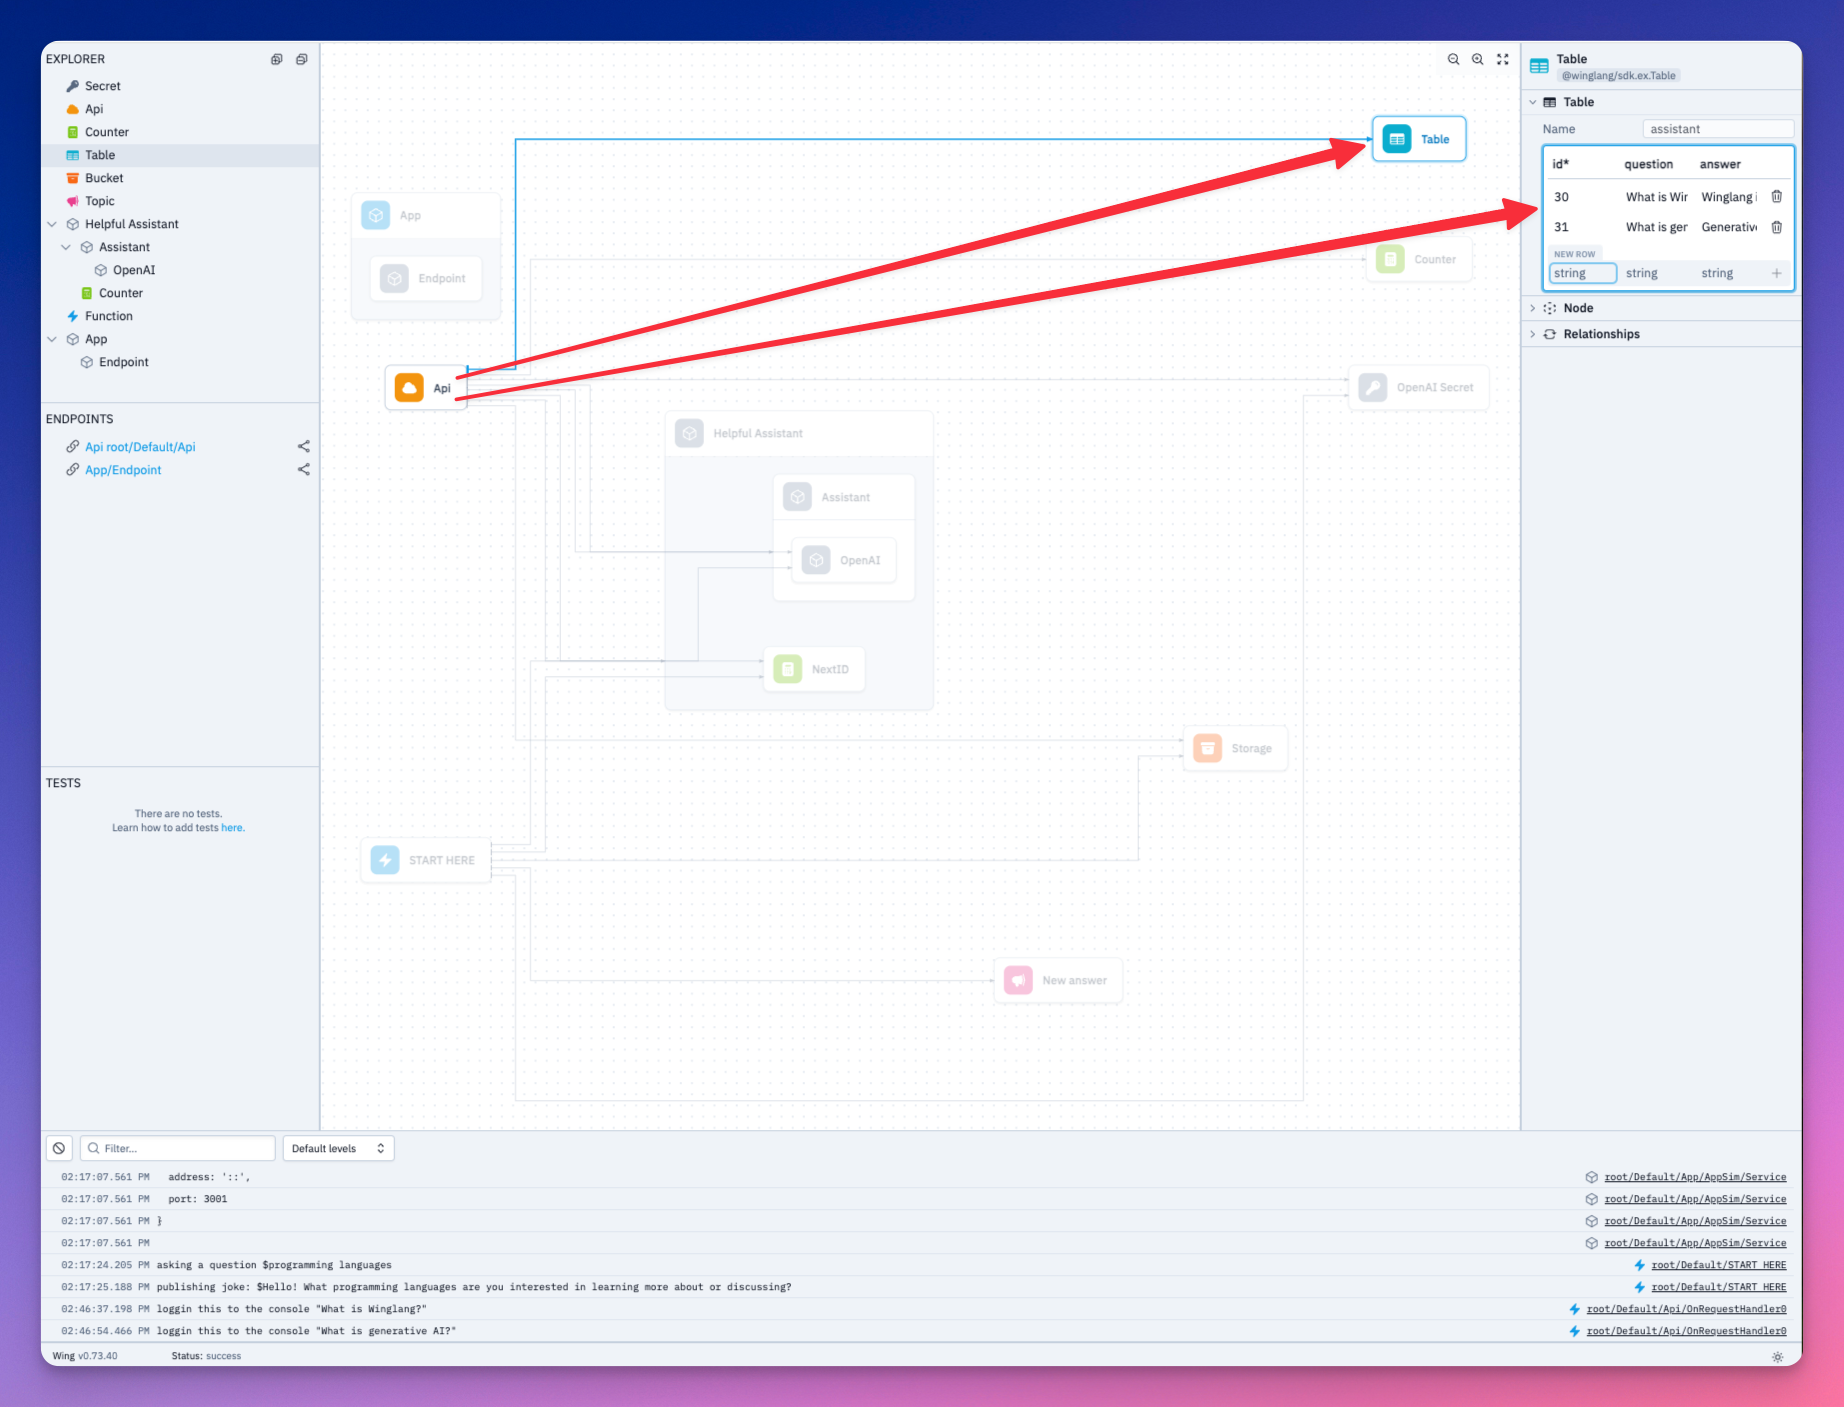
We need to expose the API URL of our backend to our Next frontend. This is where the react library installed earlier comes in handy.
let website = new react.App({
    projectPath: "../frontend",
    localPort: 4000
});

website.addEnvironment("API_URL", api.url);
Add the following to the layout.js of your Next app.
import { Inter } from "next/font/google";
import "./globals.css";

const inter = Inter({ subsets: ["latin"] });

export const metadata = {
    title: "Create Next App",
    description: "Generated by create next app",
};

export default function RootLayout({ children }) {
    return (
        <html lang="en">
	        <head>
            <script src="./wing.js" defer></script>
           </head>
            <body className={inter.className}>{children}</body>
        </html>
    );
}
We now have access to API_URL in our Next application.
Let’s implement the frontend logic to call our backend.
import { useEffect, useState, useCallback } from 'react';
import axios from 'axios';

function App() {

    const [isThinking, setIsThinking] = useState(false);
    const [input, setInput] = useState("");
    const [allInteractions, setAllInteractions] = useState([]);

    const retrieveAllInteractions = useCallback(async (api_url) => {
		    await axios ({
		      method: "GET",
		      url: `${api_url}/assistant`,
		    }).then(res => {
		      setAllInteractions(res.data)
		    })
  }, [])

    const handleSubmit = useCallback(async (e)=> {
	    e.preventDefault()

	    setIsThinking(!isThinking)


	    if(input.trim() === ""){
	      alert("Chat cannot be empty")
	      setIsThinking(true)

	    }

	      await axios({
	        method: "POST",
	        url: `${window.wingEnv.API_URL}/assistant`,
	        headers: {
	          "Content-Type": "application/json"
	        },
	        data: input
	      })
	      setInput("");
	      setIsThinking(false);
	      await retrieveAllInteractions(window.wingEnv.API_URL);

  })

    useEffect(() => {
        if (typeof window !== "undefined") {
            retrieveAllInteractions(window.wingEnv.API_URL);
        }
    }, []);

    // Here you would return your component's JSX
    return (
        // JSX content goes here
    );
}

export default App;
The retrieveAllInteractions function fetches all the questions and answers in the backend’s database. The handSubmit function sends the user’s prompt to the backend.
Let’s add the JSX implementation.
import { useEffect, useState } from 'react';
import axios from 'axios';
import './App.css';

function App() {
    // ...

    return (
        <div className="container">
            <div className="header">
                <h1>My Assistant</h1>
                <p>Ask anything...</p>
            </div>

            <div className="chat-area">
                <div className="chat-area-content">
                    {allInteractions.map((chat) => (
                        <div key={chat.id} className="user-bot-chat">
                            <p className='user-question'>{chat.question}</p>
                            <p className='response'>{chat.answer}</p>
                        </div>
                    ))}
                    <p className={isThinking ? "thinking" : "notThinking"}>Generating response...</p>
                </div>

                <div className="type-area">
                    <input
                        type="text"
                        placeholder="Ask me any question"
                        value={input}
                        onChange={(e) => setInput(e.target.value)}
                    />
                    <button onClick={handleSubmit}>Send</button>
                </div>
            </div>
        </div>
    );
}

export default App;
Navigate to your backend directory and run your Wing app locally using the following command
cd ~assistant/backend
wing it
Also run your Next.js frontend:
cd ~assistant/frontend
npm run dev
Let’s take a look at our application.
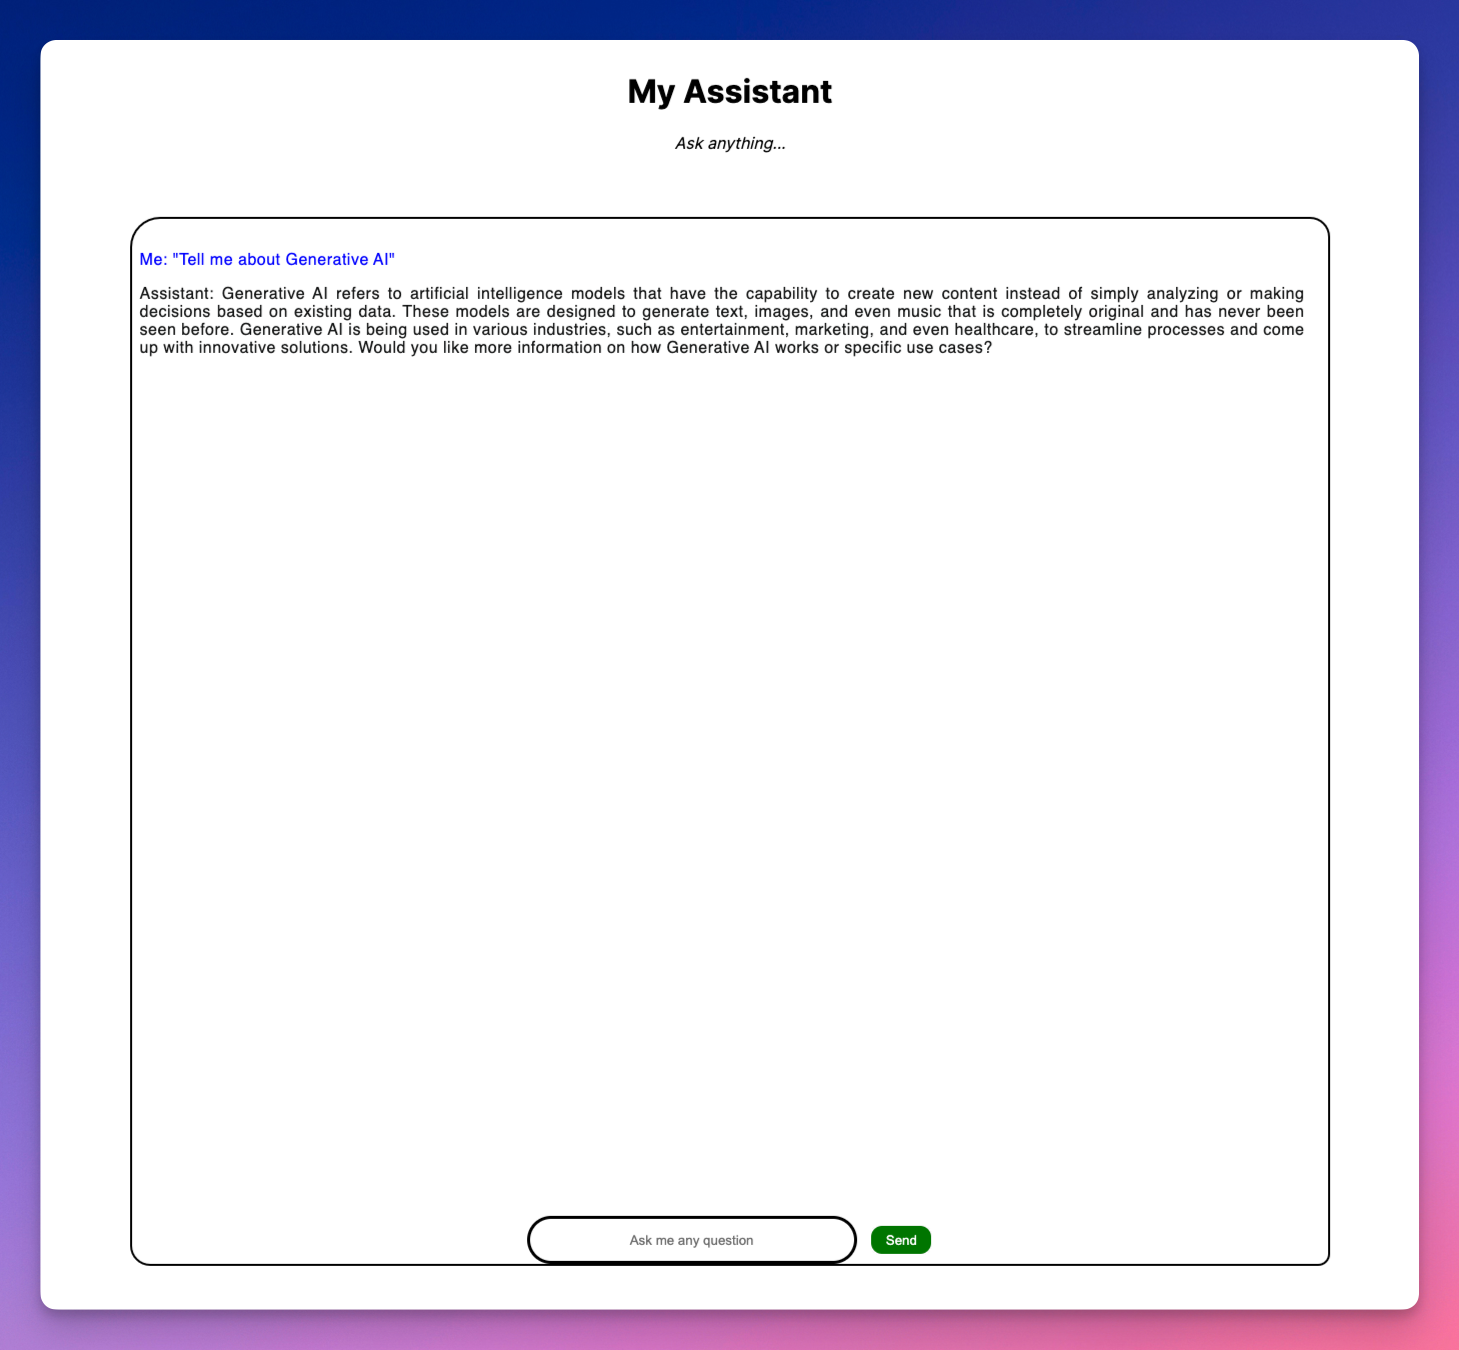
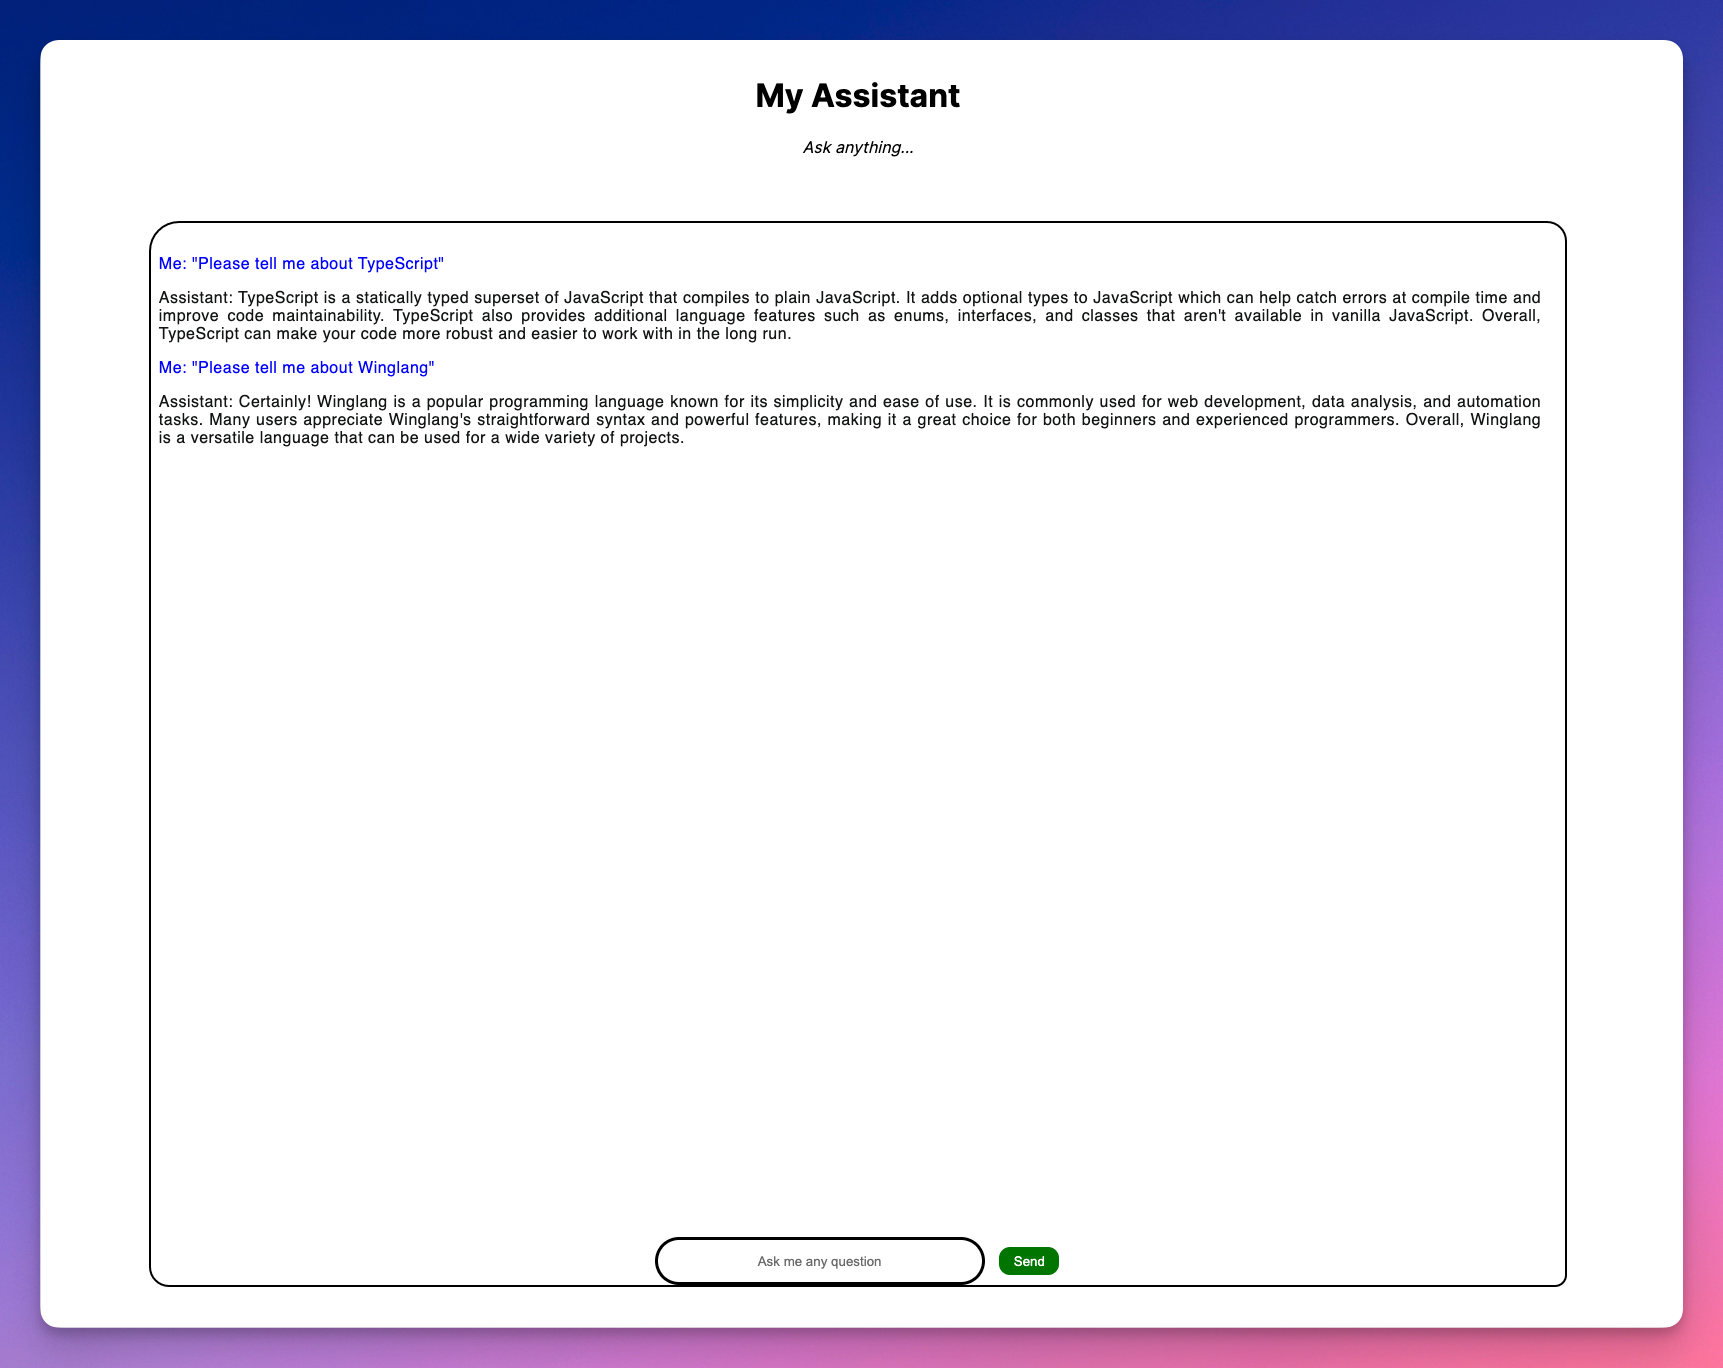
Let’s ask our AI Assistant a couple developer questions from our Next App.
We’ve seen how our app can work locally. Wing also allows you to deploy to any cloud provider including AWS. To deploy to AWS, you need Terraform and AWS CLI configured with your credentials.
tf-aws. The command instructs the compiler to use Terraform as the provisioning engine to bind all our resources to the default set of AWS resources.cd ~/assistant/backend
wing compile --platform tf-aws main.w
cd ./target/main.tfaws
terraform init
terraform apply
Note: terraform apply takes some time to complete.
You can find the complete code for this tutorial here.
As I mentioned earlier, we should all be concerned with our apps security, building your own ChatGPT client and deploying it to your cloud infrastructure gives your app some very good safeguards.
We have demonstrated in this tutorial how Wing provides a straightforward approach to building scalable cloud applications without worrying about the underlying infrastructure.
If you are interested in building more cool stuff, Wing has an active community of developers, partnering in building a vision for the cloud. We'd love to see you there.
Just head over to our Discord and say hi!
The 9th issue of the Wing Inflight Magazine.
import ReactPlayer from "react-player"; import console_new_look from "./assets/2024-03-13-magazine-008/console-new-look.mp4";
The 8th issue of the Wing Inflight Magazine.

This is an experience report on the initial steps of implementing a CRUD (Create, Read, Update, Delete) REST API in Winglang, with a focus on addressing typical production environment concerns such as secure authentication, observability, and error handling. It highlights how Winglang's distinctive features, particularly the separation of Preflight cloud resource configuration from Inflight API request handling, can facilitate more efficient integration of essential middleware components like logging and error reporting. This balance aims to reduce overall complexity and minimize the resulting code size. The applicability of various design patterns, including Pipe-and-Filters, Decorator, and Factory, is evaluated. Finally, future directions for developing a fully-fledged middleware library for Winglang are identified.
In my previous publication, I reported on my findings about the possible implementation of the Hexagonal Ports and Adapters pattern in the Winglang programming language using the simplest possible GreetingService sample application. The main conclusions from this evaluation were:
Initially, I planned to proceed with exploring possible ways of implementing a more general Staged Event-Driven Architecture (SEDA) architecture in Winglang. However, using the simplest possible GreetingService as an example left some very important architectural questions unanswered. Therefore I decided to explore in more depth what is involved in implementing a typical Create/Retrieve/Update/Delete (CRUD) service exposing standardized REST API and addressing typical production environment concerns such as secure authentication, observability, error handling, and reporting.
To prevent domain-specific complexity from distorting the focus on important architectural considerations, I chose the simplest possible TODO service with four operations:
Using this simple example allowed me to evaluate many important architectural options and to to come up with an initial prototype of a middleware library for the Winglang programming language compatible with and potentially surpassing popular libraries for mainstream programming languages, such as Middy for Node.js middleware engine for AWS Lambda and AWS Power Tools for Lambda.
Unlike my previous publication, I will not describe the step-by-step process of how I arrived at the current arrangement. Software architecture and design processes are rarely linear, especially beyond beginner-level tutorials. Instead, I will describe a starting point solution, which, while far from final, is representative enough to sense the direction in which the final framework might eventually evolve. I will outline the requirements, I wanted to address, the current architectural decisions, and highlight directions for future research.
Developing a simple, prototype-level TODO REST API service in Winglang is indeed very easy, and could be done within half an hour, using the Winglang Playground:
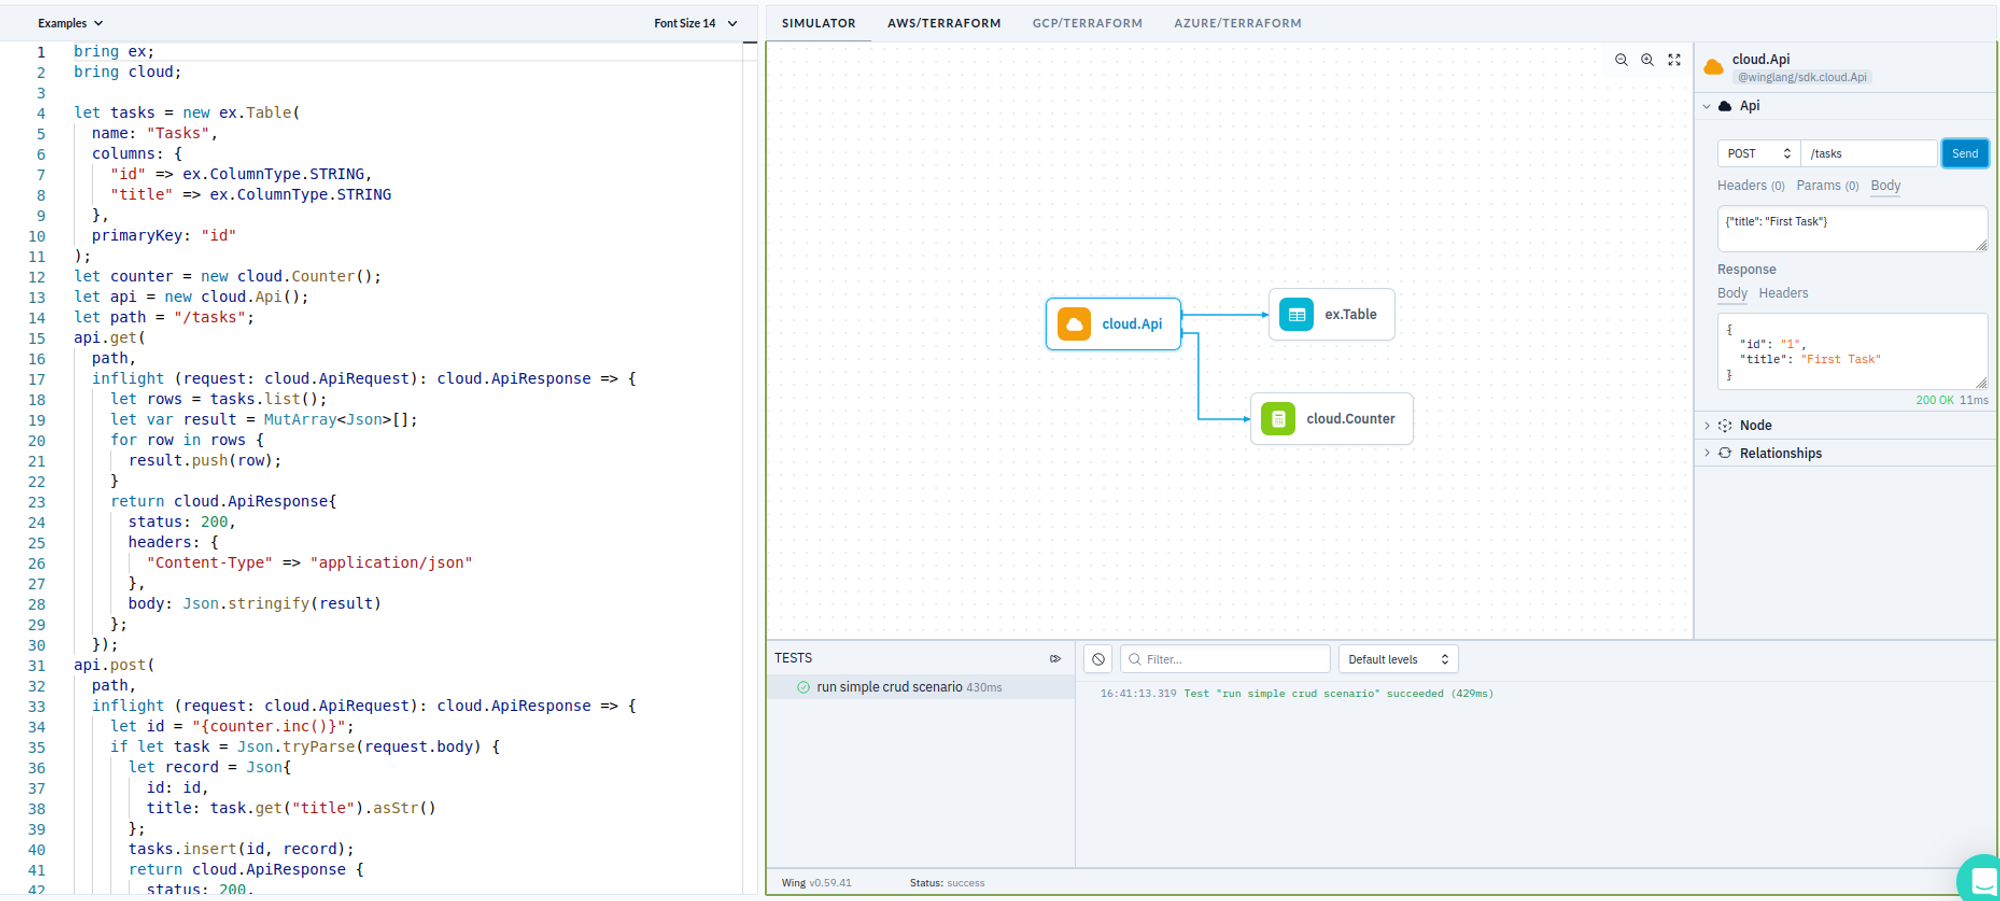
To keep things simple, I put everything in one source, even though, it of course could be split into Core, Ports, and Adapters. Let’s look at the major parts of this sample.
First, we need to define cloud resources, aka Ports, that we are going to use. This this is done as follows:
bring ex;
bring cloud;

let tasks = new ex.Table(
  name: "Tasks",
  columns: {
    "id" => ex.ColumnType.STRING,
    "title" => ex.ColumnType.STRING
  },
  primaryKey: "id"
);
let counter = new cloud.Counter();
let api = new cloud.Api();
let path = "/tasks";
Here we define a Winglang Table to keep TODO Tasks with only two columns: task ID and title. To keep things simple, we implement task ID as an auto-incrementing number using the Winglang Counter resource. And finally, we expose the TODO Service API using the Winglang Api resource.
Now, we are going to define a separate handler function for each of the four REST API requests. Getting a list of all tasks is implemented as:
api.get(
  path,
  inflight (request: cloud.ApiRequest): cloud.ApiResponse => {
    let rows = tasks.list();
    let var result = MutArray<Json>[];
    for row in rows {
      result.push(row);
    }
    return cloud.ApiResponse{
      status: 200,
      headers: {
        "Content-Type" => "application/json"
      },
      body: Json.stringify(result)
    };
  });
Creating a new task record is implemented as:
api.post(
  path,
  inflight (request: cloud.ApiRequest): cloud.ApiResponse => {
    let id = "{counter.inc()}";
    if let task = Json.tryParse(request.body) {
      let record = Json{
        id: id,
        title: task.get("title").asStr()
      };
      tasks.insert(id, record);
      return cloud.ApiResponse {
        status: 200,
        headers: {
          "Content-Type" => "application/json"
        },
        body: Json.stringify(record)
      };
    } else {
      return cloud.ApiResponse {
        status: 400,
        headers: {
          "Content-Type" => "text/plain"
        },
        body: "Bad Request"
      };
    }
  });
Updating an existing task is implemented as:
api.put(
  "{path}/:id",
  inflight (request: cloud.ApiRequest): cloud.ApiResponse => {
    let id = request.vars.get("id");
    if let task = Json.tryParse(request.body) {
      let record = Json{
        id: id,
        title: task.get("title").asStr()
      };
      tasks.update(id, record);
      return cloud.ApiResponse {
        status: 200,
        headers: {
          "Content-Type" => "application/json"
        },
        body: Json.stringify(record)
      };
    } else {
      return cloud.ApiResponse {
        status: 400,
        headers: {
          "Content-Type" => "text/plain"
        },
        body: "Bad Request"
      };
    }
  });
Finally, deleting an existing task is implemented as:
api.delete(
  "{path}/:id",
  inflight (request: cloud.ApiRequest): cloud.ApiResponse => {
    let id = request.vars.get("id");
    tasks.delete(id);
    return cloud.ApiResponse {
      status: 200,
      headers: {
        "Content-Type" => "text/plain"
      },
      body: ""
    };
  });
We could play with this API using the Winglang Simulator:
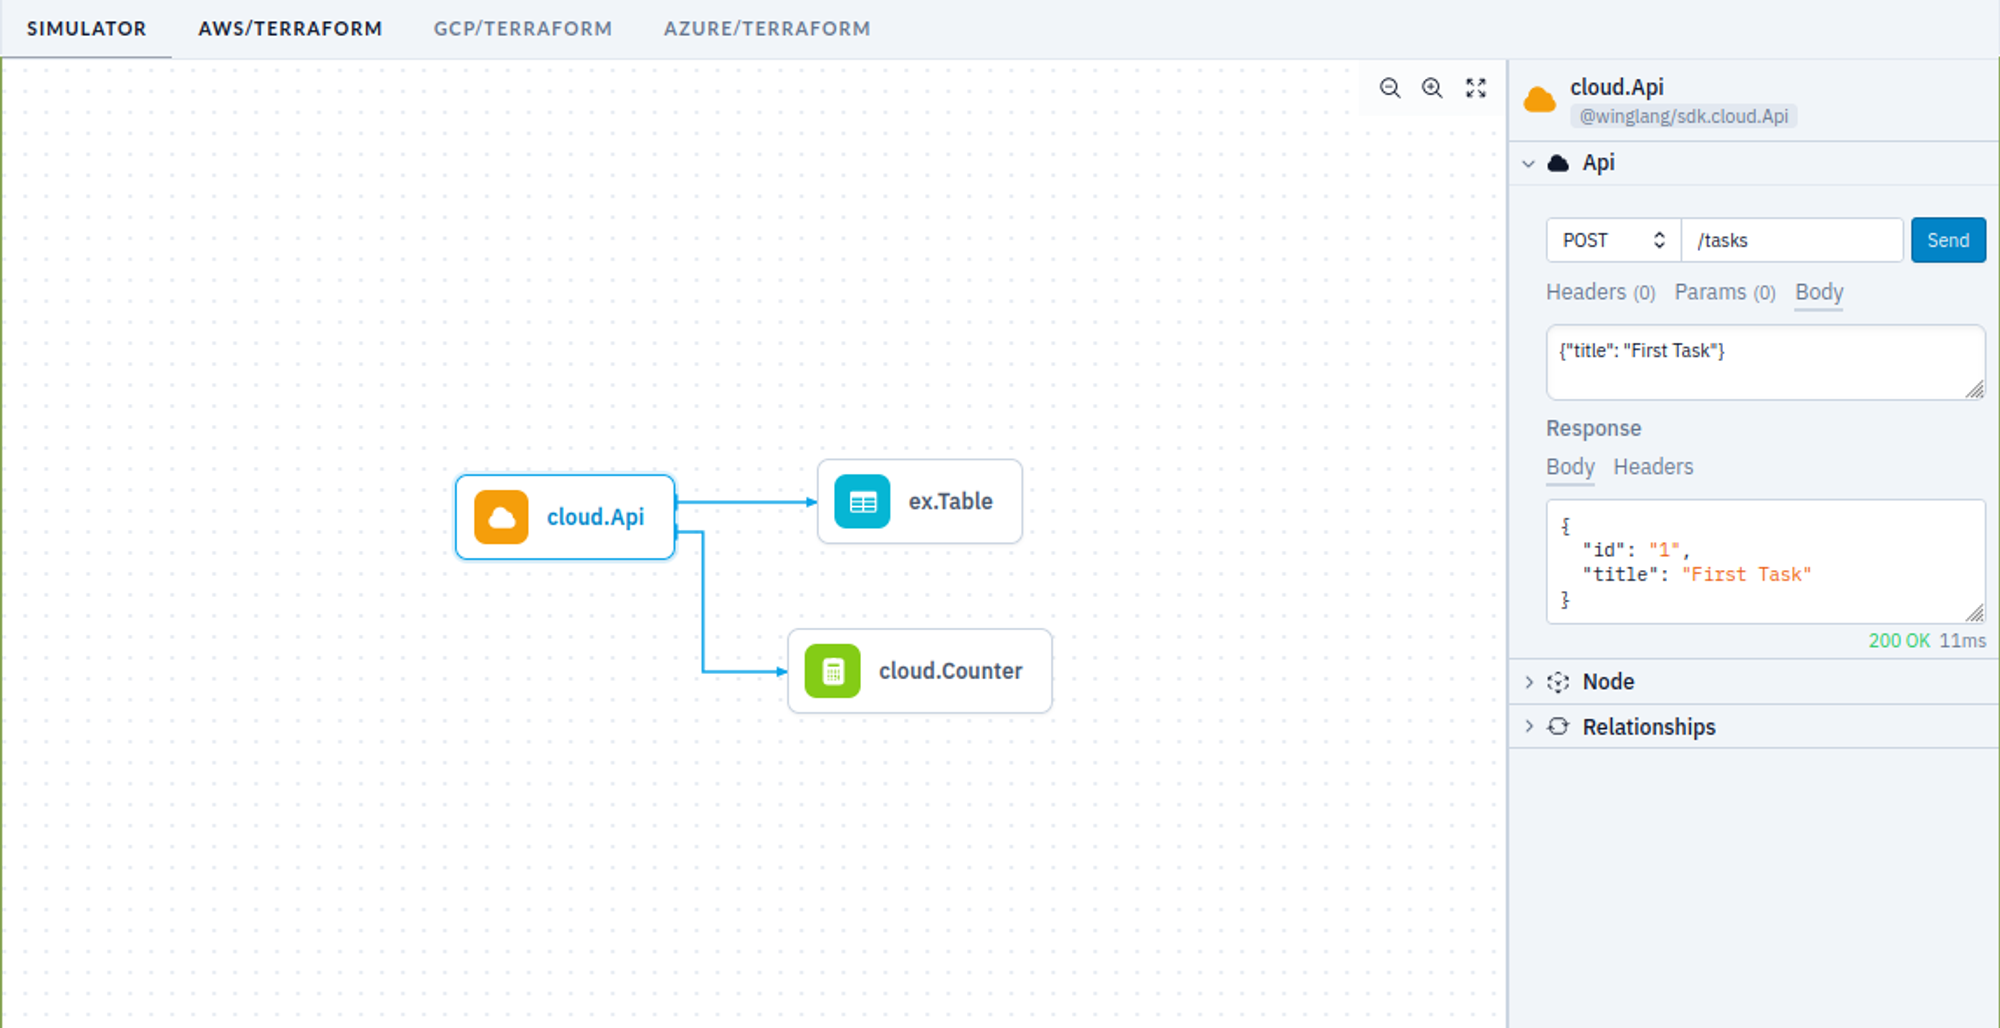
We could write one or more tests to validate the API automatically:
bring http;
bring expect;
let url = "{api.url}{path}";
test "run simple crud scenario" {
  let r1 = http.get(url);
  expect.equal(r1.status, 200);
  let r1_tasks = Json.parse(r1.body);
  expect.nil(r1_tasks.tryGetAt(0));
  let r2 = http.post(url, body: Json.stringify(Json{title: "First Task"}));
  expect.equal(r2.status, 200);
  let r2_task = Json.parse(r2.body);
  expect.equal(r2_task.get("title").asStr(), "First Task");
  let id = r2_task.get("id").asStr();
  let r3 = http.put("{url}/{id}", body: Json.stringify(Json{title: "First Task Updated"}));
  expect.equal(r3.status, 200);
  let r3_task = Json.parse(r3.body);
  expect.equal(r3_task.get("title").asStr(), "First Task Updated");
  let r4 = http.delete("{url}/{id}");
  expect.equal(r4.status, 200);
}
Last but not least, this service can be deployed on any supported cloud platform using the Winglang CLI. The code for the TODO Service is completely cloud-neutral, ensuring compatibility across different platforms without modification.
Should there be a need to expand the task details or link them to other system entities, the approach remains largely unaffected, provided the operations adhere to straightforward CRUD logic and can be executed within a 29-second timeout limit.
This example unequivocally demonstrates that the Winglang programming environment is a top-notch tool for the rapid development of such services. If this is all you need, you need not read further. What follows is a kind of White Rabbit hole of multiple non-functional concerns that need to be addressed before we can even start talking about serious production deployment.
You are warned. The forthcoming text is not for everybody, but rather for seasoned cloud software architects.

TODO sample service implementation presented above belongs to the so-called Headless REST API. This approach focuses on core functionality, leaving user experience design to separate layers. This is often implemented as Client-Side Rendering or Server Side Rendering with an intermediate Backend for Frontend tier, or by using multiple narrow-focused REST API services functioning as GraphQL Resolvers. Each approach has its merits for specific contexts.
I advocate for supporting HTTP Content Negotiation and providing a minimal UI for direct API interaction via a browser. While tools like Postman or Swagger can facilitate API interaction, experiencing the API as an end user offers invaluable insights. This basic UI, or what I refer to as an "engineering UI," often suffices.
In this context, anything beyond simple Server Side Rendering deployed alongside headless protocol serialization, such as JSON, might be unnecessarily complex. While Winglang provides support for Website cloud resource for web client assets (HTML pages, JavaScript, CSS), utilizing it for such purposes introduces additional complexity and cost.
A simpler solution would involve basic HTML templates, enhanced with HTMX's features and a CSS framework like Bootstrap. Currently, Winglang does not natively support HTML templates, but for basic use cases, this can be easily managed with TypeScript. For instance, rendering a single task line could be implemented as follows:
import { TaskData } from "core/task";

export function formatTask(path: string, task: TaskData): string {
  return `
    <li class="list-group-item d-flex justify-content-between align-items-center">
        <form hx-put="${path}/${task.taskID}" hx-headers='{"Accept": "text/plain"}' id="${task.taskID}-form">
            <span class="task-text">${task.title}</span>
            <input
                type="text"
                name="title"
                class="form-control edit-input"
                style="display: none;"
                value="${task.title}">
        </form>
        <div class="btn-group">
            <button class="btn btn-danger btn-sm delete-btn"
                hx-delete="${path}/${task.taskID}"
                hx-target="closest li"
                hx-swap="outerHTML"
                hx-headers='{"Accept": "text/plain"}'>✕</button>
            <button class="btn btn-primary btn-sm edit-btn">✎</button>
        </div>
    </li>
    `;
}
That would result in the following UI screen:
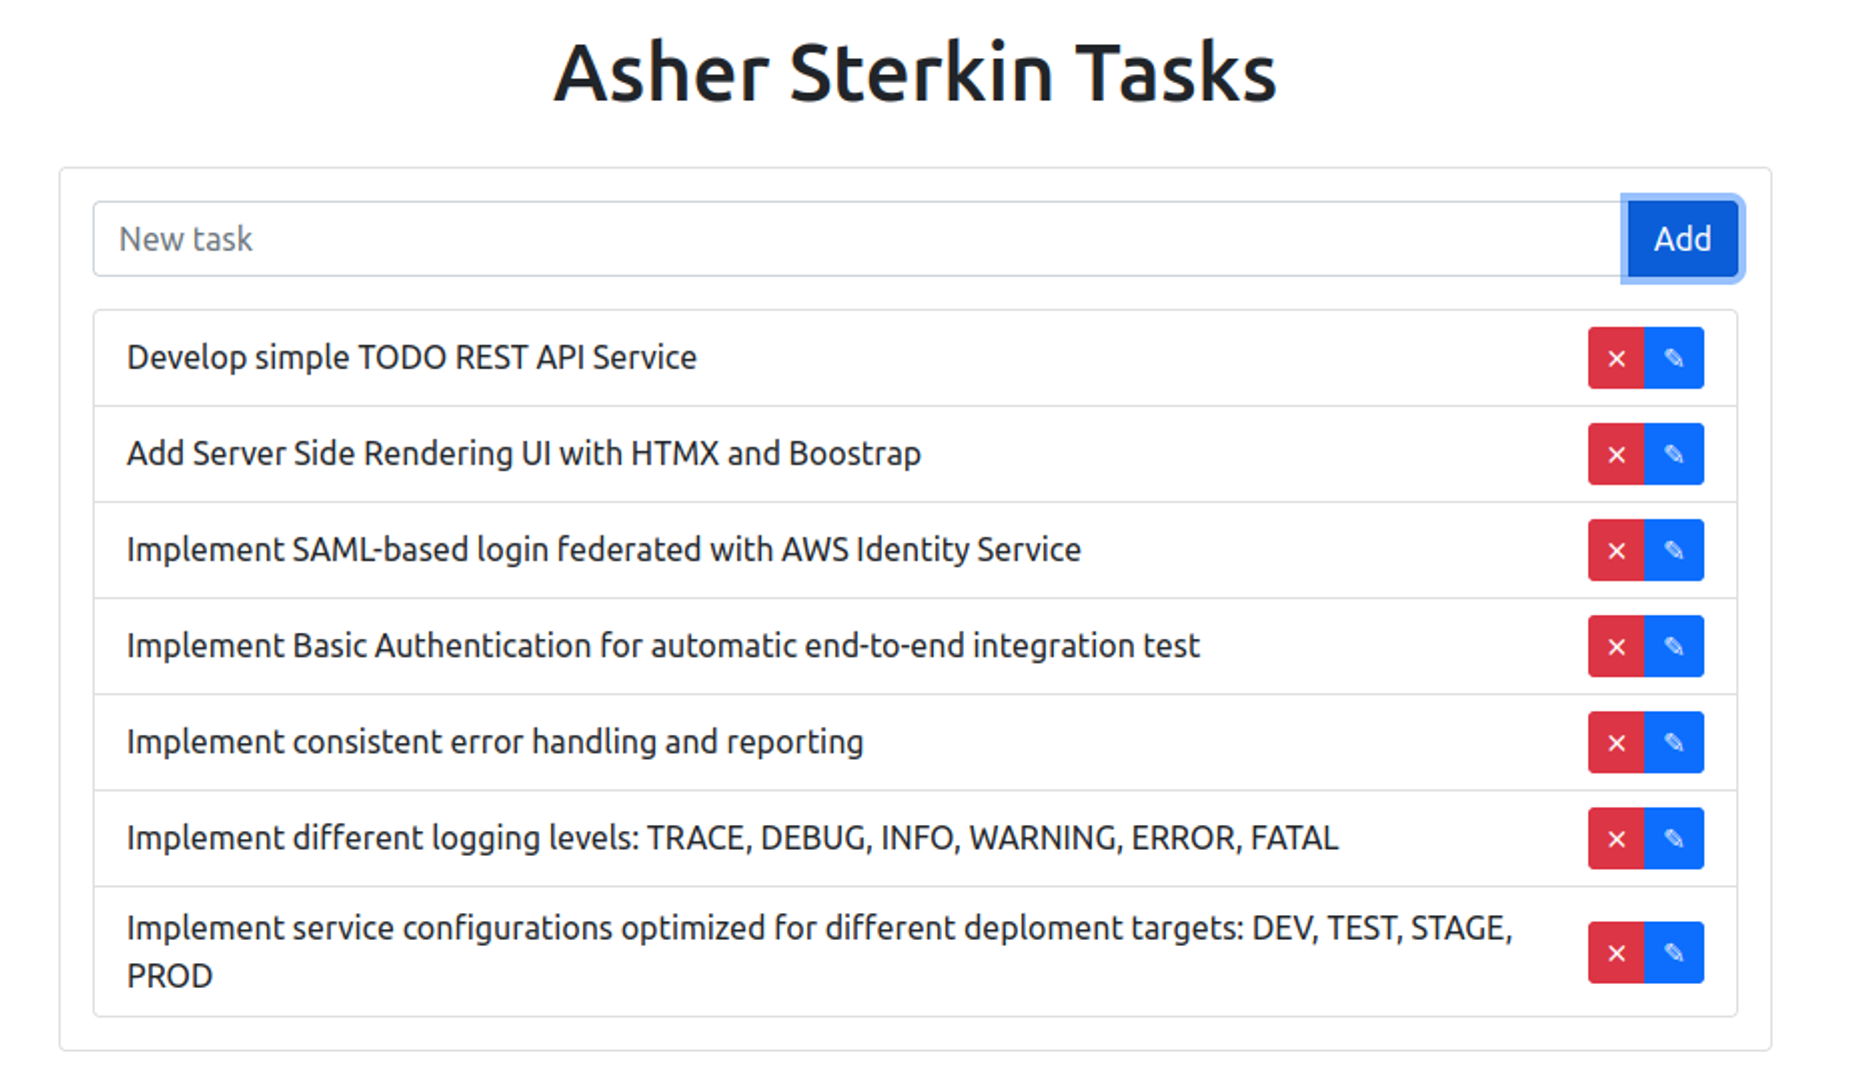
Not super-fancy, but good enough for demo purposes.
Even purely Headless REST APIs require strong usability considerations. API calls should follow REST conventions for HTTP methods, URL formats, and payloads. Proper documentation of HTTP methods and potential error handling are crucial. Client and server errors need to be logged, converted into appropriate HTTP status codes, and accompanied by clear explanation messages in the response body.
The need to handle multiple request parsers and response formatters based on content negotiation using Content-Type and Accept headers in HTTP requests led me to the following design approach:
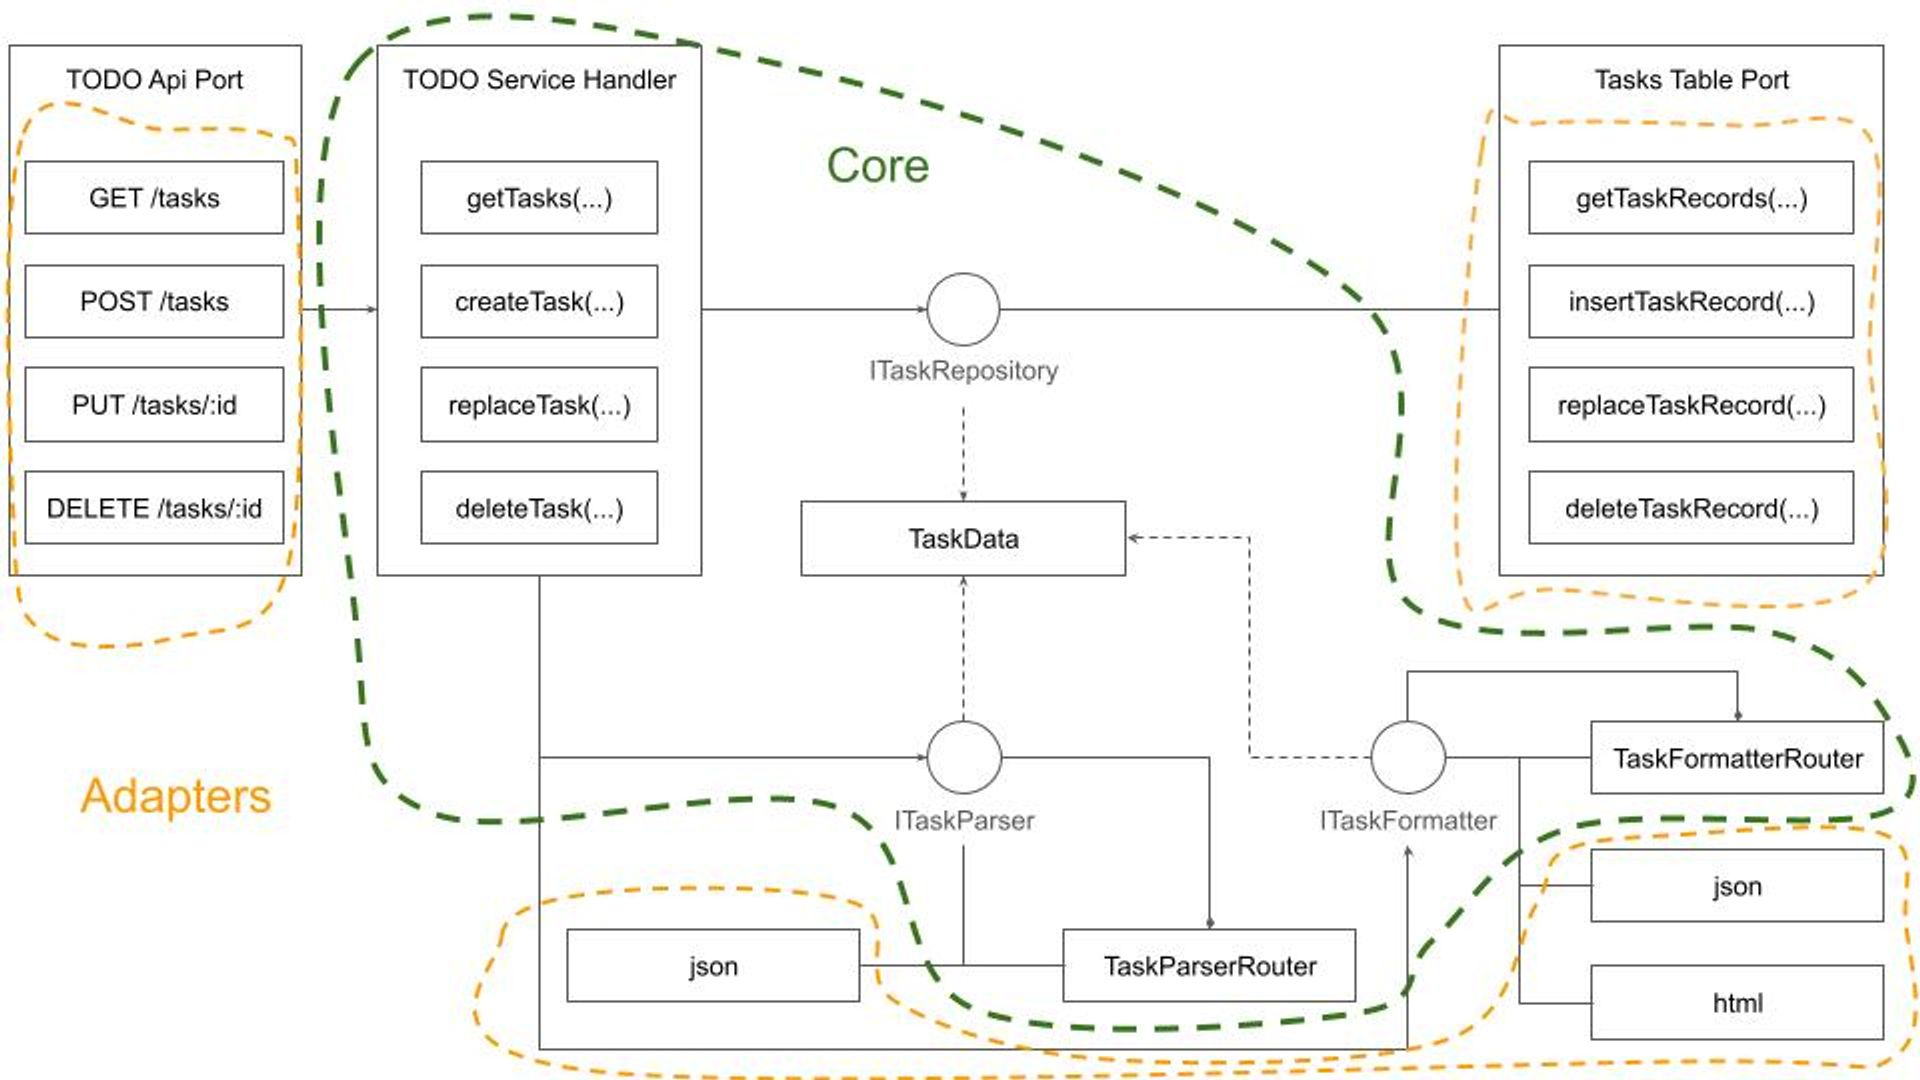
Adhering to the Dependency Inversion Principle ensures that the system Core is completely isolated from Ports and Adapters. While there might be an inclination to encapsulate the Core within a generic CRUD framework, defined by a ResourceData type, I advise caution. This recommendation stems from several considerations:
Another option would be to abandon the Core data types definition and rely entirely on untyped JSON interfaces, akin to a Lisp-like programming style. However, given Winglang's strong typing, I decided against this approach.
Overall, the TodoServiceHandler is quite simple and easy to understand:
bring "./data.w" as data;
bring "./parser.w" as parser;
bring "./formatter.w" as formatter;

pub class TodoHandler {
    _path: str;
    _parser: parser.TodoParser;
    _tasks: data.ITaskDataRepository;
    _formatter: formatter.ITodoFormatter;

    new(
        path: str,
        tasks_: data.ITaskDataRepository,
        parser: parser.TodoParser,
        formatter: formatter.ITodoFormatter,
    ) {
        this._path = path;
        this._tasks = tasks_;
        this._parser = parser;
        this._formatter = formatter;
    }

    pub inflight getHomePage(user: Json, outFormat: str): str {
        let userData = this._parser.parseUserData(user);

        return this._formatter.formatHomePage(outFormat, this._path, userData);
    }

    pub inflight getAllTasks(user: Json, query: Map<str>, outFormat: str): str {
        let userData = this._parser.parseUserData(user);
        let tasks = this._tasks.getTasks(userData.userID);

        return this._formatter.formatTasks(outFormat, this._path, tasks);
    }

    pub inflight createTask(
				user: Json,
				body: str,
				inFormat: str,
				outFormat: str
		): str {
        let taskData = this._parser.parsePartialTaskData(user, body);
        this._tasks.addTask(taskData);

        return this._formatter.formatTasks(outFormat, this._path, [taskData]);
    }

    pub inflight replaceTask(
				user: Json,
				id: str,
				body: str,
				inFormat: str,
				outFormat: str
		): str {
        let taskData = this._parser.parseFullTaskData(user, id, body);
        this._tasks.replaceTask(taskData);

        return taskData.title;
    }

    pub inflight deleteTask(user: Json, id: str): str {
        let userData = this._parser.parseUserData(user);
        this._tasks.deleteTask(userData.userID, num.fromStr(id));
        return "";
    }
}
As you might notice, the code structure deviates slightly from the design diagram presented earlier. These minor adaptations are normal in software design; new insights emerge throughout the process, necessitating adjustments. The most notable difference is the user: Json argument defined for every function. We'll discuss the purpose of this argument in the next section.
Exposing the TODO service to the internet without security measures is a recipe for disaster. Hackers, bored teens, and professional attackers will quickly target its public IP address. The rule is very simple:
any public interface must be protected unless exposed for a very short testing period. Security is non-negotiable.
Conversely, overloading a service with every conceivable security measure can lead to prohibitively high operational costs. As I've argued in previous writings, making architects accountable for the costs of their designs might significantly reshape their approach:
If cloud solution architects were responsible for the costs incurred by their systems, it could fundamentally change their design philosophy.
What we need, is a reasonable protection of the service API, not less but not more either. Since I wanted to experiment with full-stack Service Side Rendering UI my natural choice was to enforce user login at the beginning, to produce a JWT Token with reasonable expiration, say one hour, and then to use it for authentication of all forthcoming HTTP requests.
Due to the Service Side Rendering rendering specifics using HTTP Cookie to carry over the session token was a natural (to be honest suggested by ChatGPT) choice. For the Client-Side Rendering option, I might need to use the Bearer Token delivered via the HTTP Request headers Authorization field.
With session tokens now incorporating user information, I could aggregate TODO tasks by the user. Although there are numerous methods to integrate session data, including user details into the domain, I chose to focus on userID and fullName attributes for this study.
For user authentication, several options are available, especially within the AWS ecosystem:
As an independent software technology researcher, I gravitate towards the simplest solutions with the fewest components, which also address daily operational needs. Leveraging the AWS Identity Center, as detailed in a separate publication, was a logical step due to my existing multi-account/multi-user setup.
After integration, my AWS Identity Center main screen looks like this:
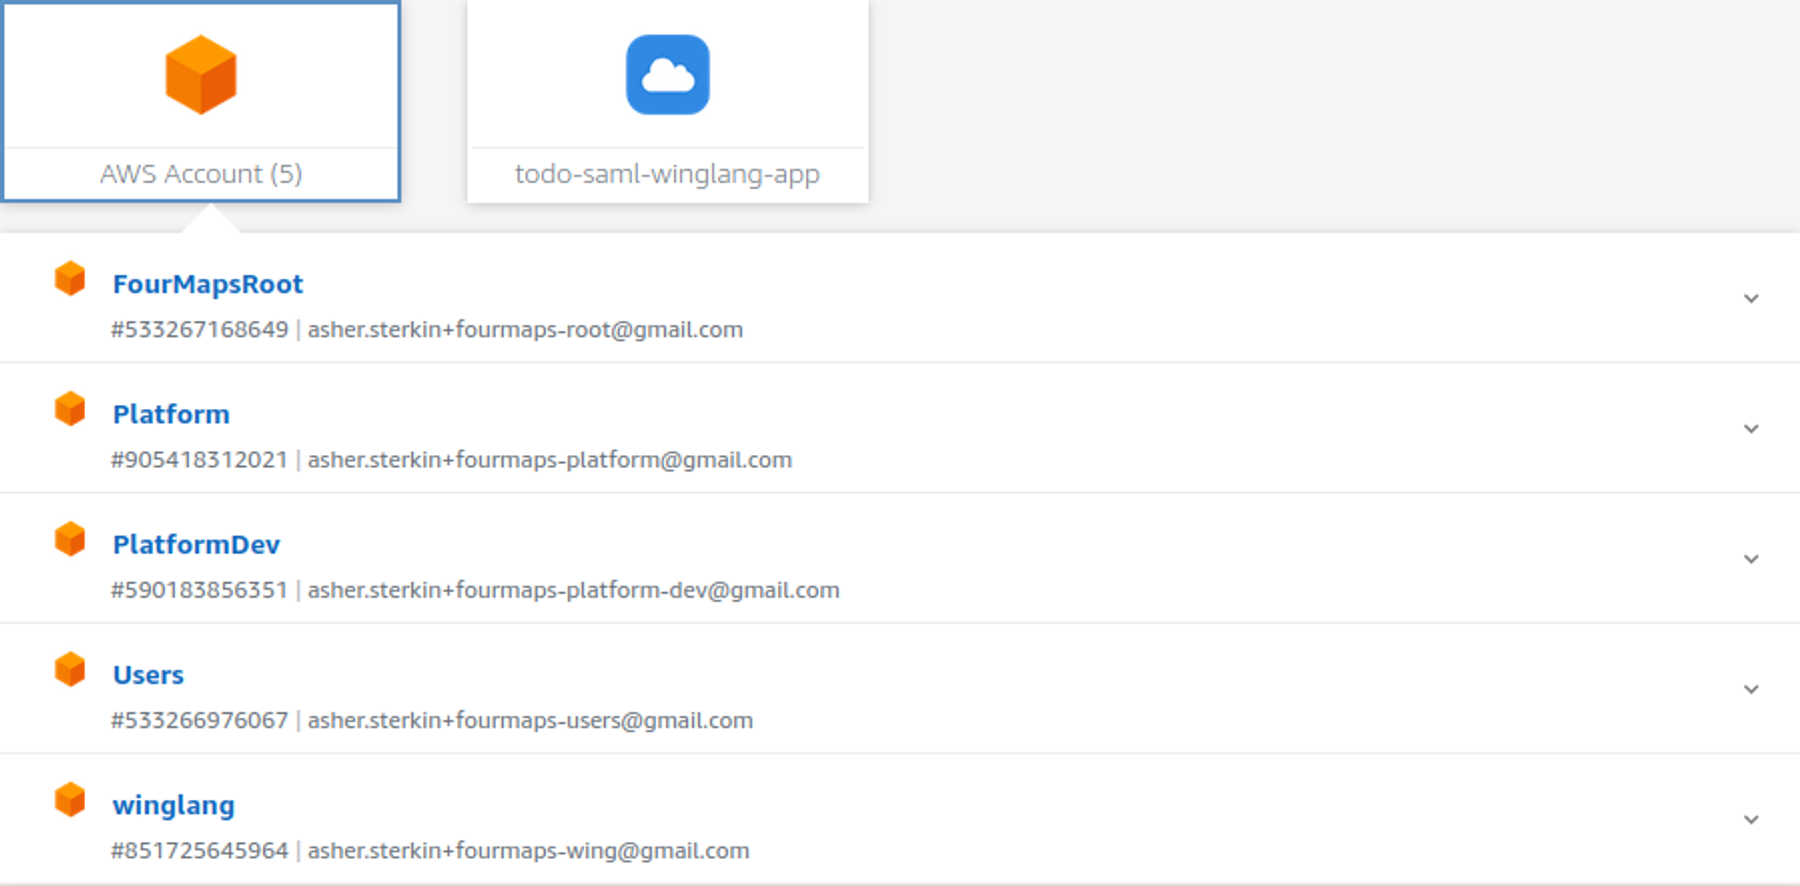
That means that in my system, users, myself, or guests, could use the same AWS credentials for development, administration, and sample or housekeeping applications.
To integrate with AWS Identity Center I needed to register my application and provide a new endpoint implementing the so-called “Assertion Consumer Service URL (ACS URL)”. This publication is not about the SAML standard. It would suffice to say that with ChatGPT and Google search assistance, it could be done. Some useful information can be found here. What came very handy was a TypeScript samlify library which encapsulates the whole heavy lifting of the SAML Login Response validation process.
What I’m mostly interested in is how this variability point affects the overall system design. Let’s try to visualize it using a semi-formal data flow notation:
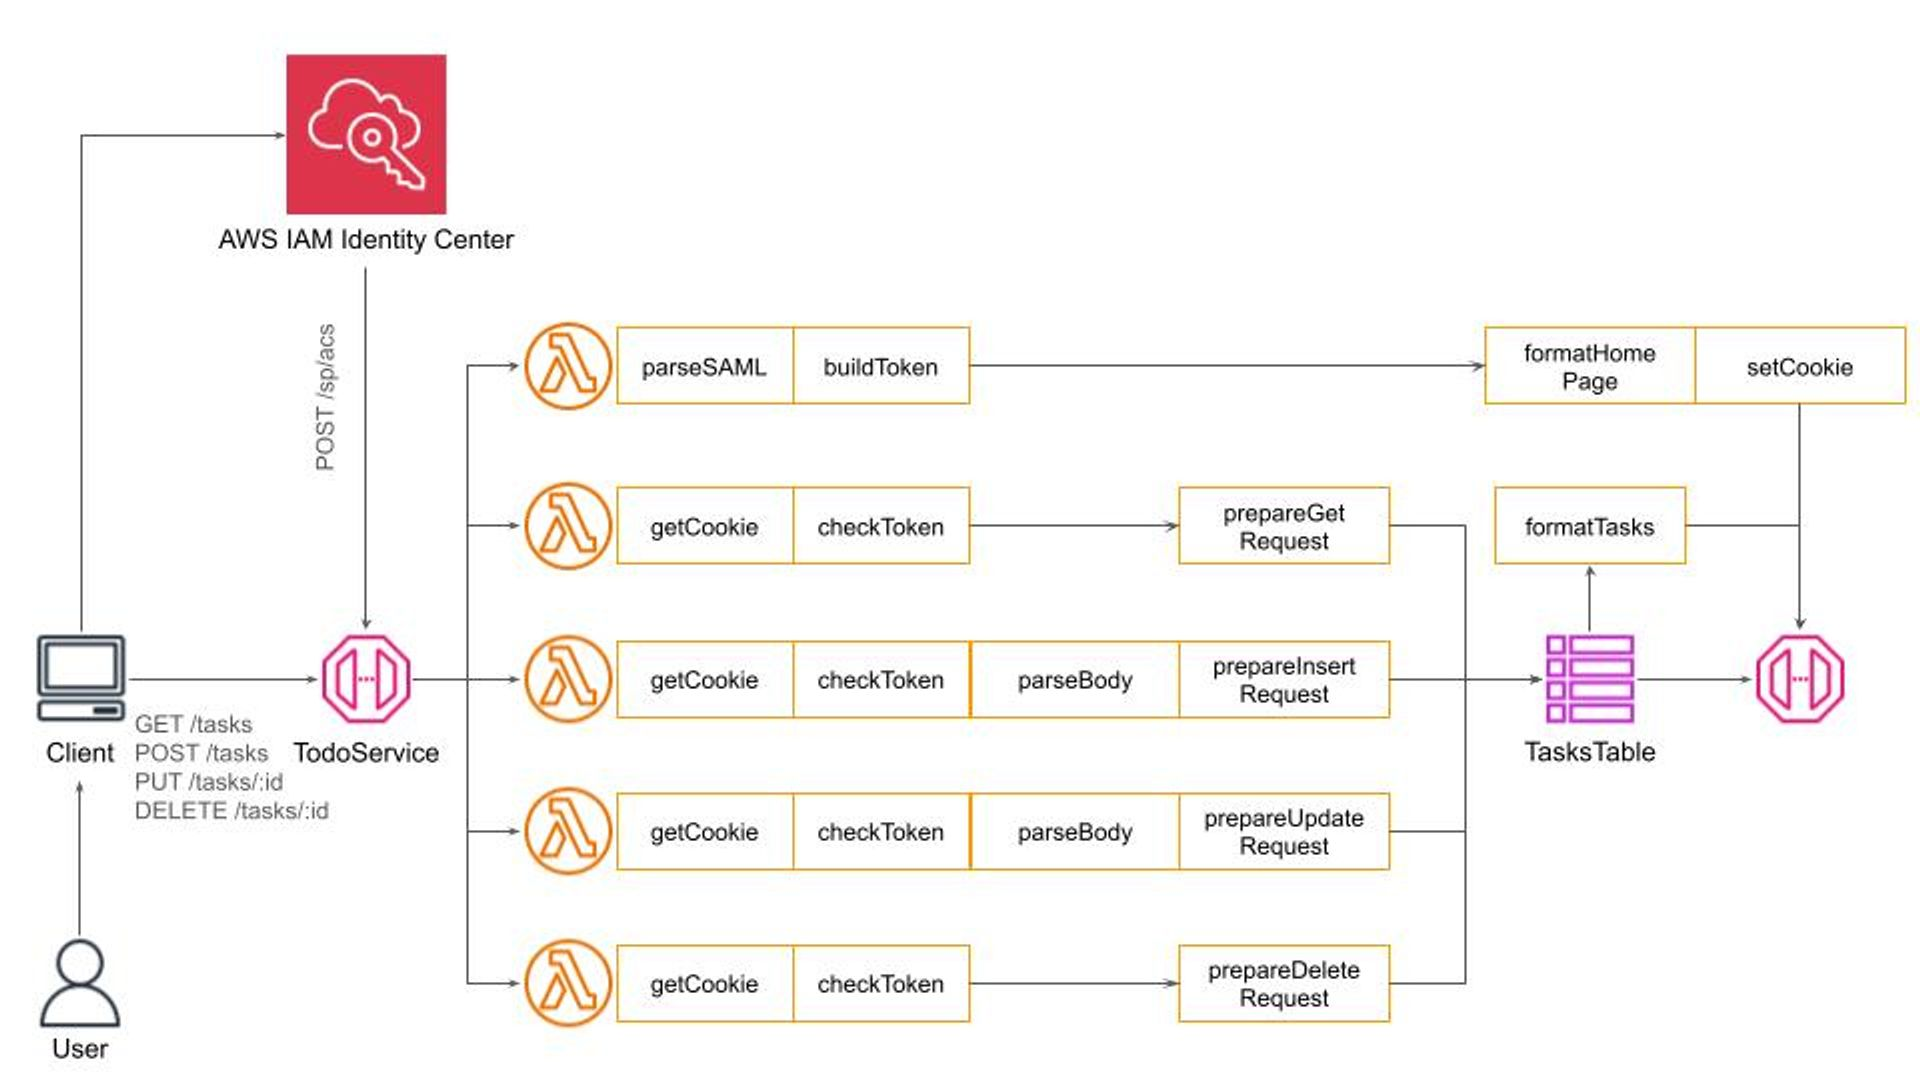
While it might seem unusual this representation reflects with high fidelity how data flows through the system. What we see here is a special instance of the famous Pipe-and-Filters architectural pattern.
Here, data flows through a pipeline and each filter performs one well-defined task in fact following the Single Responsibility Principle. Such an arrangement allows me to replace filters should I want to switch to a simple Basic HTTP Authentication, to use the HTTP Authorization header, or use a different secret management policy for JWT token building and validation.
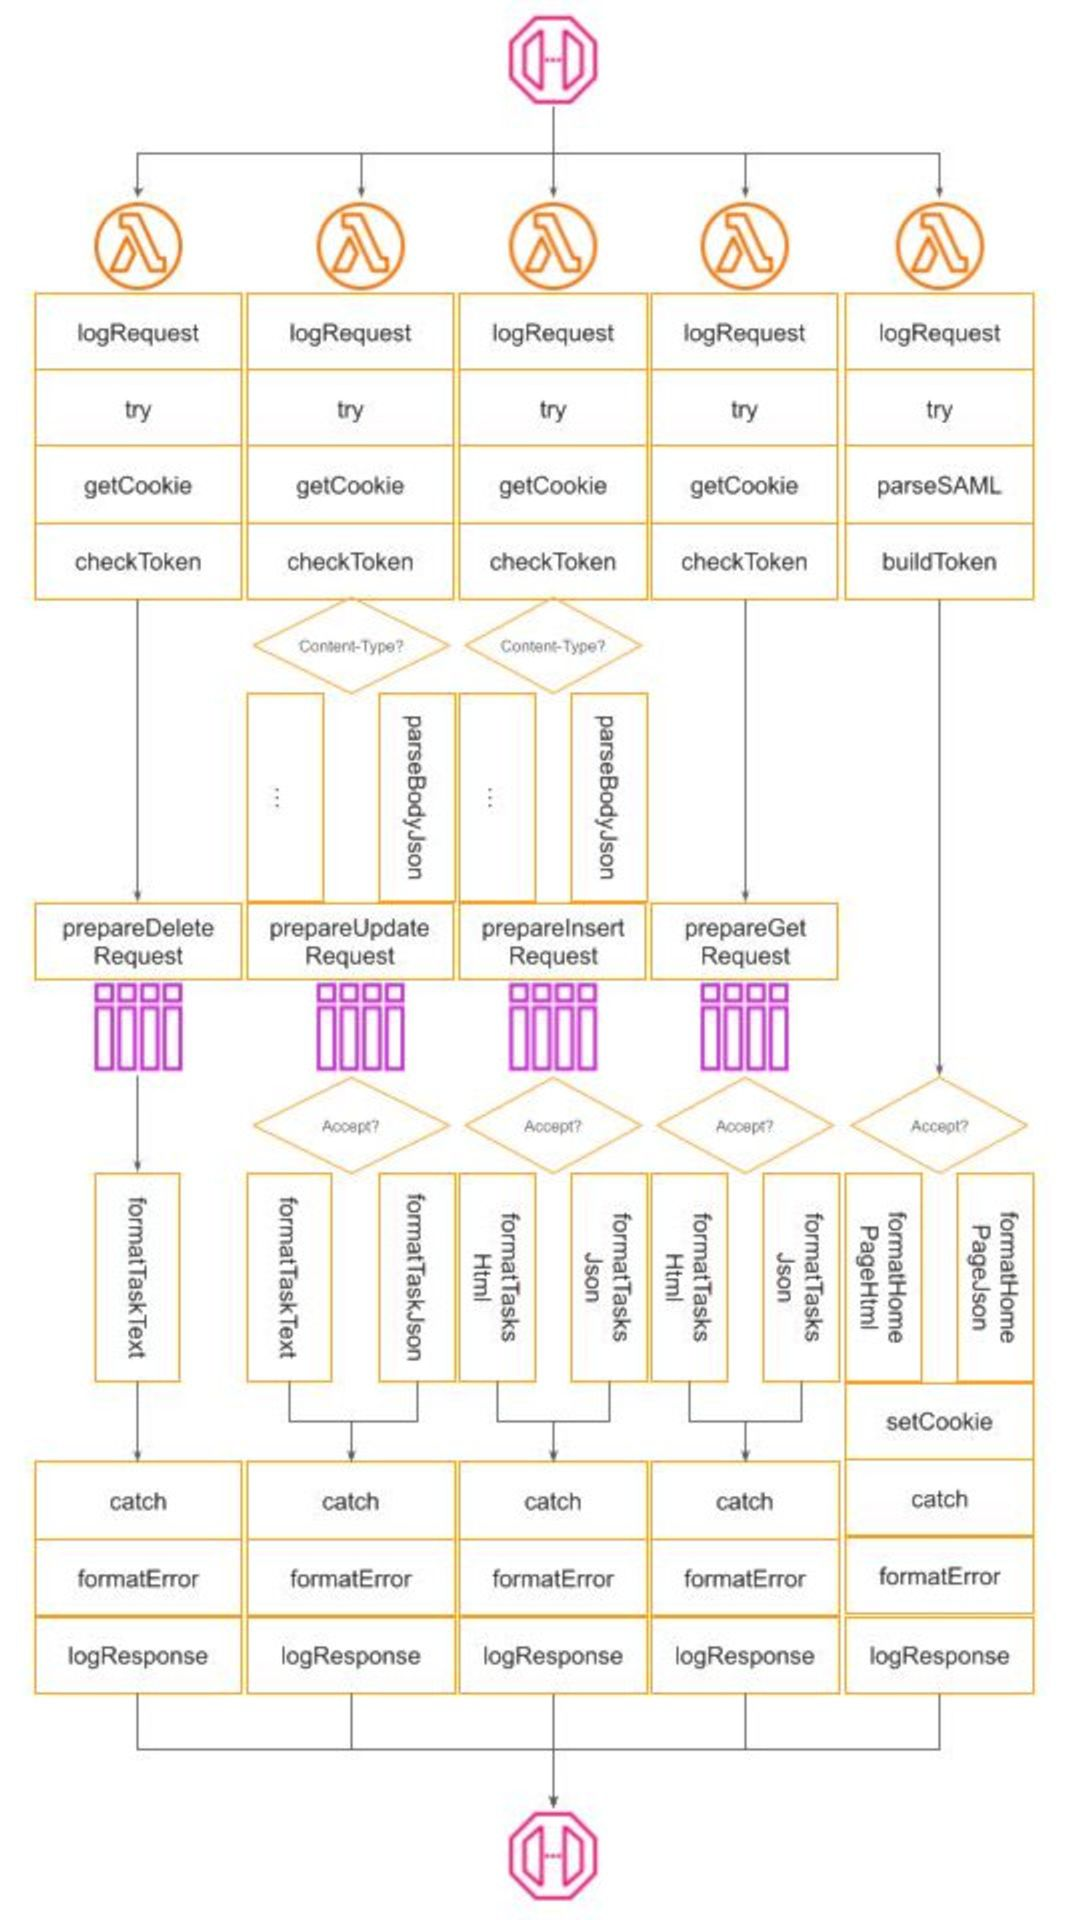
If we zoom into Parse and Format filters, we will see a typical dispatch logic using Content-Type and Accept HTTP headers respectively:

Many engineers confuse design and architectural patterns with specific implementations. This misses the essence of what patterns are meant to achieve.
Patterns are about identifying a suitable approach to balance conflicting forces with minimal intervention. In the context of building cloud-based software systems, where security is paramount but should not be overpriced in terms of cost or complexity, this understanding is crucial. The Pipe-and-Filters design pattern helps with addressing such design challenges effectively. It allows for modularization and flexible configuration of processing steps, which in this case, relate to authentication mechanisms.
For instance, while robust security measures like SAML authentication are necessary for production environments, they may introduce unnecessary complexity and overhead in scenarios such as automated end-to-end testing. Here, simpler methods like Basic HTTP Authentication may suffice, providing a quick and cost-effective solution without compromising the system's overall integrity. The goal is to maintain the system's core functionality and code base uniformity while varying the authentication strategy based on the environment or specific requirements.
Winglang's unique Preflight compilation feature facilitates this by allowing for configuration adjustments at the build stage, eliminating runtime overhead. This capability presents a significant advantage of Winglang-based solutions over other middleware libraries, such as Middy and AWS Power Tools for Lambda, by offering a more efficient and flexible approach to managing the authentication pipeline.
Implementing Basic HTTP Authentication, therefore, only requires modifying a single filter within the authentication pipeline, leaving the remainder of the system unchanged:
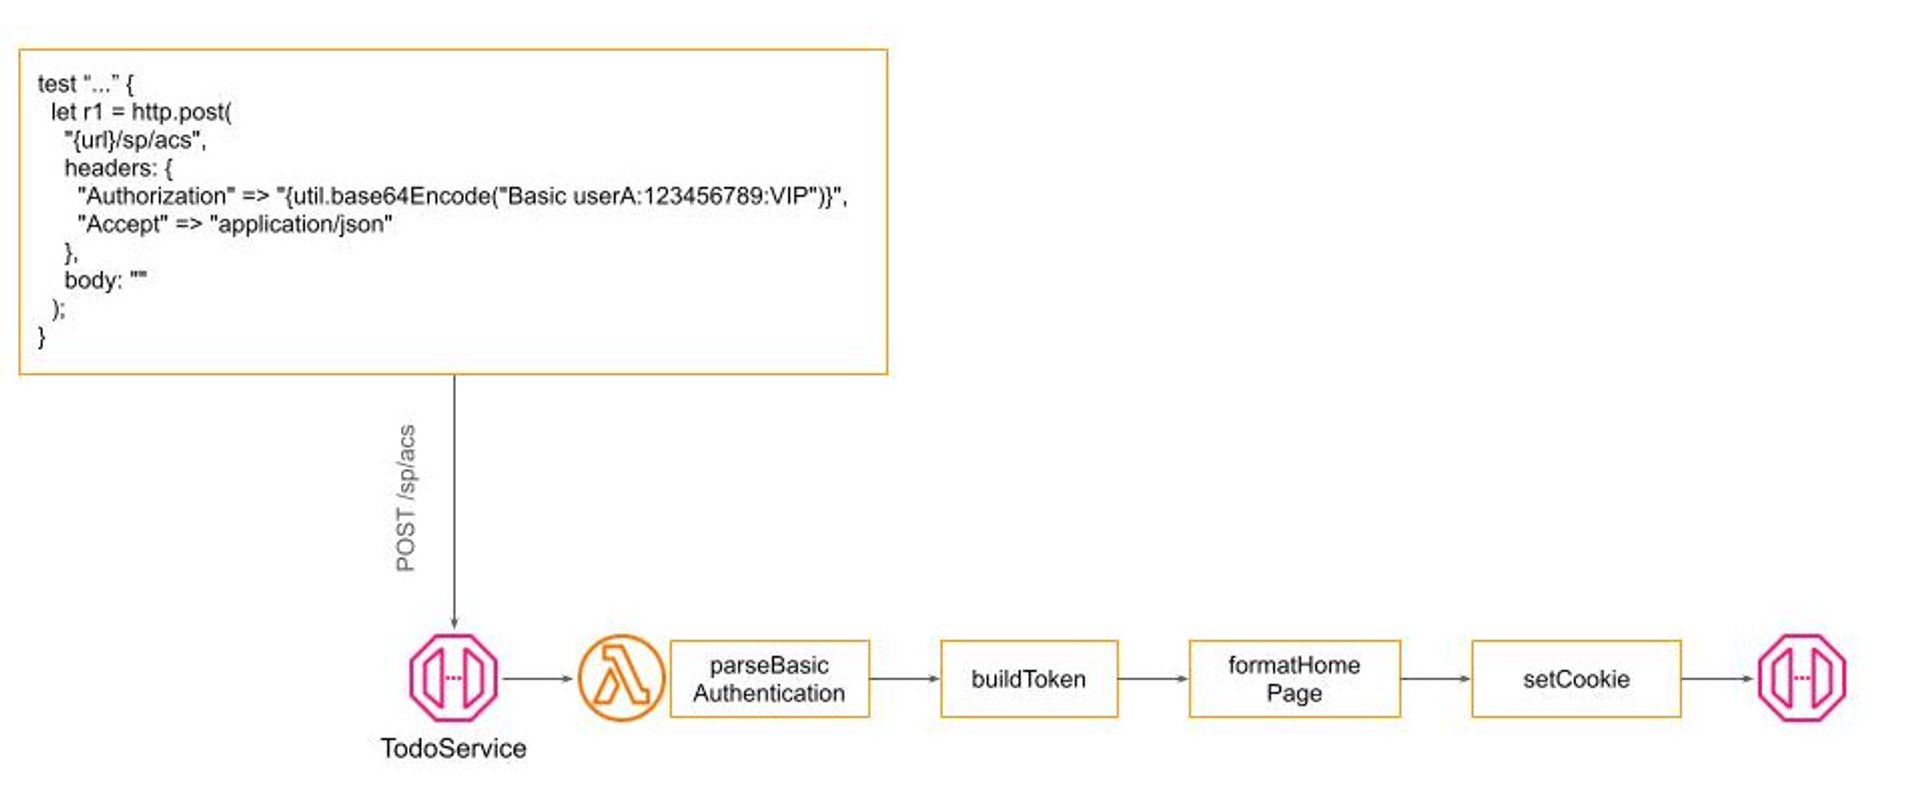
Due to some technical limitations, it’s currently not possible to implement Pipe-and-Filters in Winglang directly, but it could be quite easily simulated by a combination of Decorator and Factory design patterns. How exactly, we will see shortly. Now, let’s proceed to the next topic.
In this publication, I’m not going to cover all aspects of production operation. The topic is large and deserves a separate publication of its own. Below, is presented what I consider as a bare minimum:
To operate a service we need to know what happens with it, especially when something goes wrong. This is achieved via a Structured Logging mechanism. At the moment, Winglang provides only a basic log(str) function. For my investigation, I need more and implemented a poor man-structured logging class
// A poor man implementation of configurable Logger
// Similar to that of Python and TypeScript
bring cloud;
bring "./dateTime.w" as dateTime;

pub enum logging {
  TRACE,
  DEBUG,
  INFO,
  WARNING,
  ERROR,
  FATAL
}

//This is just enough configuration
//A serious review including compliance
//with OpenTelemetry and privacy regulations
//Is required. The main insight:
//Serverless Cloud logging is substantially
//different
pub interface ILoggingStrategy {
  inflight timestamp(): str;
  inflight print(message: Json): void;
}

pub class DefaultLoggerStrategy impl ILoggingStrategy {
  pub inflight timestamp(): str {
    return dateTime.DateTime.toUtcString(std.Datetime.utcNow());
  }
  pub inflight print(message: Json): void {
    log("{message}");
  }
}

//TBD: probably should go into a separate module
bring expect;
bring ex;

pub class MockLoggerStrategy impl ILoggingStrategy {
  _name: str;
  _counter: cloud.Counter;
  _messages: ex.Table;

  new(name: str?) {
    this._name = name ?? "MockLogger";
    this._counter = new cloud.Counter();
    this._messages = new ex.Table(
      name: "{this._name}Messages",
      columns: Map<ex.ColumnType>{
        "id" => ex.ColumnType.STRING,
        "message" => ex.ColumnType.STRING
      },
      primaryKey: "id"
    );
  }
  pub inflight timestamp(): str {
    return "{this._counter.inc(1, this._name)}";
  }
  pub inflight expect(messages: Array<Json>): void {
    for message in messages {
      this._messages.insert(
	      message.get("timestamp").asStr(),
	      Json{ message: "{message}"}
	    );
    }
  }
  pub inflight print(message: Json): void {
    let expected = this._messages.get(
	    message.get("timestamp").asStr()
	  ).get("message").asStr();
    expect.equal("{message}", expected);
  }
}

pub class Logger {
  _labels: Array<str>;
  _levels: Array<logging>;
  _level: num;
  _service: str;
  _strategy: ILoggingStrategy;

  new (level: logging, service: str, strategy: ILoggingStrategy?) {
    this._labels = [
        "TRACE",
        "DEBUG",
        "INFO",
        "WARNING",
        "ERROR",
        "FATAL"
    ];
    this._levels = Array<logging>[
      logging.TRACE,
      logging.DEBUG,
      logging.INFO,
      logging.WARNING,
      logging.ERROR,
      logging.FATAL
    ];
    this._level = this._levels.indexOf(level);
    this._service = service;
    this._strategy = strategy ?? new DefaultLoggerStrategy();
  }
  pub inflight log(level_: logging, func: str, message: Json): void {
    let level = this._levels.indexOf(level_);
    let label = this._labels.at(level);
    if  this._level <= level {
      this._strategy.print(Json {
        timestamp: this._strategy.timestamp(),
        level: label,
        service: this._service,
        function: func,
        message: message
      });
    }
  }
  pub inflight trace(func: str, message: Json): void {
    this.log(logging.TRACE, func,message);
  }
  pub inflight debug(func: str, message: Json): void {
    this.log(logging.DEBUG, func, message);
  }
  pub inflight info(func: str, message: Json): void {
    this.log(logging.INFO, func, message);
  }
  pub inflight warning(func: str, message: Json): void {
    this.log(logging.WARNING, func, message);
  }
  pub inflight error(func: str, message: Json): void {
    this.log(logging.ERROR, func, message);
  }
  pub inflight fatal(func: str, message: Json): void {
    this.log(logging.FATAL, func, message);
  }
}
There is nothing spectacular here and, as I wrote in the comments, a cloud-based logging system requires a serious revision. Still, it’s enough for the current investigation. I’m fully convinced that logging is an integral part of any service specification and has to be tested with the same rigor as core functionality. For that purpose, I developed a simple mechanism to mock logs and check them against expectations.
For a REST API CRUD service, we need to log at least three types of things:
In addition, depending on needs the original error message might need to be converted into a standard one, for example in order not to educate attackers.
How much if any details to log depends on multiple factors: deployment target, type of request, specific user, type of error, statistical sampling, etc. In development and test mode, we will normally opt for logging almost everything and returning the original error message directly to the client screen to ease debugging. In production mode, we might opt for removing some sensitive data because of regulation requirements, to return a general error message, such as “Bad Request”, without any details, and apply only statistical sample logging for particular types of requests to save the cost.
Flexible logging configuration was achieved by injecting four additional filters in every request handling pipeline:
This structure, although not an ultimate one, provides enough flexibility to implement a wide range of logging and error-handling strategies depending on the service and its deployment target specifics.
As with logs, Winglang at the moment provides only a basic throw <str> operator, so I decided to implement my version of a poor man structured exceptions:
// A poor man structured exceptions
pub inflight class Exception {
    pub tag: str;
    pub message: str?;

    new(tag: str, message: str?) {
        this.tag = tag;
        this.message = message;
    }
    pub raise() {
        let err = Json.stringify(this);
        throw err;
    }
    pub static fromJson(err: str): Exception {
        let je = Json.parse(err);

        return new Exception(
	        je.get("tag").asStr(),
	        je.tryGet("message")?.tryAsStr()
	      );
    }
    pub toJson(): Json { //for logging
        return Json{tag: this.tag, message: this.message};
    }
}

// Standard exceptions, similar to those of Python
pub inflight class KeyError extends Exception {
    new(message: str?) {
        super("KeyError", message);
    }
}
pub inflight class ValueError extends Exception {
    new(message: str?) {
        super("ValueError", message);
    }
}
pub inflight class InternalError extends Exception {
    new(message: str?) {
        super("InternalError", message);
    }
}
pub inflight class NotImplementedError extends Exception {
    new(message: str?) {
        super("NotImplementedError", message);
    }
}
//Two more HTTP-specific, yet useful
pub inflight class AuthenticationError extends Exception {
		//aka HTTP 401 Unauthorized
    new(message: str?) {
        super("AuthenticationError", message);
    }
}
pub inflight class AuthorizationError extends Exception {
		//aka HTTP 403 Forbidden
    new(message: str?) {
        super("AuthorizationError", message);
    }
}
These experiences highlight how the developer community can bridge gaps in new languages with temporary workarounds. Winglang is still evolving, but its innovative features can be harnessed for progress despite the language's age.
Now, it’s time to take a brief look at the last production topic on my list, namely
Scaling is a crucial aspect of cloud development, but it's often misunderstood. Some neglect it entirely, leading to problems when the system grows. Others over-engineer, aiming to be a "FANG" system from day one. The proclamation "We run everything on Kubernetes" is a common refrain in technical circles, regardless of whether it's appropriate for the project at hand.
Neither—neglect nor over-engineering— extreme is ideal. Like security, scaling shouldn't be ignored, but it also shouldn't be over-emphasized.
Up to a certain point, cloud platforms provide cost-effective scaling mechanisms. Often, the choice between different options boils down to personal preference or inertia rather than significant technical advantages.
The prudent path involves starting small and cost-effectively, scaling out based on real-world usage and performance data, rather than assumptions. This approach necessitates a system designed for easy configuration changes to accommodate scaling, something not inherently supported by Winglang but certainly within the realm of feasibility through further development and research. As an illustration, let's consider scaling within the AWS ecosystem:
In essence, Winglang's approach, emphasizing the Preflight and Inflight stages, holds promise for facilitating these scaling strategies, although it may still be in the early stages of fully realizing this potential. This exploration of scalability within cloud software development emphasizes starting small, basing decisions on actual data, and remaining flexible in adapting to changing requirements.
In the mid-1990s, I learned about Commonality Variability Analysis from Jim Coplien. Since then, this approach, alongside Edsger W. Dijkstra's Layered Architecture, has been a cornerstone of my software engineering practices. Commonality Variability Analysis asks: "In our system, which parts will always be the same and which might need to change?" The Open-Closed Principle dictates that variable parts should be replaceable without modifying the core system.
Deciding when to finalize the stable aspects of a system involves navigating the trade-off between flexibility and efficiency, with several stages from code generation to runtime offering opportunities for fixation. Dynamic language proponents might delay these decisions to runtime for maximum flexibility, whereas advocates for static, compiled languages typically secure crucial system components as early as possible.
Winglang, with its unique Preflight compilation phase, stands out by allowing cloud resources to be fixed early in the development process. In this publication, I explored how Winglang enables addressing non-functional aspects of cloud services through a flexible pipeline of filters, though this granularity introduces its own complexity. The challenge now becomes managing this complexity without compromising the system's efficiency or flexibility.
While the final solution is a work in progress, I can outline a high-level design that balances these forces:
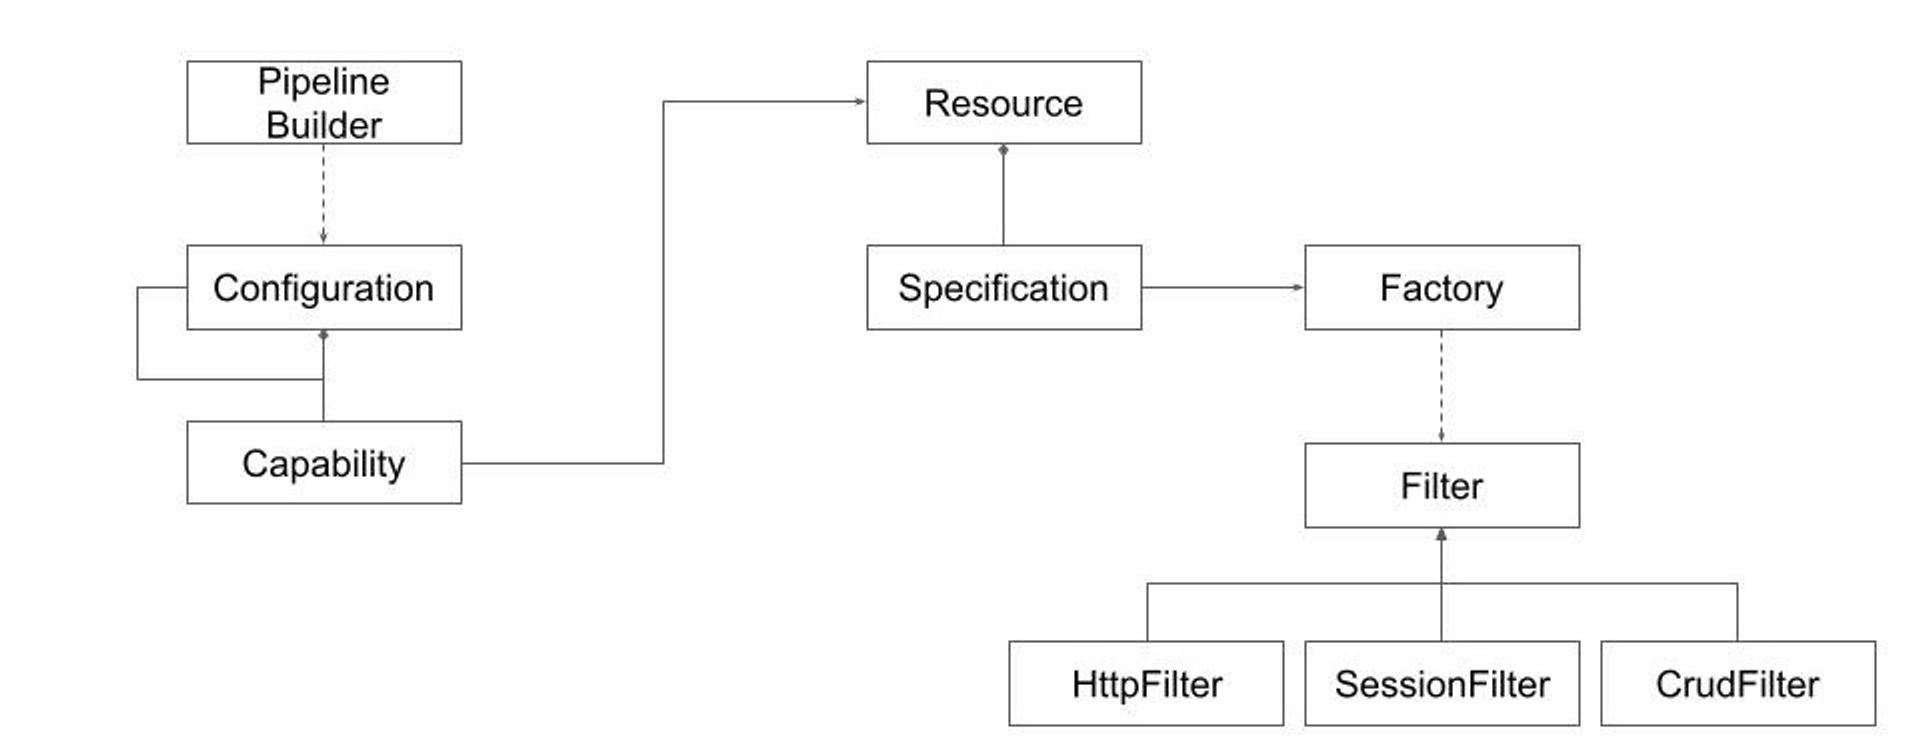
This design combines several software Design Patterns to achieve the desired balance. The process involves:
This approach shifts complexity towards implementing the Pipeline Builder machinery and Configuration specification. Experience teaches such machinery could be implemented (described for example in this publication). That normally requires some generic programming and dynamic import capabilities. Coming up with a good configuration data model is more challenging.
Recent advances in generative AI-based copilots raise new questions about achieving the most cost-efficient outcome. To understand the problem, let's revisit the traditional compilation and configuration stack:
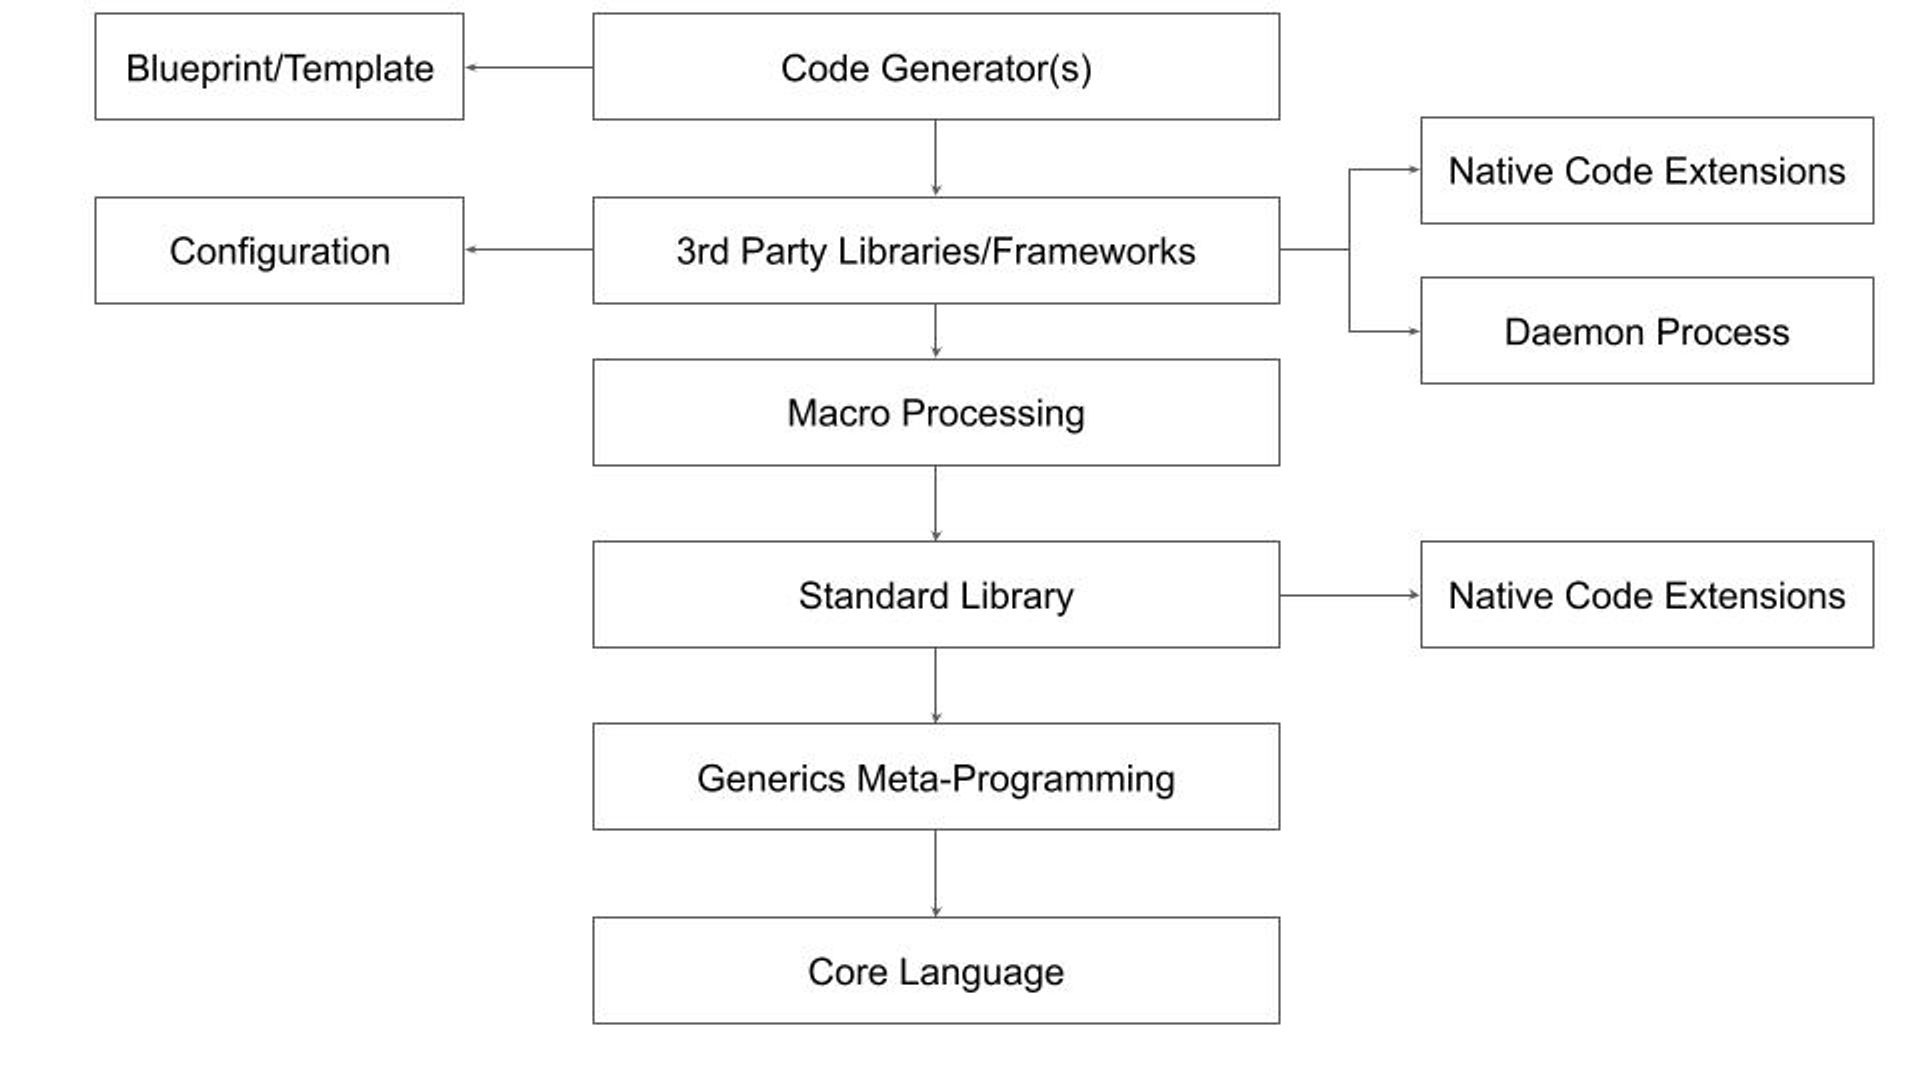
This general case may not apply to every ecosystem. Here's a breakdown of the typical layers:
This complex structure has limitations. Generics can obscure the core language, macros are unsafe, configuration files are poorly disguised scripts, and code generators rely on inflexible static templates. These limitations are why I believe the current trend of Internal Development Platforms has limited growth potential.
As we look forward to the role of generative AI in streamlining these processes, the question becomes: Can generative AI-based copilots not only simplify but also enhance our ability to balance commonality and variability in software engineering?
This is going to be the main topic of my future research to be reported in the next publications. Stay tuned.
The landscape of serverless architectures is constantly evolving - and the patterns used by developers today range from microservices, to hexagonal architectures, to multi-tier architectures, to event-based architectures (EDAs). One of the most important challenges every development team considers when designing and building their system is how well it secures their application.
In this post, we’re going to deep dive on the private API gateway pattern: including what a private API gateway entails, its distinct advantages, and why you or your team might opt for this route over other services.
Based on our team’s experience, we’ll be focusing on the capabilities available when building private API gateways on AWS using their managed VPC and API Gateway services. But many of the lessons will also apply to cloud applications built using Azure’s API Management service and other major cloud providers.
If we simplify what a private API gateway is, it's a secure means of exposing a set of APIs within a private network, typically established using a Virtual Private Cloud (VPC). Let’s first understand each of these.
An API Gateway makes it easy for developers to create, publish, maintain, monitor, and secure large numbers of API endpoints at scale. The gateway provides a central point where you can manage API throttling, authorization, API versioning, and monitoring configuration.
On the other hand, a Virtual Private Cloud (or VPC), is a mechanism for creating a logically isolated virtual networking environment. Such a virtual network parallels a network that you’d operate in your own data center, including subnets, IP addressing capabilities, routing tables, and gateways to connect to other networks.
When your API gateway is located within a VPC, you have a private API gateway. Unlike their public counterparts accessible over the internet, private API gateways are crafted to be accessed exclusively from within the specified network. This means only backend services and databases created within your organization can access the API endpoints.
Let's take a look at three common use cases.
By confining your API within a private network, you minimize exposure to potential security threats originating from a public API over the internet. For the security conscious, VPCs provide a much saner starting point for securing your application since private compute resources can simply say “allow any traffic from our private network,” reducing the need to manually manage firewalls and IP tables. In this scenario, it doesn’t really matter what you’re building - you just don’t want the public internet messing around with it!
Some compliance standards or organizational policies mandate the use of VPCs to ensure that sensitive data remains within controlled environments. For example, with regulations like HIPAA in the United States, deploying applications within VPCs is a common strategy to ensure the confidentiality and security of patient data. In these situations, cloud architectures that are designed around API endpoint usage will benefit from being able to use private API gateways.
For companies that operate in a hybrid cloud environment (a mix of public cloud and on-premises data centers), a private API gateway can manage and route traffic within the private network. This is essential for sensitive data that cannot be transferred to public clouds due to policy or regulatory reasons. Migrating applications to the cloud is made easier by the fact that modern cloud providers like AWS allow application code running within VPCs to have secure access to the common services like S3, DynamoDB, and IAM - all routed through the backbone of Amazon’s networking infrastructure.
While setting up cloud applications in private networks has many security benefits, accessing a private API from external environments, such as during development or testing phases, can be cumbersome. VPCs typically add complexity to serverless applications by increasing the amount of infrastructure that needs to be managed through tools like Terraform and CloudFormation, and may require setting up bastion hosts for debugging applications in production.
Furthermore, establishing secure connections to any networks outside of the VPC may require setting up Virtual Private Networks (VPNs) or using services like Amazon Direct Connect, which introduces extra complexity.
In the Wing Discord community, we’ve seen many developers share their advice and experiences building cloud applications of all shapes and sizes. Recently, we heard about a user’s positive experience building a cloud application with Wing that established API endpoints within their VPC through a private API Gateway. Inspired by their efforts, we extracted their solution into a template that makes it easy for anyone to turn their API gateway into a private one.
One of the biggest pains people have when using serverless is that they constantly have to wait for deployments to finish in order to test changes to their code. This is where Winglang and it's cloud simulator rocks - it allows you to develop your entire serverless application without having to deploy anything on the cloud, letting you iterate in milliseconds instead of minutes.
If you’re curious to learn more, check out our tutorial that walks you step-by-step through building a simple application with a private API gateway and deploy it to your own AWS account. If you have feedback or any other questions, let us know by dropping a comment in our community discord. Don’t be shy!

As the saying goes, there are several ways to skin a cat...in the tech world, there are 5 ways to skin a Lambda Function 🤩
As developers try to bridge the gap between development and DevOps, I thought it would be helpful to compare Programming Languages and DevTools.
Let's start with the idea of a simple function that would upload a text file to a Bucket in our cloud app.
The next step is to demonstrate several ways this could be accomplished.
Note: In cloud development, managing permissions and bucket identities, packaging runtime code, and handling multiple files for infrastructure and runtime add layers of complexity to the development process.

Let's dive into some code!
After installing Wing, let's create a file:
main.w
If you aren't familiar with the Wing Programming Language, please check out the open-source repo HERE
bring cloud;

let bucket = new cloud.Bucket();

new cloud.Function(inflight () => {
  bucket.put("hello.txt", "world!");
});
Let's do a breakdown of what's happening in the code above.
bring cloudis Wing's import syntax
Create a Cloud Bucket:
let bucket = new cloud.Bucket();initializes a new cloud bucket instance.
On the backend, the Wing platform provisions a new bucket in your cloud provider's environment. This bucket is used for storing and retrieving data.
Create a Cloud Function: The
new cloud.Function(inflight () => { ... });statement defines a new cloud function.
This function, when triggered, performs the actions defined within its body.
bucket.put("hello.txt", "world!");uploads a file named hello.txt with the content world! to the cloud bucket created earlier.
wing compile --platform tf-aws main.w
terraform apply
That's it, Wing takes care of the complexity of (permissions, getting the bucket identity in the runtime code, packaging the runtime code into a bucket, having to write multiple files - for infrastructure and runtime), etc.
Not to mention it generates IAC (TF or CF), plus Javascript that you can deploy with existing tools.
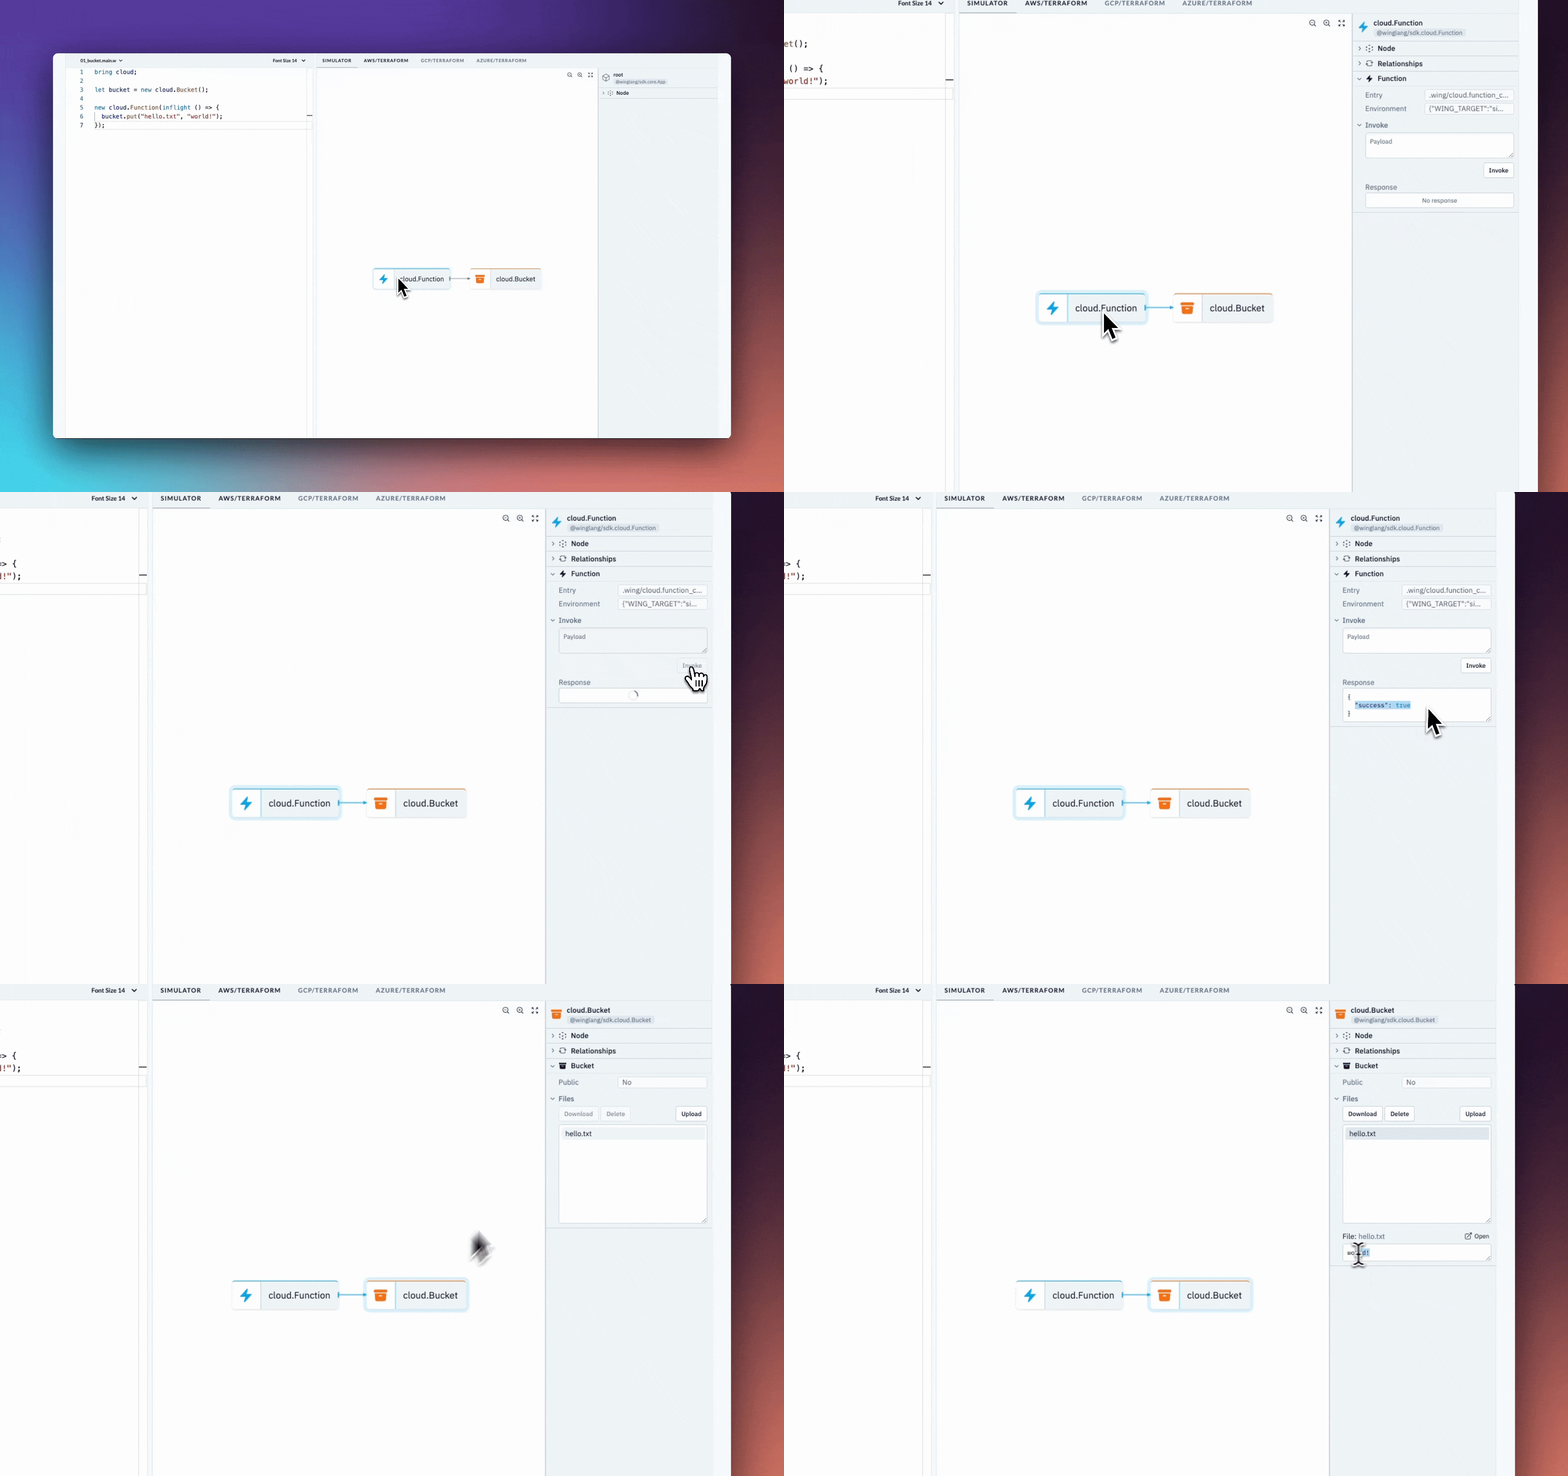
But while you develop, you can use the local simulator to get instant feedback and shorten the iteration cycles
Wing even has a playground that you can try out in the browser!
Step 1: Initialize a New Pulumi Project
mkdir pulumi-s3-lambda-ts
cd pulumi-s3-lambda-ts
pulumi new aws-typescript
Step 2. Write the code to upload a text file to S3.
This will be your project structure.
pulumi-s3-lambda-ts/
├─ src/
│  ├─ index.ts              # Pulumi infrastructure code
│  └─ lambda/
│     └─ index.ts           # Lambda function code to upload a file to S3
├─ tsconfig.json            # TypeScript configuration
└─ package.json             # Node.js project file with dependencies
Let's add this code to index.ts
import * as pulumi from "@pulumi/pulumi";
import * as aws from "@pulumi/aws";

// Create an AWS S3 bucket
const bucket = new aws.s3.Bucket("myBucket", {
  acl: "private",
});

// IAM role for the Lambda function
const lambdaRole = new aws.iam.Role("lambdaRole", {
  assumeRolePolicy: JSON.stringify({
    Version: "2023-10-17",
    Statement: [
      {
        Action: "sts:AssumeRole",
        Principal: {
          Service: "lambda.amazonaws.com",
        },
        Effect: "Allow",
        Sid: "",
      },
    ],
  }),
});

// Attach the AWSLambdaBasicExecutionRole policy
new aws.iam.RolePolicyAttachment("lambdaExecutionRole", {
  role: lambdaRole,
  policyArn: aws.iam.ManagedPolicy.AWSLambdaBasicExecutionRole,
});

// Policy to allow Lambda function to access the S3 bucket
const lambdaS3Policy = new aws.iam.Policy("lambdaS3Policy", {
  policy: bucket.arn.apply((arn) =>
    JSON.stringify({
      Version: "2023-10-17",
      Statement: [
        {
          Action: ["s3:PutObject", "s3:GetObject"],
          Resource: `${arn}/*`,
          Effect: "Allow",
        },
      ],
    })
  ),
});

// Attach policy to Lambda role
new aws.iam.RolePolicyAttachment("lambdaS3PolicyAttachment", {
  role: lambdaRole,
  policyArn: lambdaS3Policy.arn,
});

// Lambda function
const lambda = new aws.lambda.Function("myLambda", {
  code: new pulumi.asset.AssetArchive({
    ".": new pulumi.asset.FileArchive("./src/lambda"),
  }),
  runtime: aws.lambda.Runtime.NodeJS12dX,
  role: lambdaRole.arn,
  handler: "index.handler",
  environment: {
    variables: {
      BUCKET_NAME: bucket.bucket,
    },
  },
});

export const bucketName = bucket.id;
export const lambdaArn = lambda.arn;
Next, create a lambda/index.ts directory for the Lambda function code:
import { S3 } from "aws-sdk";

const s3 = new S3();

export const handler = async (): Promise<void> => {
  const bucketName = process.env.BUCKET_NAME || "";
  const fileName = "example.txt";
  const content = "Hello, Pulumi!";

  const params = {
    Bucket: bucketName,
    Key: fileName,
    Body: content,
  };

  try {
    await s3.putObject(params).promise();
    console.log(
      `File uploaded successfully at https://${bucketName}.s3.amazonaws.com/${fileName}`
    );
  } catch (err) {
    console.log(err);
  }
};
Step 3: TypeScript Configuration (tsconfig.json)
{
  "compilerOptions": {
    "target": "ES2018",
    "module": "CommonJS",
    "strict": true,
    "esModuleInterop": true,
    "skipLibCheck": true,
    "forceConsistentCasingInFileNames": true
  },
  "include": ["src/**/*.ts"],
  "exclude": ["node_modules", "**/*.spec.ts"]
}
After creating a Pulumi project, a yaml file will automatically be generated. pulumi.yaml
name: s3-lambda-pulumi
runtime: nodejs
description: A simple example that uploads a file to an S3 bucket using a Lambda function
template:
  config:
    aws:region:
      description: The AWS region to deploy into
      default: us-west-2
Ensure your lambda directory with the index.js file is correctly set up. Then, run the following command to deploy your infrastructure: pulumi up
Step 1: Initialize a New CDK Project
mkdir cdk-s3-lambda
cd cdk-s3-lambda
cdk init app --language=typescript
Step 2: Add Dependencies
npm install @aws-cdk/aws-lambda @aws-cdk/aws-s3
Step 3: Define the AWS Resources in CDK
File: index.js
import * as cdk from "@aws-cdk/core";
import * as lambda from "@aws-cdk/aws-lambda";
import * as s3 from "@aws-cdk/aws-s3";

export class CdkS3LambdaStack extends cdk.Stack {
  constructor(scope: cdk.Construct, id: string, props?: cdk.StackProps) {
    super(scope, id, props);

    // Create the S3 bucket
    const bucket = new s3.Bucket(this, "MyBucket", {
      removalPolicy: cdk.RemovalPolicy.DESTROY, // NOT recommended for production code
    });

    // Define the Lambda function
    const lambdaFunction = new lambda.Function(this, "MyLambda", {
      runtime: lambda.Runtime.NODEJS_14_X, // Define the runtime
      handler: "index.handler", // Specifies the entry point
      code: lambda.Code.fromAsset("lambda"), // Directory containing your Lambda code
      environment: {
        BUCKET_NAME: bucket.bucketName,
      },
    });

    // Grant the Lambda function permissions to write to the S3 bucket
    bucket.grantWrite(lambdaFunction);
  }
}
Step 4: Lambda Function Code
Create the same file struct as above and in the pulumi directory: index.ts
import { S3 } from 'aws-sdk';
const s3 = new S3();

exports.handler = async (event: any) => {
  const bucketName = process.env.BUCKET_NAME;
  const fileName = 'uploaded_file.txt';
  const content = 'Hello, CDK! This file was uploaded by a Lambda function!';

  try {
    const result = await s3.putObject({
      Bucket: bucketName!,
      Key: fileName,
      Body: content,
    }).promise();

    console.log(`File uploaded successfully: ${result}`);
    return {
      statusCode: 200,
      body: `File uploaded successfully: ${fileName}`,
    };
  } catch (error) {
    console.log(error);
    return {
      statusCode: 500,
      body: `Failed to upload file: ${error}`,
    };
  }
};
First, compile your TypeScript code: npm run build, then
Deploy your CDK to AWS: cdk deploy
Step 1: Initialize a New CDKTF Project
mkdir cdktf-s3-lambda-ts
cd cdktf-s3-lambda-ts
Then, initialize a new CDKTF project using TypeScript:
cdktf init --template="typescript" --local
Step 2: Install AWS Provider and Add Dependencies
npm install @cdktf/provider-aws
Step 3: Define the Infrastructure
Edit main.ts to define the S3 bucket and Lambda function:
import { Construct } from "constructs";
import { App, TerraformStack } from "cdktf";
import { AwsProvider, s3, lambdafunction, iam } from "@cdktf/provider-aws";

class MyStack extends TerraformStack {
  constructor(scope: Construct, id: string) {
    super(scope, id);

    new AwsProvider(this, "aws", { region: "us-west-2" });

    // S3 bucket
    const bucket = new s3.S3Bucket(this, "lambdaBucket", {
      bucketPrefix: "cdktf-lambda-",
    });

    // IAM role for Lambda
    const role = new iam.IamRole(this, "lambdaRole", {
      name: "lambda_execution_role",
      assumeRolePolicy: JSON.stringify({
        Version: "2023-10-17",
        Statement: [
          {
            Action: "sts:AssumeRole",
            Principal: { Service: "lambda.amazonaws.com" },
            Effect: "Allow",
          },
        ],
      }),
    });

    new iam.IamRolePolicyAttachment(this, "lambdaPolicy", {
      role: role.name,
      policyArn:
        "arn:aws:iam::aws:policy/service-role/AWSLambdaBasicExecutionRole",
    });

    const lambdaFunction = new lambdafunction.LambdaFunction(this, "MyLambda", {
      functionName: "myLambdaFunction",
      handler: "index.handler",
      role: role.arn,
      runtime: "nodejs14.x",
      s3Bucket: bucket.bucket, // Assuming the Lambda code is uploaded to this bucket
      s3Key: "lambda.zip", // Assuming the Lambda code zip file is named lambda.zip
      environment: {
        variables: {
          BUCKET_NAME: bucket.bucket,
        },
      },
    });

    // Grant the Lambda function permissions to write to the S3 bucket
    new s3.S3BucketPolicy(this, "BucketPolicy", {
      bucket: bucket.bucket,
      policy: bucket.bucket.apply((name) =>
        JSON.stringify({
          Version: "2023-10-17",
          Statement: [
            {
              Action: "s3:*",
              Resource: `arn:aws:s3:::${name}/*`,
              Effect: "Allow",
              Principal: {
                AWS: role.arn,
              },
            },
          ],
        })
      ),
    });
  }
}

const app = new App();
new MyStack(app, "cdktf-s3-lambda-ts");
app.synth();
Step 4: Lambda Function Code
The Lambda function code should be written in TypeScript and compiled into JavaScript, as AWS Lambda natively executes JavaScript. Here's an example index.ts for the Lambda function that you need to compile and zip:
import { S3 } from "aws-sdk";

const s3 = new S3();

exports.handler = async () => {
  const bucketName = process.env.BUCKET_NAME || "";
  const content = "Hello, CDKTF!";
  const params = {
    Bucket: bucketName,
    Key: `upload-${Date.now()}.txt`,
    Body: content,
  };

  try {
    await s3.putObject(params).promise();
    return { statusCode: 200, body: "File uploaded successfully" };
  } catch (err) {
    console.error(err);
    return { statusCode: 500, body: "Failed to upload file" };
  }
};
You need to compile this TypeScript code to JavaScript, zip it, and upload it to the S3 bucket manually or using a script.
Ensure the s3Key in the LambdaFunction resource points to the correct zip file in the bucket.
Compile your project using npm run build
Generate Terraform Configuration Files
Run the cdktf synth command. This command executes your CDKTF app, which generates Terraform configuration files (*.tf.json files) in the cdktf.out directory:
Deploy Your Infrastructure
cdktf deploy
Step 1: Terraform Setup
Define your AWS Provider and S3 Bucket Create a file named main.tf with the following:
provider "aws" {
  region = "us-west-2" # Choose your AWS region
}

resource "aws_s3_bucket" "lambda_bucket" {
  bucket_prefix = "lambda-upload-bucket-"
  acl           = "private"
}

resource "aws_iam_role" "lambda_execution_role" {
  name = "lambda_execution_role"

  assume_role_policy = jsonencode({
    Version = "2023-10-17"
    Statement = [
      {
        Action = "sts:AssumeRole"
        Effect = "Allow"
        Principal = {
          Service = "lambda.amazonaws.com"
        }
      },
    ]
  })
}

resource "aws_iam_policy" "lambda_s3_policy" {
  name        = "lambda_s3_policy"
  description = "IAM policy for Lambda to access S3"

  policy = jsonencode({
    Version = "2023-10-17"
    Statement = [
      {
        Action   = ["s3:PutObject", "s3:GetObject"],
        Effect   = "Allow",
        Resource = "${aws_s3_bucket.lambda_bucket.arn}/*"
      },
    ]
  })
}

resource "aws_iam_role_policy_attachment" "lambda_s3_access" {
  role       = aws_iam_role.lambda_execution_role.name
  policy_arn = aws_iam_policy.lambda_s3_policy.arn
}

resource "aws_lambda_function" "uploader_lambda" {
  function_name = "S3Uploader"

  s3_bucket = "YOUR_DEPLOYMENT_BUCKET_NAME" # Set your deployment bucket name here
  s3_key    = "lambda.zip" # Upload your ZIP file to S3 and set its key here

  handler = "index.handler"
  role    = aws_iam_role.lambda_execution_role.arn
  runtime = "nodejs14.x"

  environment {
    variables = {
      BUCKET_NAME = aws_s3_bucket.lambda_bucket.bucket
    }
  }
}
Step 2: Lambda Function Code (TypeScript)
Create a TypeScript file index.ts for the Lambda function:
import { S3 } from 'aws-sdk';

const s3 = new S3();

exports.handler = async (event: any) => {
  const bucketName = process.env.BUCKET_NAME;
  const fileName = `uploaded-${Date.now()}.txt`;
  const content = 'Hello, Terraform and AWS Lambda!';

  try {
    await s3.putObject({
      Bucket: bucketName!,
      Key: fileName,
      Body: content,
    }).promise();

    console.log('Upload successful');
    return {
      statusCode: 200,
      body: JSON.stringify({ message: 'Upload successful' }),
    };
  } catch (error) {
    console.error('Upload failed:', error);
    return {
      statusCode: 500,
      body: JSON.stringify({ message: 'Upload failed' }),
    };
  }
};
Finally after uploading your Lambda function code to the specified S3 bucket, run terraform apply.
I hope you enjoyed this comparison of five simple ways to write a function in our cloud app that uploads a text file to a Bucket.
As you can see, most of the code becomes very complex, except for Wing.
If you are intrigued about Wing and like how we are simplifying the process of cloud development, please join our community and reach out to us on Twitter.
As I argued elsewhere, automatically generating cloud infrastructure specifications directly from application code represents “The Next Logical Step in Cloud Automation.” This approach, sometimes referred to as “Infrastructure From Code” (IfC), aims to:
Ensure automatic coordination of four types of interactions with cloud services: life cycle management, pre- and post-configuration, consumption, and operation, while making pragmatic choices of the most appropriate levels of API abstraction for each cloud service and leaving enough control to the end-user for choosing the most suitable vendor, based on personal preferences, regulations or brownfield deployment constraints
While analyzing the IfC Technology Landscape a year ago, I identified five attributes essential for analyzing major offerings in this space:
At that time, Winglang appeared on my radar as a brand-new cloud programming-oriented language running atop the NodeJS runtime. It comes with an optional plugin for VSCode, its own console, and fully supports cloud self-hosting via popular cloud orchestration engines such as Terraform and AWS CDK.
Today, I want to explore how well Winglang is suited for supporting the Clean Architecture style, based on the Hexagonal Ports and Adapters pattern. Additionally, I’m interested in how easily Winglang can be integrated with TypeScript, a representative of mainstream programming languages that can be compiled into JavaScript and run atop the NodeJS runtime engine.
This publication is a technology research report. While it could potentially be converted into a tutorial, it currently does not serve as one. The code snippets in Winglang are intended to be self-explanatory. The language syntax falls within the common Algol-60 family and is, in most cases, straightforward to understand. In instances of uncertainty, please consult the Winglang Language Reference, Library, and Examples. For introductory materials, refer to the References.
Many thanks to Elad Ben-Israel, Shai Ber, and Nathan Tarbert for the valuable feedback on the early draft of this paper.
Creating the simplest possible “Hello, World!” application is a crucial, yet often overlooked, validation step in new software technology. Although such an application lacks practical utility, it reveals the general accessibility of the technology to newcomers. As a marketing wit once told me, “We have only one chance to make a first impression.” So, let’s begin with a straightforward one-liner in Winglang.
About Winglang: Winglang is an innovative cloud-oriented programming language designed to simplify cloud application development. It integrates seamlessly with cloud services, offering a unique approach to building and deploying applications directly in the cloud environment. This makes Winglang an intriguing option for developers looking to leverage cloud capabilities more effectively.
Installing Winglang is straightforward, assuming you already have npm and terraform installed and configured on your computer. As a technology researcher, I primarily work with remote desktops. Therefore, I won’t delve into the details of preparing your workstation here. My personal setup, once stabilized, will be shared in a separate publication.
My first step is to create a one-line application that prints the sentence “Hello, Winglang!” In Winglang, this is indeed could be done in a single line:
log(“Hello, Winglang!”);
However, to execute this one line of code, we need to compile it by typing wing compile:
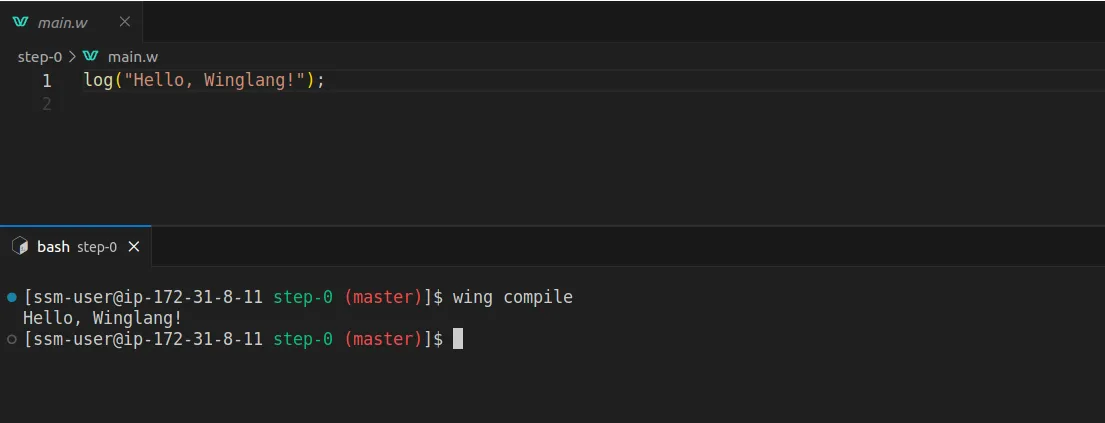
Winglang adopts an intriguing approach by distinctly separating the phases of programmatic definition of cloud resources during compilation and their use during runtime. This is articulated in Winglang as Preflight and Inflight execution phases.
Simply put, the Preflight phase occurs when application code is compiled into a target orchestration engine template, such as a local simulator or Terraform, while the Inflight phase is when the application code executes within a Cloud Function or Container.
The ability to use the same syntax for programming the compilation phase and even print logs is quite a unique feature. For comparison, consider the ability to use the same syntax for programming “C” macros or C++ templates to print debugging logs of the compilation phase, just as you would program the runtime phase.
Now, I aim to create the simplest possible application that prints the sentence “Hello, Winglang!” during runtime, that is during the Inflight phase. In Winglang, accomplishing this requires just a couple of lines, similar to what you’d expect in any mainstream programming language:
bring cloud;

log("Hello, Winglang, Preflight!");

let helloWorld = new cloud.Function(inflight (event: str) => {
    log("Hello, Winglang!");
});
By typing wing it in the VSCode Terminal, you can bring up the Winglang simulator (I prefer the preview in the editor). Click on cloud.Function, then on Invoke, and you will see the following:
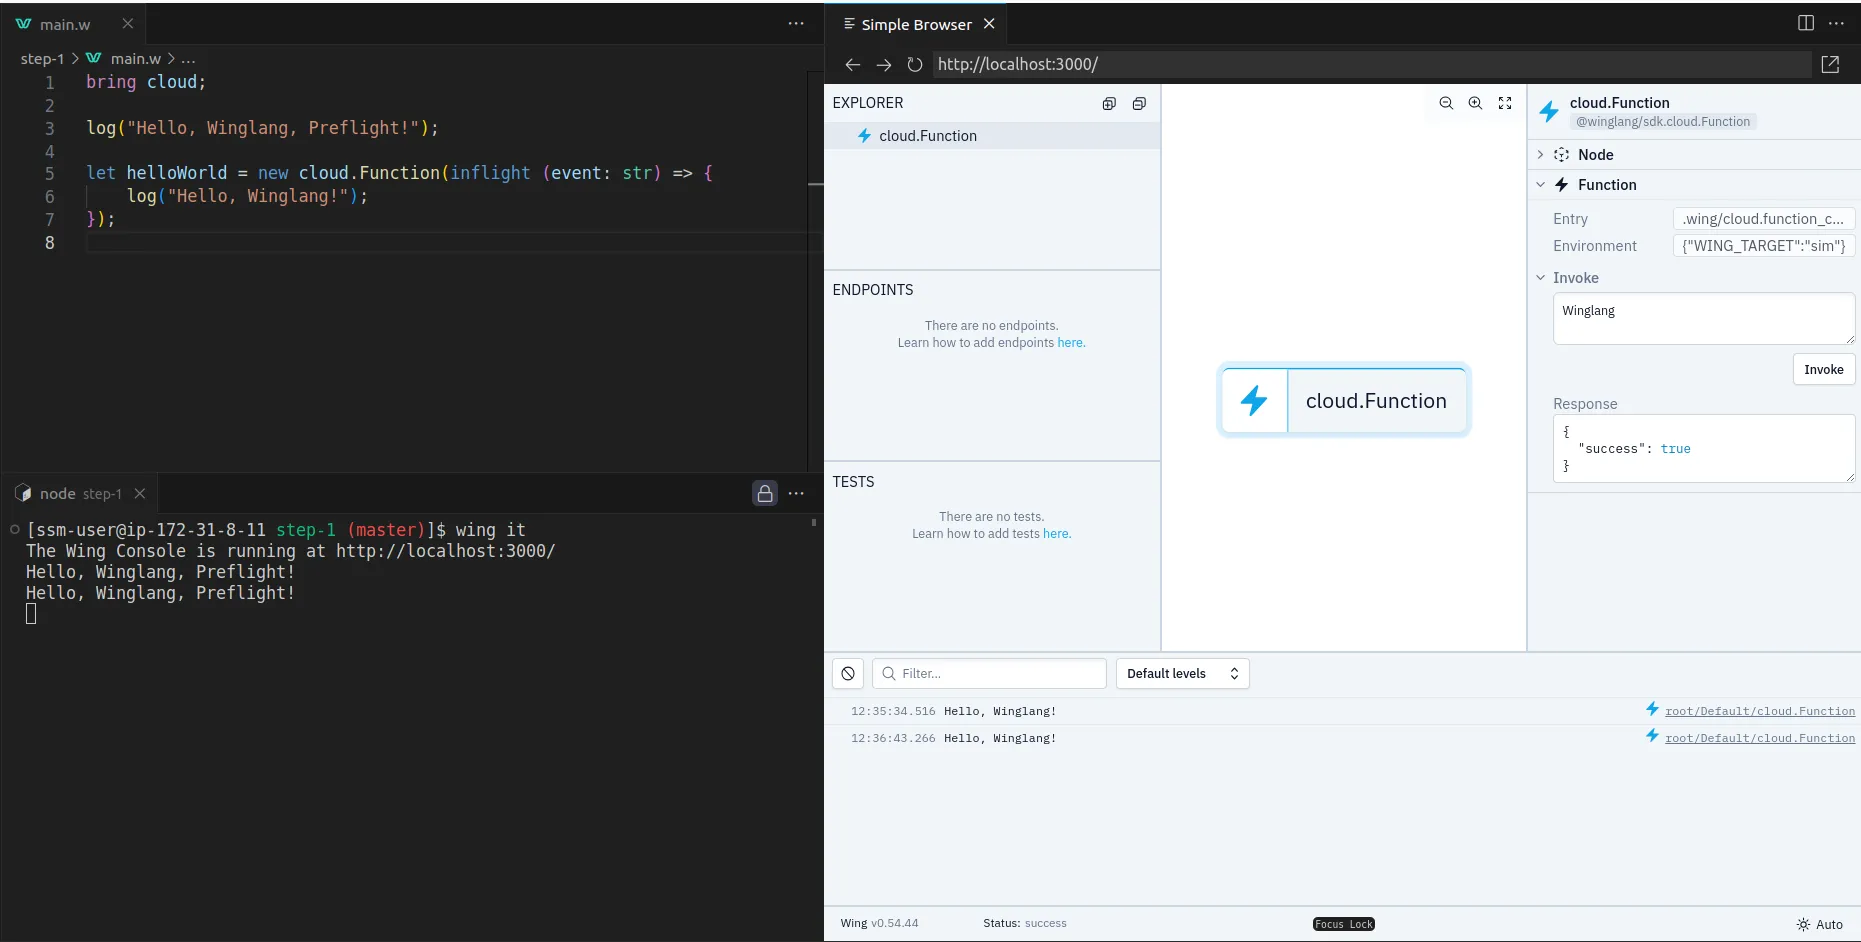
This is pretty cool and Winglang definitely passes the initial smoke test.
name ArgumentTo move beyond simply printing static text, we’re going to slightly modify our initial function to return the greeting “Hello,<name>!”, where <name> is the function’s argument. The updated code, along with the simulator’s output, will look something like this:
Keep in mind, there’s no need to close the simulator. Simply edit the file, hit CTRL+S to save, and the simulator will automatically load the new version.
In today’s world, a system without test automation support hardly has a right to exist. Let’s add some tests to our simple function (now renamed to makeGreeting):
Again, there’s no need to close the simulator. The entire process is interactive and flows quite smoothly.
You can also run the tests via the command line in the VSCode Terminal:
The same test can also be run automatically in the cloud by typing, for example, wing test -t tf-aws. Additionally, the same code can be deployed on a target cloud.
Cloud neutrality support in Winglang is important and fascinating topic, which will be covered in more details in the next Step Four: Extracting Core section.
If all you need is to develop simple Transaction Scripts that:
Then you may choose to stop here. Explore Winglang Examples to see what can be achieved today, and visit Winglang Issues for insights on current limitations and future plans. However, if you’re interested in exploring how Winglang supports complex software architectures with potentially intricate computational logic and long-term support requirements, you are welcome to proceed to Part Two of this publication.
Hexagonal Architecture, introduced by Alistair Cockburn in 2005, represented a significant shift in the way software applications were structured. Also known as the Ports and Adapters pattern, this architectural style was designed to create a clear separation between an application’s core logic and its external components. It enables applications to be equally driven by users, programs, automated tests, or batch scripts, and allows for development and testing in isolation from runtime devices and databases. By organizing interactions through ‘ports’ and ‘adapters’, the architecture ensures that the application remains agnostic to the nature of external technologies and interfaces. This approach not only prevented the infiltration of business logic into user interface code but also enhanced the flexibility and maintainability of software, making it adaptable to various environments and technologies.
While I believe that Alistair Cockburn, like many other practitioners, may have misinterpreted the original intent of layered software architecture as introduced by E.W. Dijkstra in his seminal work, “The Structure of ‘THE’ Multiprogramming System” (a topic I plan to address in a separate publication), the foundational idea he presents remains useful. As I argued in my earlier publication, the Ports metaphor aligns well with cloud resources that trigger specific events, while software modules interacting directly with the cloud SDK effectively function as Adapters.
Numerous attempts (see References) have been made to apply Hexagonal Architecture concepts to cloud and, more specifically, serverless development. A notable example is the blog post “Developing Evolutionary Architecture with AWS Lambda,” which showcases a repository structure closely aligned with what I envision. However, even this example employs a more complex application than what I believe is necessary for initial exploration. I firmly hold that we should fully understand and explore the simplest possible applications, at the “Hello, World!” level, before delving into more complex scenarios. With this in mind, let’s examine how far we can go in building a straightforward Greeting Service.
First and foremost, our goal is to extract the Core and ensure its complete independence from any external dependencies:
bring cloud;

pub class Greeting impl cloud.IFunctionHandler {
    pub inflight handle(name: str): str {
        return "Hello, {name}!";
    }
}
At the moment, the Winglang Module System does not support public functions. I does, however, support public static class functions, which semantically are equivalent. Unfortunately, I cannot directly pass a public static inflight function to cloud.Function (it only works for closures), and I need to implement the cloud.IFunctionHandler interface. These limitations are fairly understandable and quite typical for a new programming system.
By extracting the core into a separate module, we can focus on what brings the application to life in the first place. This also enables extensive testing of the core logic independently, as shown below:
bring "./core" as core;
bring expect;

let greeting = new core.Greeting();

test "it will return 'Hello, <name>!'" {
    expect.equal("Hello, World!", greeting.handle("World"));
    expect.equal("Hello, Winglang!", greeting.handle("Winglang"));
}
Keeping the simulator up with only the core test allows us to quickly explore application logic and discuss it with stakeholders without worrying about cloud resources. This approach often epitomizes what a true MVP (Minimum Viable Product) is about:
The main file is now streamlined, focusing on system-level packaging and testing:
bring cloud;
bring "./core" as core;


let makeGreeting = new cloud.Function(inflight (name: str): str => {
    log("Received: {name}");
    let greeting = core.Greeting.makeGreeting(name);
    log("Returned: {greeting}");
    return greeting;
});


bring expect;

test "it will return 'Hello, `<name>`!'" {
 expect.equal("Hello, Winglang!", makeGreeting.invoke("Winglang"));
}
To consolidate everything, it’s time to introduce a Makefile to automate the entire process:
.PHONY: all test_core test_local test_remote

cloud ?= aws

all: test_remote

test_core:
 wing test test.core.main.w -t sim

test_local: test_core
 wing test main.w -t sim

test_remote: test_local
 wing test main.w -t tf-$(cloud)
Here, I’ve defined a Makefile variable cloud with the default value aws, which specifies the target cloud platform for remote tests. By using Terraform as an orchestration engine, I ensure that the same code and Makefile will run without any changes on any cloud platform supported by Winglang, such as aws, gcp, or azure.
The output of remote testing is worth examining:
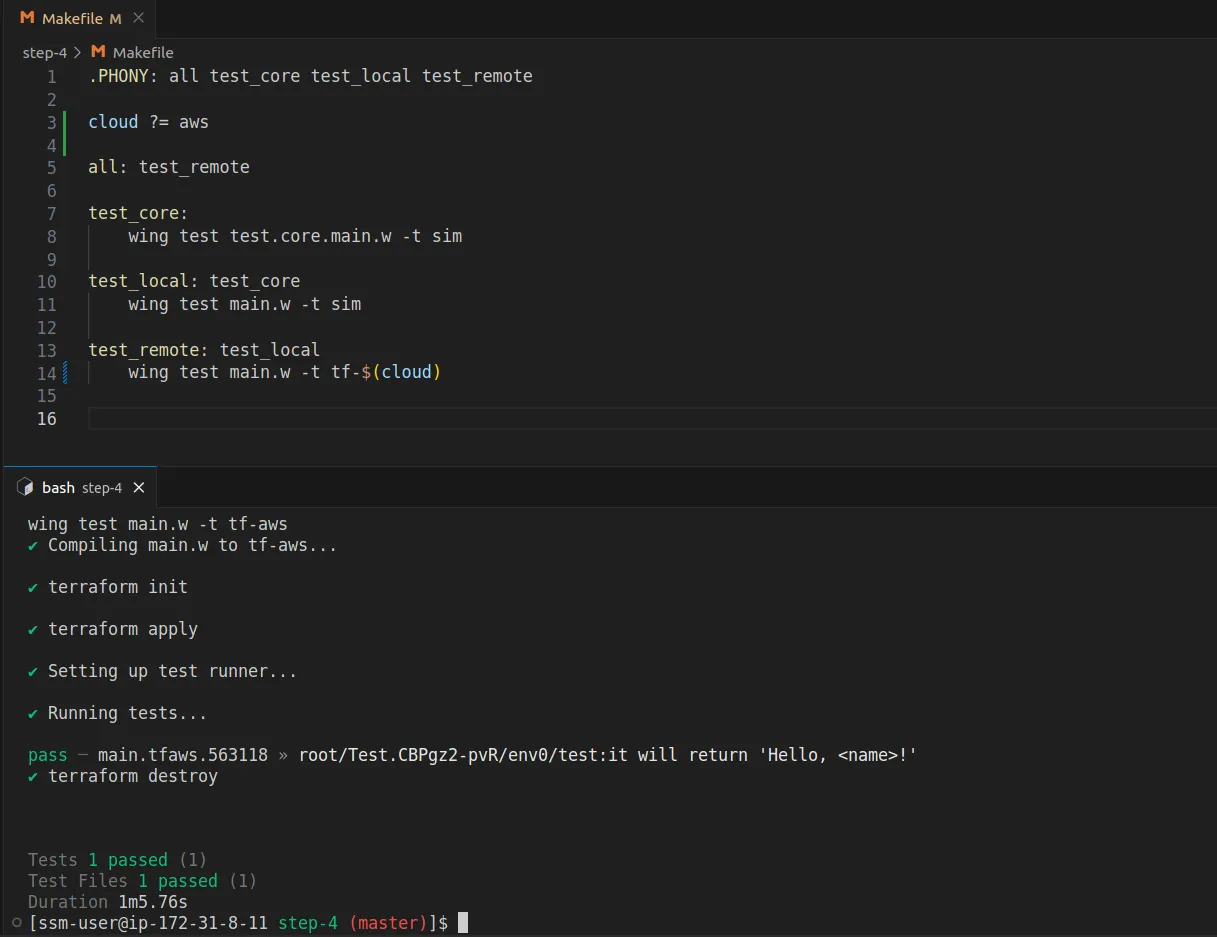
As we can see, Winglang automatically converts the Preflight code into Terraform templates and invokes Terraform commands to deploy the resulting stack to the cloud. It then runs the same test, effectively executing the Inflight code on the actual cloud, aws in this case, and finally deletes all resources. In such cases, I don't even need to access the cloud console to monitor the process. I can treat the cloud as a supercomputer, working with it through Winglang's cross-compilation mechanism.
The project structure now mirrors our architectural intent:
greeting-service/
│
├── core/
│ └── Greeting.w
│
├── main.w
├── Makefile
└── test.core.main.w
makeGreeting(name) Request HandlerThe core functionality should be purely computational, stateless, and free from side effects. This is crucial to ensure that the core does not depend on any external framework and can be fully tested automatically. Introducing states or external side effects would generally hinder this possibility. However, we still aim to isolate application logic from the real environment represented by Ports and Adapters. To achieve this, we introduce a separate Request Handler module, as follows:
bring cloud;
bring "../core" as core;

pub class Greeting impl cloud.IFunctionHandler {
 pub inflight handle(name: str): str {
 log("Received: {name}");
 let greeting = core.Greeting.makeGreeting(name);
 log("Returned: {greeting}");
 return greeting;
 }
}
In this case, the GreetingHandler is responsible for logging, which is a side effect. In more complex applications, it would communicate with external databases, message buses, third-party services, etc., via Ports and Adapters.
The core logic is now encapsulated as a plain function and is no longer derived from the cloud.IFunctionHandler interface:
pub class Greeting {
 pub static inflight makeGreeting(name: str): str {
 return "Hello, {name}!";
 }
}
The unit test for the core logic is accordingly simplified:
bring "./core" as core;
bring expect;

test "it will return 'Hello, <name>!'" {
    expect.equal("Hello, World!", core.Greeting.makeGreeting("World"));
    expect.equal("Hello, Wing!", core.Greeting.makeGreeting("Wing"));
}
The responsibility of connecting the handler and core logic now falls to the main.w module:
bring cloud;
bring "./handlers" as handlers;


let greetingHandler = new handlers.Greeting();
let makeGreetingFunction = new cloud.Function(greetingHandler);

bring expect;

test "it will return 'Hello, <name>!'" {
    expect.equal("Hello, Wing!", makeGreetingFunction.invoke("Wing"));
}
Once again, the project structure reflects our architectural intent:
greeting-service/
│
├── core/
│   └── Greeting.w
├── handlers/
│   └── Greeting.w
├── main.w
├── Makefile
└── test.core.main.w
It should be noted that for a simple service like Greeting, such an evolved structure could be considered over-engineering and not justified by actual business needs. However, as a software architect, it’s essential for me to outline a general skeleton for a fully-fledged service without getting bogged down in application-specific complexities that might not yet be known. By isolating different system components from one another, we make future system evolution less painful, and in many cases just practically feasible. In such cases, investing in a preliminary system structure by following best practices is fully justified and necessary. As Grady Booch famously said, “One cannot refactor a doghouse into a skyscraper.”
In general, keeping core functionality purely stateless and free from side effects, and isolating stateful application behavior with potential side effects into separate handlers, is conceptually equivalent to the monadic programming style widely adopted in Functional Programming environments.
We can now remove the direct cloud.Function creation from the main module and encapsulate it into a separate GreetingFunction port as follows:
bring "./handlers" as handlers;
bring "./ports" as ports;


let greetingHandler = new handlers.Greeting();
let makeGreetingService = new ports.GreetingFunction(greetingHandler);

bring expect;

test "it will return 'Hello, <name>!'" {
    expect.equal("Hello, Wing!", makeGreetingService.invoke("Wing"));
}
The GreetingFunction is defined in a separate module like this:
bring cloud;

pub class GreetingFunction {
    \_f: cloud.Function;
    new(handler: cloud.IFunctionHandler) {
        this.\_f = new cloud.Function(handler);
    }
    pub inflight invoke(name: str): str {
        return this.\_f.invoke(name);
    }
}
This separation of concerns allows the main.w module to focus on connecting different parts of the system together. Specific port configuration is performed in a separate module dedicated to that purpose. While such isolation of GreetingHandler might seem unnecessary at this stage, it becomes more relevant when considering the nuanced configuration supported by Winglang cloud.Function, including execution platform (e.g., AWS Lambda vs Container), environment variables, timeout, maximum resources, etc. Extracting the GreetingFunction port definition into a separate module naturally facilitates the concealment of these details.
The project structure is updated accordingly:
greeting-service/
│
├── core/
│   └── Greeting.w
├── handlers/
│   └── Greeting.w
├── ports/
│   └── greetingFunction.w
├── main.w
├── Makefile
└── test.core.main.w
The adopted naming convention for port modules also allows for the inclusion of multiple port definitions within the same project, enabling the selection of the required one based on external configuration.
There are several reasons why a project might consider implementing its core functionality in a mainstream programming language that can still run atop the underlying runtime environment. For example, using TypeScript, which compiles into JavaScript, and can be integrated with Winglang. Here are some of the most common reasons:
The Greeting service core functionality, redeveloped in TypeScript, would look like this:
export function makeGreeting(name: string): string {
    return \`Hello, ${name}!\`;
}
Its unit test, developed using the jest framework, would be:
import { makeGreeting } from "@core/makeGreeting";

describe("makeGreeting", () => {
  it("should return a greeting with the provided name", () => {
    const name = "World";
    const expected = "Hello, World!";
    const result = makeGreeting(name);
    expect(result).toBe(expected);
  });
});
To make it accessible to Winglang language modules, a simple wrapper is needed:
pub inflight class Greeting {
    pub extern "../target/core/makeGreeting.js" static inflight  makeGreeting(name: str): str;
}
The main technical challenge is to place the compiled JavaScript version where the Winglang wrapper can find it. For this project, I decided to use the target folder, where the Winglang compiler puts its artifacts. To achieve this, I created a dedicated tsconfig.build.json:
{
    "extends": "./tsconfig.json",
    "compilerOptions": {
      "outDir": "./target",
      // ... production-specific compiler options ...
    },
    "exclude": \[
      "core/\*.test.ts"
    \]
}
The Makefile was also modified to automate the process:
.PHONY: all install test\_core test\_local test\_remote

cloud ?= aws

all: test\_remote

install:
 npm install

test\_core: install
 npm run test

build\_core: test\_core
 npm run build

test\_local: build\_core
 wing test main.w -t sim

test\_remote: test\_local
 wing test main.w -t tf-$(cloud)
The folder structure reflects the changes made:
greeting-service/
│
├── core/
│   └── Greeting.w
│   └── makeGreeting.ts
│   └── makeGreeting.test.ts
├── handlers/
│   └── Greeting.w
├── ports/
│   └── greetingFunction.w
├── jest.config.js
├── main.w
├── Makefile
├── package-lock.json
├── package.json
├── tsconfig.build.json
└── tsconfig.json
Now, let’s consider making our Greeting service accessible via a REST API. This could be necessary, for instance, to enable demonstrations from a web browser or to facilitate calls from external services that, due to security or technological constraints, cannot communicate directly with the GreetingFunction port. To accomplish this, we need to introduce a new Port definition and modify the main.w module, while keeping everything else unchanged:
bring cloud;
bring http;


pub class GreetingApi{
    pub apiUrl: str;

    new(handler: cloud.IFunctionHandler) {
        let api = new cloud.Api();

        api.get("/greetings", inflight (request: cloud.ApiRequest): cloud.ApiResponse => {
            return cloud.ApiResponse{
                status: 200,
                body: handler.handle(request.query.get("name"))
            };
        });

        this.apiUrl = api.url;
    }

    pub inflight invoke(name: str): str {
        let result = http.get("{this.apiUrl}/greetings?name={name}");
        assert(200 == result.status);
        return result.body;
    }

}
To maintain a consistent testing interface, I implemented an invoke method that functions similarly to the GreetingFunction port. This design choice is not mandatory but rather a matter of convenience to minimize the amount of change.
The main.w module now allocates the GreetingApi port:
bring "./handlers" as handlers;
bring "./ports" as ports;


let greetingHandler = new handlers.Greeting();
let makeGreetingService = new ports.GreetingApi(greetingHandler);

bring expect;

test "it will return 'Hello, <name>!'" {
    expect.equal("Hello, Wing!", makeGreetingService.invoke("Wing"));
}
Since there is now something to use externally, the Makefile was modified to include deploy and destroy targets,as follows:
.PHONY: all install test\_core build\_core update test\_adapters test\_local test\_remote compile tf-init deploy destroy

cloud ?= aws
target := target/main.tf$(cloud)

all: test\_remote

install:
 npm install

test\_core: install
 npm run test

build\_core: test\_core
 npm run build

update:
 sudo npm update -g wing

test\_adapters: update
 wing test test.adapters.main.w -t sim

test\_local: build\_core test\_adapters
 wing test test.main.w -t sim

test\_remote: test\_local
 wing test test.main.w -t tf-$(cloud)

compile:
 wing compile main.w -t tf-$(cloud)

tf-init: compile
 ( \\
  cd $(target) ;\\
  terraform init \\
 )

deploy: tf-init
 ( \\
  cd $(target) ;\\
  terraform apply -auto-approve \\
 )

destroy:
 ( \\
  cd $(target) ;\\
  terraform destroy -auto-approve \\
 )
The browser screen looks almost as expected, but notice a strange JSON.parse error message (will be addressed in the forthcoming section):
The project structure is updated to reflect these changes:

greeting-service/
│
├── core/
│   └── Greeting.w
│   └── makeGreeting.ts
│   └── makeGreeting.test.ts
├── handlers/
│   └── Greeting.w
├── ports/
│   └── greetingApi.w
│   └── greetingFunction.w
├── jest.config.js
├── main.w
├── Makefile
├── package-lock.json
├── package.json
├── tsconfig.build.json
└── tsconfig.json
The GreetingApi port implementation introduced in the previous section slightly violates the Single Responsibility Principle, which states: “A class should have only one reason to change.” Currently, there are multiple potential reasons for change:
We can generally agree that while HTTP Request Processing and HTTP Response Formatting are closely related, HTTP Routing stands apart. To decouple these functionalities, we introduce an ApiAdapter responsible for converting cloud.ApiRequest to cloud.ApiResponse, thereby extracting this functionality from the GreetingApi port.
To achieve this, we introduce a new IRestApiAdapter interface:
bring cloud;


pub interface IRestApiAdapter {
    inflight handle(request: cloud.ApiRequest): cloud.ApiResponse;
}
The GreetingApiAdapter class is defined as follows:
bring cloud;
bring "./IRestApiAdapter.w" as restApiAdapter;

pub class GreetingApiAdapter impl restApiAdapter.IRestApiAdapter {
    \_h: cloud.IFunctionHandler;
    new(handler: cloud.IFunctionHandler) {
        this.\_h = handler;
    }
    inflight pub handle(request: cloud.ApiRequest): cloud.ApiResponse {
        return cloud.ApiResponse{
            status: 200,
            body: this.\_h.handle(request.query.get("name"))
        };
    }
}
The modified GreetingApi port class is now:
bring cloud;
bring http;
bring "../adapters/IRestApiAdapter.w" as restApiAdapter;

pub class GreetingApi{
    \_apiUrl: str;
    \_adapter: restApiAdapter.IRestApiAdapter;
    new(adapter: restApiAdapter.IRestApiAdapter) {
        let api = new cloud.Api();
        this.\_adapter = adapter;

        api.get("/greetings", inflight (request: cloud.ApiRequest): cloud.ApiResponse => {
            return this.\_adapter.handle(request);
        });
        this.\_apiUrl = api.url;
    }
    pub inflight invoke(name: str): str {
        let result = http.get("{this.\_apiUrl}/greetings?name={name}");
        assert(200 == result.status);
        return result.body;
    }
}
The main.w module is updated accordingly:
bring "./handlers" as handlers;
bring "./ports" as ports;
bring "./adapters" as adapters;

let greetingHandler = new handlers.Greeting();
let greetingStringAdapter = new adapters.GreetingApiAdapter(greetingHandler);
let makeGreetingService = new ports.GreetingApi(greetingStringAdapter);
bring expect;
test "it will return 'Hello, <name>!'" {
    expect.equal("Hello, Wing!", makeGreetingService.invoke("Wing"));
}
The project structure reflects these changes:
greeting-service/
│
├── adapters/
│   └── greetingApiAdapter.w
│   └── IRestApiAdapter.w
├── core/
│   └── Greeting.w
│   └── makeGreeting.ts
│   └── makeGreeting.test.ts
├── handlers/
│   └── Greeting.w
├── ports/
│   └── greetingApi.w
│   └── greetingFunction.w
├── jest.config.js
├── main.w
├── Makefile
├── package-lock.json
├── package.json
├── tsconfig.build.json
└── tsconfig.json
Extracting the GreetingApiAdapter from the GreetingApi port might seem like a purist action, performed to demonstrate the potential value of Adapters, even if artificially and not strictly necessary. However, this perspective changes when we consider serious testing. The GreetingApiAdapter implementation from the previous section assumes that the name argument always comes within the query part of the HTTP request. But what happens if it doesn't? The system will crash, while according to standard it should respond with the HTTP 400 (Bad Request) status code in such cases. The modified structure allows us to introduce a separate unit test fully dedicated to testing the GreetingApiAdapter:
bring cloud;
bring expect;
bring "./adapters" as adapters;
bring "./handlers" as handlers;

let greetingHandler = new handlers.Greeting();
let greetingStringAdapter = new adapters.GreetingStringRestApiAdapter(greetingHandler);

test "it will return 200 and correct answer when name supplied" {
    let request = cloud.ApiRequest{
        method: cloud.HttpMethod.GET,
        path: "/greetings",
        query: {"name" => "Wing"},
        vars: {}
    };
    let response = greetingStringAdapter.handle(request);
    expect.equal(200, response.status);
    expect.equal("Hello, Wing!", response.body);
}

test "it will return 400 and error message when name is not supplied" {
    let request = cloud.ApiRequest{
        method: cloud.HttpMethod.GET,
        path: "/greetings",
        query: {"somethingElse" => "doesNotMatter"},
        vars: {}
    };
    let response = greetingStringAdapter.handle(request);
    expect.equal(400, response.status);
    expect.equal("Query name=<name> is missing", response.body);
}
Running this test with the existing implementation will result in failure, necessitating the following changes:
bring cloud;
bring "./IRestApiAdapter.w" as restApiAdapter;


pub class GreetingStringRestApiAdapter impl restApiAdapter.IRestApiAdapter {
    \_h: cloud.IFunctionHandler;

    new(handler: cloud.IFunctionHandler) {
        this.\_h = handler;
    }

    inflight pub handle(request: cloud.ApiRequest): cloud.ApiResponse {
        if let name = request.query.tryGet("name") {
            return cloud.ApiResponse{
                status: 200,
                body: this.\_h.handle(name)
            };
        } else {
            return cloud.ApiResponse{
                status: 400,
                body: "Query name=<name> is missing"
            };
        }
    }
}
The main lesson from this story is that system complexity can exist in multiple places, not always within the core logic. Separation of concerns aids in managing this complexity through dedicated and isolated test suites.
GreetingServiceAfter all the modifications made, the resulting version of the main.w module has become quite complex, incorporating the logic of wiring system handlers, ports, and adapters. Additionally, maintaining end-to-end system tests within the same module is only feasible up to a point. Different testing and production environments may be necessary to address various security and cost considerations. To tackle these issues, it's advisable to extract the GreetingService configuration into a separate module:
bring "./handlers" as handlers;
bring "./ports" as ports;
bring "./adapters" as adapters;


pub class Greeting {
    pub api: ports.GreetingApi;

    new() {
        let greetingHandler = new handlers.Greeting();
        let greetingStringAdapter = new adapters.GreetingStringRestApiAdapter(greetingHandler);
        this.api = new ports.GreetingApi(greetingStringAdapter);
    }
}
Ideally, the creation of the Greeting service object should be implemented using a static method, following the Factory Method design pattern. However, I encountered difficulties in this approach, as Preflight static functions require a context, which I was unable to determine how to obtain. Nonetheless, even in this form, extracting the Greeting service class opens up multiple possibilities for different configurations in testing and production environments. The main.w module can now be relieved of the testing code:
bring "./service.w" as service;


let greetingService = new service.Greeting();
The system end-to-end test is now placed in its dedicated test.main.w module:
bring "./service.w" as service;

let greetingService = new service.Greeting();
bring expect;
test "it will return 'Hello, <name>!'" {
    expect.equal("Hello, Wing!", greetingService.api.invoke("Wing"));
}
In this case, code duplication is minimal, and as previously mentioned, a real system will have different configurations for test and production environments. The detailed specifications for these will be passed to the Greeting service class constructor.
Now, I aim to put the resulting architecture to the final test by partially implementing HTTP Content Negotiation. Specifically, the Greeting service should support returning a greeting statement as plain text, HTML, or JSON, depending on the client's request. The appropriate way to express these requirements is to modify the GreetingApiAdapter unit test as follows:
bring cloud;
bring expect;
bring "./adapters" as adapters;
bring "./handlers" as handlers;

let greetingHandler = new handlers.Greeting();
let greetingStringAdapter = new adapters.GreetingApiAdapter(greetingHandler);

test "it will return 200 and plain text answer when name is supplied without headers" {
    let request = cloud.ApiRequest{
        method: cloud.HttpMethod.GET,
        path: "/greetings",
        query: {"name" => "Wing"},
        vars: {}
    };
    let response = greetingStringAdapter.handle(request);
    expect.equal(200, response.status);
    expect.equal("Hello, Wing!", response.body);
    expect.equal("text/plain", response.headers?.get("Content-Type"));
}

test "it will return 200 and json answer when name is supplied with headers Accept: application/json" {
    let request = cloud.ApiRequest{
        method: cloud.HttpMethod.GET,
        path: "/greetings",
        query: {"name" => "Wing"},
        headers: {"Accept" => "application/json"},
        vars: {}
    };
    let response = greetingStringAdapter.handle(request);
    expect.equal(200, response.status);
    expect.equal("application/json", response.headers?.get("Content-Type"));
    let data = Json.tryParse(response.body);
    let expected = Json.stringify(Json {
        greeting: "Hello, Wing!"
    });
    expect.equal(expected, response.body);
}

test "it will return 200 and html answer when name is supplied with headers Accept: text/html" {
    let request = cloud.ApiRequest{
        method: cloud.HttpMethod.GET,
        path: "/greetings",
        query: {"name" => "Wing"},
        headers: {"Accept" => "text/html"},
        vars: {}
    };
    let response = greetingStringAdapter.handle(request);
    expect.equal(200, response.status);
    expect.equal("text/html", response.headers?.get("Content-Type"));
    let body = response.body ?? "";
    assert(body.contains("Hello, Wing!"));
}

test "it will return 400 and error message when name is not supplied" {
    let request = cloud.ApiRequest{
        method: cloud.HttpMethod.GET,
        path: "/greetings",
        query: {"somethingElse" => "doesNotMatter"},
        vars: {}
    };
    let response = greetingStringAdapter.handle(request);
    expect.equal(400, response.status);
    expect.equal("Query name=<name> is missing", response.body);
    expect.equal("text/plain", response.headers?.get("Content-Type"));
}
Suddenly, having a separate class for HTTP request/response handling doesn’t seem like a purely theoretical exercise, but rather a very pragmatic architectural decision. To make these tests pass, substantial modifications are needed in the GreetingApiAdapter class:
bring cloud;
bring "./IRestApiAdapter.w" as restApiAdapter;
bring "../core" as core;


pub class GreetingApiAdapter impl restApiAdapter.IRestApiAdapter {
    \_h: cloud.IFunctionHandler;

    new(handler: cloud.IFunctionHandler) {
        this.\_h = handler;
    }

    inflight static \_textPlain(greeting: str): str {
        return greeting;
    }

    inflight static \_applicationJson(greeting: str): str {
        let responseBody = Json {
            greeting: greeting
        };
        return Json.stringify(responseBody);
    }

    inflight \_findContentType(formatters: Map<inflight (str): str>, headers: Map<str>): str {
        let contentTypes = (headers.tryGet("Accept") ?? "").split(",");
        for ct in contentTypes {
            if formatters.has(ct) {
                return ct;
            }
        }
        return "text/plain";
    }

    inflight \_buildOkResponse(headers: Map<str>, name: str): cloud.ApiResponse {
        let greeting = this.\_h.handle(name) ?? "";  // TODO: guard against empty greeting or what??
        let formatters = {
            "text/plain" => GreetingApiAdapter.\_textPlain,
            "text/html"  => core.Greeting.formatHtml,
            "application/json" => GreetingApiAdapter.\_applicationJson
        };
        let contentType = this.\_findContentType(formatters, headers);
        return cloud.ApiResponse{
            status: 200,
            body: formatters.get(contentType)(greeting),
            headers: {"Content-Type" => contentType}
        };
    }

    inflight pub handle(request: cloud.ApiRequest): cloud.ApiResponse {
        if let name = request.query.tryGet("name") {
            return this.\_buildOkResponse(request.headers ?? {}, name);
        } else {
            return cloud.ApiResponse{
                status: 400,
                body: "Query name=<name> is missing",
                headers: {"Content-Type" => "text/plain"}
            };
        }
    }
}
Notice how quickly the complexity escalates. We’re not done yet, as we need a proper HTML formatter. The easiest way to implement it seemed to be in TypeScript, so I decided to place it in the core package:
export function formatHtml(greeting: string): string {
    return \`
    <!DOCTYPE html>
    <html lang="en">
    <head>
        <meta charset="UTF-8">
        <meta name="viewport" content="width=device-width, initial-scale=1.0">
        <title>Wing Greeting Service</title>

        <!-- Tailwind CSS Play CDN https://tailwindcss.com/docs/installation/play-cdn -->
        <script src="https://cdn.tailwindcss.com"></script>
    </head>
    <body class="flex items-center justify-center h-screen">
        <div class="text-center", id="greeting">
            <h1 class="text-2xl font-bold">${greeting}</h1>
        </div>
    </body>
    </html>
    \`
}
There is, of course, a separate unit test for it:
import { formatHtml } from "@core/formatHtml";

describe("formatHtml", () => {
  it("should return a properly formatted HTML greeting page", () => {
    const greeting = "Hello, World!";
    const result = formatHtml(greeting);
    expect(result).toContain(greeting);
  });
});
Placing the HTML response formatter in the core package could be debated as a violation of Hexagonal Architecture principles. Indeed, formatting an HTML response doesn’t seem to belong to the core application logic. Technically, relocating it wouldn’t be too hard, and in a larger real-world system, that’s probably what should be done. However, I chose to place it there to consolidate all TypeScript-related components in one place and to test and build them through the same set of Makefile targets.
Now, the browser gets response in format it could understand and render properly:
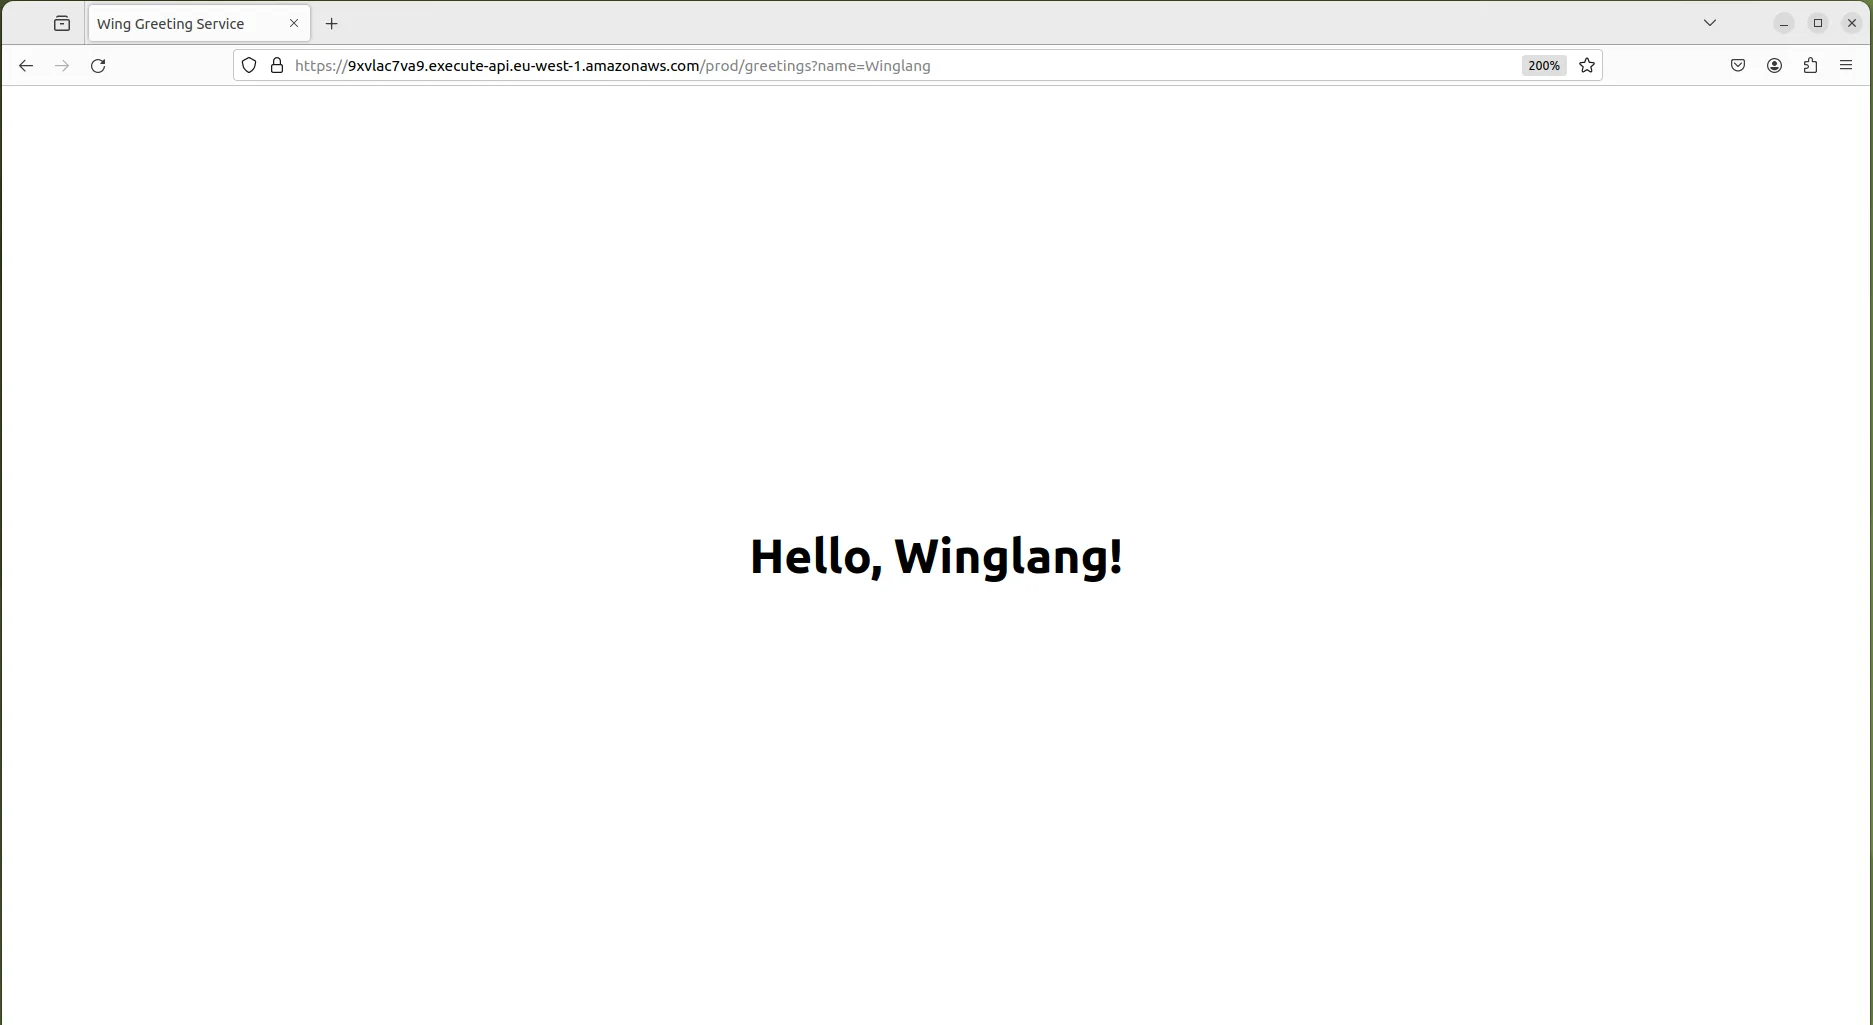
As stated at the outset, the objectives of this technology research report were to explore:
The exploration was conducted using the simplest “Hello, World!” application, which evolved into the GreetingService through twelve incremental steps, each introducing a minor modification to the previous code base. This resulted in the following project structure:
greeting-service/
│
├── adapters/
│   └── greetingApiAdapter.w
│   └── IRestApiAdapter.w
├── core/
│   └── Greeting.w
│   └── makeGreeting.ts
│   └── makeGreeting.test.ts
├── handlers/
│   └── Greeting.w
├── ports/
│   └── greetingApi.w
│   └── greetingFunction.w
├── jest.config.js
├── main.w
├── Makefile
├── package-lock.json
├── package.json
├── service.w
├── test.adapters.main.w
├── test.main.w
├── tsconfig.build.json
└── tsconfig.json
In my view, this structure reflects the overall service architecture quite well. As a minor improvement, I would consider relocating the TypeScript related files to a sub-level within the core folder.
Overall, the Winglang Module System passed the initial test, providing substantial support for the separation of concerns as prescribed by the Hexagonal Ports and Adapters pattern. It also offers reasonable support for interoperability with NodeJS runtime engine-based languages, such as TypeScript. My wish list for potential improvements includes:
main.w, essential for the effective implementation of the Factory Method design pattern, crucial for supporting non-trivial service configurations.main.w (this worked for TypeScript external functions), to eliminate the need for some extra boilerplate.This report evaluates the Winglang programming language for implementing one sequential stage of a more general Staged Event-Driven Architecture (SEDA). The assessment of how well Winglang supports the full-fledged Event-Driven part and asynchronous stage implementation (most likely for Handlers) will be the subject of future research. Stay tuned.
Wow its 2024, almost a quarter of the way through the 21st century, if you are reading this you probably should pat yourself on the back, because you did it! You have survived the crazy roller coaster ride that has lingered over the last several years, ranging from a pandemic to global insecurity with ongoing wars.
So finally 2024 is here, and we all get to ask ourselves, "Is this the year things finally start going back to normal?"... probably not! Though, as we all sit on the edge of our seats waiting for the next global crisis (my bingo card has mole people rising to the surface) we can take solace in one silver lining. Wing Custom Platforms are all the rage, and easier than ever to build!
In this blog series I'm going to be walking through how to build, publish, and use your own Wing Custom Platforms. Now before we get too deep, and since this is the first installment of what will probably be many procrastinated iterations, lets just do a quick level set.
A programming language for the cloud.
Wing combines infrastructure and runtime code in one language, enabling developers to stay in their creative flow, and to deliver better software, faster and more securely.

The purpose of the post is not to explain all the dry details of Wing Platforms, thats the job of the Wing docs (I'll provide reference links down below). Rather we want to get into the fun of building one, so Ill briefly explain.
Wing Custom Platforms offer us a way to hook into a Wing application's compilation process. This is done through various hooks that a custom platform can implement. As of the today, some of these hooks include:
postSynth hook and provides the same input, however the key difference is the passed config is immutable. Which is important for validation operationsThere are several other hooks that exist though, we wont go into all those in this blog.
One more bit of information we need before we start building our very own Custom Platform which is kind of important is, "what is our platform going to do?"
I'm glad you asked! We are going to build a Custom Platform that will enhance the developer experience when working with Terraform based platforms, some of which come builtin with Wing installation such as tf-aws, tf-azure, and tf-gcp.
The specific enhancement is we want to add is the functionality to configure how Terraform state files are managed through the use of Terraform backends. By default all of the builtin Terraform based platforms will use local state file configurations, which is nice for quick experimentation, but lacks some rigor for production quality deployments.
Build and publish a Wing Custom Platform that provides a way to configure your Terraform backend state management.
For the purpose of brevity we will focus on 3 backend types, s3, azurerm, and gcs
To begin lets just create a new npm project, I'm going to be a little bit more bare bones in this guide, so ill just create a package.json and tsconfig.json
Below is my package.json file, the only real interesting part about it is the dev dependency on @winglang/sdk this is so we can use some of the exposed Platform types, which we will see an example of soon.
{
  "name": "@wingplatforms/tf-backends",
  "version": "0.0.1",
  "main": "index.js",
  "repository": {
    "type": "git",
    "url": "https://github.com/hasanaburayyan/wing-tf-backends"
  },
  "license": "ISC",
  "devDependencies": {
    "typescript": "5.3.3",
    "@winglang/sdk": "0.54.30"
  },
  "files": ["lib"]
}
Here is the tsconfig.json Ive omitted a few other details for brevity since some other options are just personal preference. Whats worth noting here is how I have decided to structure the project. All my code will exist in a src folder and my expectations are that output of compilation will be in the lib folder. Now you might set your project up different and thats fine, but its worth explaining if you are just following along.
{
  "compilerOptions": {
    "target": "ES2020",
    "module": "commonjs",
    "rootDir": "./src",
    "outDir": "./lib",
    "lib": ["es2020", "dom"]
  },
  "include": ["./src/**/*"],
  "exclude": ["./node_modules"]
}
Then to prep our dependencies we can just run npm install
Okay now that that initial setup is out of the way, time to start writing our Platform!!
First Ill create a file src/platform.ts this will contain the main code for our Platform, which is used by the Wing compiler. The bare minimum code required for a Platform would look like this
import { platform } from "@winglang/sdk";

export class Platform implements platform.IPlatform {
  readonly target = "tf-*";
}
Here we create and export the our Platform class, which implements the IPlatform interface. All the platform hooks are optional so we don't actually have to define anything else for this to technically be valid.
Now the required bit is defining target this mechanism allows a platform to define the provisioning engine and cloud provider it is compatible with. At the time of this blog post there is not actually an enforcement of this compatibly but... we imagine it works :)
Okay, so we have a barebones Platform but its not actually useful yet, lets change that! First we will plan on using environment variables to determine which type of backend our users want to use, as well as what is the key for the state file.
So we will provide a constructor in our Platform:
import { platform } from "@winglang/sdk";

export class Platform implements platform.IPlatform {
  readonly target = "tf-*";
  readonly backendType: string;
  readonly stateFileKey: string;

  constructor() {
    if (!process.env.TF_BACKEND_TYPE) {
      throw new Error(`TF_BACKEND_TYPE environment variable must be set.`);
    }
    if (!process.env.TF_STATE_FILE_KEY) {
      throw new Error("TF_STATE_FILE_KEY environment variable must be set.");
    }

    this.backendType = process.env.TF_BACKEND_TYPE;
    this.stateFileKey = process.env.TF_STATE_FILE_KEY;
  }
}
Cool, now we are starting to get moving. Our Platform will require the users to have two environment variables set when compiling their Wing code, TF_BACKEND_TYPE and TF_STATE_FILE_KEY for now we will just persist this data as instance variables.
One more house keeping item we need to do is export our Platform code, to do this lets create an index.ts with a single line that looks like this:
export * from "./platform";
Before we get much further I just want to show how to test your Platform locally to see it working. In order to test this code we need to first compile it using the command npx tsc and since we already defined everything in our tsconfig.json we will conveniently have a folder named lib that contains all the generated JavaScript code.
Lets create a super simple Wing application to use this Platform with.
// main.w
bring cloud;

new cloud.Bucket();
The above Wing code will just import the cloud library and use it to create a Bucket resource.
Next we will run a Wing compile command using our Platform in combination with some other Terraform based Platform, in my case it will be tf-aws
wing compile main.w --platform tf-aws --platform ./lib
Note: We are providing two Platforms tf-aws and a relative path to our compiled Platform ./lib The ordering of these Platforms is also important tf-aws MUST come first since its a Platform that implements the newApp() API. We won't dive deeper into that in this post but the reference reading materials down below will provide links if you want to dive deeper.
Now running this code will result in the following error:
wing compile main.w -t tf-aws -t ./lib

An error occurred while loading the custom platform: Error: TF_BACKEND_TYPE environment variable must be set.
Now before you freak out, just know thats one of them good errors :) we can indeed see our Platform code was loaded and run because the Error was thrown requiring TF_BACKEND_TYPE as an environment variable. If we now rerun the compile command with the required variables we should get a successful compilation
TF_BACKEND_TYPE=s3 TF_STATE_FILE_KEY=mystate.tfstate wing compile main.w -t tf-aws -t ./lib
To be extra sure the compilation worked we can inspect the generated Terraform code in target/main.tfaws/main.tf.json
{
  "//": {
    "metadata": {
      "backend": "local",
      "stackName": "root",
      "version": "0.17.0"
    },
    "outputs": {}
  },
  "provider": {
    "aws": [{}]
  },
  "resource": {
    "aws_s3_bucket": {
      "cloudBucket": {
        "//": {
          "metadata": {
            "path": "root/Default/Default/cloud.Bucket/Default",
            "uniqueId": "cloudBucket"
          }
        },
        "bucket_prefix": "cloud-bucket-c87175e7-",
        "force_destroy": false
      }
    }
  },
  "terraform": {
    "backend": {
      "local": {
        "path": "./terraform.tfstate"
      }
    },
    "required_providers": {
      "aws": {
        "source": "aws",
        "version": "5.31.0"
      }
    }
  }
}
We should see that a single Bucket is being created, however it is still using the local Terraform backend and that is because we still have some work to do!
Since we want to edit the generated Terraform configuration file after the code has been synthesized, we will implement the postSynth hook. As I explained earlier this hook is called right after synthesis completes and passes the resulting configuration file.
What is more useful about this hook is it allows us to return a mutated version of the configuration file.
To implement this hook we will update our Platform code with this
export class Platform implements platform.IPlatform {
  // ...
  postSynth(config: any): any {
    if (this.backendType === "s3") {
      if (!process.env.TF_S3_BACKEND_BUCKET) {
        throw new Error(
          "TF_S3_BACKEND_BUCKET environment variable must be set."
        );
      }

      if (!process.env.TF_S3_BACKEND_BUCKET_REGION) {
        throw new Error(
          "TF_S3_BACKEND_BUCKET_REGION environment variable must be set."
        );
      }

      config.terraform.backend = {
        s3: {
          bucket: process.env.TF_S3_BACKEND_BUCKET,
          region: process.env.TF_S3_BACKEND_BUCKET_REGION,
          key: this.stateFileKey,
        },
      };
    }
    return config;
  }
}
Now we can see there is some control flow logic happening here, if the user wants to use an s3 backend we will need some additional input such as the name and region of the bucket, which we will use TF_S3_BACKEND_BUCKET and TF_S3_BACKEND_BUCKET_REGION to configure.
Assuming all of the required environment variables exist, we can then manipulate the provided config object, where we set config.terraform.backend to use an s3 configuration block. Finally the config object is returned.
Now to see this all in action we will need to compile our code (npx tsc) and provide all four required s3 environment variables. To make the commands easier to read Ill do it in multiple lines:
# compile platform code
npx tsc

# set env vars
export TF_BACKEND_TYPE=s3
export TF_STATE_FILE_KEY=mystate.tfstate
export TF_S3_BACKEND_BUCKET=myfavorites3bucket
export TF_S3_BACKEND_BUCKET_REGION=us-east-1

# compile wing code!
wing compile main.w -t tf-aws -t ./lib
And viola! We should now be able to look at our Terraform config and see that a remote s3 backend is being used:
// Parts of the config have been omitted for brevity
{
  "terraform": {
    "required_providers": {
      "aws": {
        "version": "5.31.0",
        "source": "aws"
      }
    },
    "backend": {
      "s3": {
        "bucket": "myfavorites3bucket",
        "region": "us-east-1",
        "key": "mystate.tfstate"
      }
    }
  },
  "resource": {
    "aws_s3_bucket": {
      "cloudBucket": {
        "bucket_prefix": "cloud-bucket-c87175e7-",
        "force_destroy": false,
        "//": {
          "metadata": {
            "path": "root/Default/Default/cloud.Bucket/Default",
            "uniqueId": "cloudBucket"
          }
        }
      }
    }
  }
}
If you have been following along, pat yourself on the back again! Now on top of surviving the early 2020s you have also written your first Wing Custom Platform!
Now before we go into how to make it available for use to other Wingnuts, lets actually make our code a little cleaner, and a bit more usefully robust.
In order to live up to its name tf-backends it should probably support multiple backends! To accomplish this lets just use some good ol' coding chops to abstract a bit.
We want our Platform to support s3, azurerm, and gcs to accomplish this we just have to define different config.terraform.backend blocks based on the desired backend.
To make this work I'm going to create a few more files:
src/backends/backend.ts
// simple interface to define a backend behavior
export interface IBackend {
  generateConfigBlock(stateFileKey: string): void;
}
Now several backend classes that implement this interface
src/backends/s3.ts
import { IBackend } from "./backend";

export class S3 implements IBackend {
  readonly backendBucket: string;
  readonly backendBucketRegion: string;

  constructor() {
    if (!process.env.TF_S3_BACKEND_BUCKET) {
      throw new Error("TF_S3_BACKEND_BUCKET environment variable must be set.");
    }

    if (!process.env.TF_S3_BACKEND_BUCKET_REGION) {
      throw new Error(
        "TF_S3_BACKEND_BUCKET_REGION environment variable must be set."
      );
    }

    this.backendBucket = process.env.TF_S3_BACKEND_BUCKET;
    this.backendBucketRegion = process.env.TF_S3_BACKEND_BUCKET_REGION;
  }

  generateConfigBlock(stateFileKey: string): any {
    return {
      s3: {
        bucket: this.backendBucket,
        region: this.backendBucketRegion,
        key: stateFileKey,
      },
    };
  }
}
src/backends/azurerm.ts
import { IBackend } from "./backend";

export class AzureRM implements IBackend {
  readonly backendStorageAccountName: string;
  readonly backendStorageAccountResourceGroupName: string;
  readonly backendContainerName: string;

  constructor() {
    if (!process.env.TF_AZURERM_BACKEND_STORAGE_ACCOUNT_NAME) {
      throw new Error(
        "TF_AZURERM_BACKEND_STORAGE_ACCOUNT_NAME environment variable must be set."
      );
    }

    if (!process.env.TF_AZURERM_BACKEND_STORAGE_ACCOUNT_RESOURCE_GROUP_NAME) {
      throw new Error(
        "TF_AZURERM_BACKEND_STORAGE_ACCOUNT_RESOURCE_GROUP_NAME environment variable must be set."
      );
    }

    if (!process.env.TF_AZURERM_BACKEND_CONTAINER_NAME) {
      throw new Error(
        "TF_AZURERM_BACKEND_CONTAINER_NAME environment variable must be set."
      );
    }

    this.backendStorageAccountName =
      process.env.TF_AZURERM_BACKEND_STORAGE_ACCOUNT_NAME;
    this.backendStorageAccountResourceGroupName =
      process.env.TF_AZURERM_BACKEND_STORAGE_ACCOUNT_RESOURCE_GROUP_NAME;
    this.backendContainerName = process.env.TF_AZURERM_BACKEND_CONTAINER_NAME;
  }

  generateConfigBlock(stateFileKey: string): any {
    return {
      azurerm: {
        storage_account_name: this.backendStorageAccountName,
        resource_group_name: this.backendStorageAccountResourceGroupName,
        container_name: this.backendContainerName,
        key: stateFileKey,
      },
    };
  }
}
src/backends/gcs.ts
import { IBackend } from "./backend";

export class GCS implements IBackend {
  readonly backendBucket: string;

  constructor() {
    if (!process.env.TF_GCS_BACKEND_BUCKET) {
      throw new Error(
        "TF_GCS_BACKEND_BUCKET environment variable must be set."
      );
    }

    if (!process.env.TF_GCS_BACKEND_PREFIX) {
      throw new Error(
        "TF_GCS_BACKEND_PREFIX environment variable must be set."
      );
    }

    this.backendBucket = process.env.TF_GCS_BACKEND_BUCKET;
  }

  generateConfigBlock(stateFileKey: string): any {
    return {
      gcs: {
        bucket: this.backendBucket,
        key: stateFileKey,
      },
    };
  }
}
Now that we have our backend classes defined, we can update our Platform code to use them. My final Platform code looks like this:
import { platform } from "@winglang/sdk";
import { S3 } from "./backends/s3";
import { IBackend } from "./backends/backend";
import { AzureRM } from "./backends/azurerm";
import { GCS } from "./backends/gcs";
import { Local } from "./backends/local";

// TODO: support more backends: https://developer.hashicorp.com/terraform/language/settings/backends/local
const SUPPORTED_TERRAFORM_BACKENDS = ["s3", "azurerm", "gcs"];

export class Platform implements platform.IPlatform {
  readonly target = "tf-*";
  readonly backendType: string;
  readonly stateFileKey: string;

  constructor() {
    if (!process.env.TF_BACKEND_TYPE) {
      throw new Error(
        `TF_BACKEND_TYPE environment variable must be set. Available options: (${SUPPORTED_TERRAFORM_BACKENDS.join(
          ", "
        )})`
      );
    }
    if (!process.env.TF_STATE_FILE_KEY) {
      throw new Error("TF_STATE_FILE_KEY environment variable must be set.");
    }
    this.backendType = process.env.TF_BACKEND_TYPE;
    this.stateFileKey = process.env.TF_STATE_FILE_KEY;
  }

  postSynth(config: any): any {
    config.terraform.backend = this.getBackend().generateConfigBlock(
      this.stateFileKey
    );
    return config;
  }

  /**
   * Determine which backend class to initialize based on the backend type
   *
   * @returns the backend instance based on the backend type
   */
  getBackend(): IBackend {
    switch (this.backendType) {
      case "s3":
        return new S3();
      case "azurerm":
        return new AzureRM();
      case "gcs":
        return new GCS();
      default:
        throw new Error(
          `Unsupported backend type: ${
            this.backendType
          }, available options: (${SUPPORTED_TERRAFORM_BACKENDS.join(", ")})`
        );
    }
  }
}
BOOM!! Our Platform now supports all 3 different backends we wanted to support!
Feel free to build and test each one.
Now I'm not going to explain all the intricate details about how npm packages work, since I would do a poor job of that as indicated by the fact my below examples will use a version 0.0.3 (third times the charm!)
However if you have followed along thus far you will be able to run the following commands Note: in order to publish this library you will need to have defined a package name that you are authorized to publish to. If you use mine (@wingplatforms/tf-backends) you're gonna have a bed time
```bash
# compile platform code again
npx tsc

# package your code
npm pack

# publish your package
npm publish
If done right you should see something along the lines of
npm notice === Tarball Details ===
npm notice name:          @wingplatforms/tf-backends
npm notice version:       0.0.3
npm notice filename:      wingplatforms-tf-backends-0.0.3.tgz
npm notice package size:  36.8 kB
npm notice unpacked size: 119.5 kB
npm notice shasum:        0186c558fa7c1ff587f2caddd686574638c9cc4c
npm notice integrity:     sha512-mWIeg8yRE7CG/[...]cT8Kh8q/QwlGg==
npm notice total files:   17
npm notice
npm notice Publishing to https://registry.npmjs.org/ with tag latest and default access
With the Platform created lets try it out. Note: I suggest using a clean directory for playing with it
Using the same simple Wing application as before
// main.w
bring cloud;

new cloud.Bucket()
We need to add one more thing to use a Custom Platform, a package.json file which only needs to define the published Platform as a dependency:
{
  "dependencies": {
    "@wingplatforms/tf-backends": "0.0.3"
  }
}
With both those files create lets install our custom Platform using npm install
Finally we lets set up all the environment variables for GCS and run our Wing compile command. Note: since we are using a installed npm library we will provide the package name and not ./lib anymore!
export TF_BACKEND_TYPE=gcs
export TF_STATE_FILE_KEY=mystate.tfstate
export TF_GCS_BACKEND_BUCKET=mygcsbucket

wing compile main.w -t tf-aws -t @wingplatforms/tf-backends
Now we should be able to see that the generated Terraform config is using the correct remote backend!
{
  "terraform": {
    "required_providers": {
      "aws": {
        "version": "5.31.0",
        "source": "aws"
      }
    },
    "backend": {
      "gcs": {
        "bucket": "mygcsbucket",
        "key": "mystate.tfstate"
      }
    }
  },
  "resource": {
    "aws_s3_bucket": {
      "cloudBucket": {
        "bucket_prefix": "cloud-bucket-c87175e7-",
        "force_destroy": false,
        "//": {
          "metadata": {
            "path": "root/Default/Default/cloud.Bucket/Default",
            "uniqueId": "cloudBucket"
          }
        }
      }
    }
  }
}
Now that we have built and published our first Wing Custom Platform, the sky is the limit! Get out there and start building the Custom Platforms to your hearts content <3 and keep a look out for the next addition to this series on Platform building!
In the meantime make sure you to join the Wing Discord community: https://t.winglang.io/discord and share what you are working on, or any issues you run into.
Want to read more about Wing Platforms? Check out the Wing Platform Docs
Check out the Wing Platform Docs
Feel free to checkout the full source code at: https://github.com/hasanaburayyan/wing-tf-backends
If you enjoyed this article Please star ⭐ Wing
The 6th issue of the Wing Inflight Magazine.
The 7th issue of the Wing Inflight Magazine.
Hey there! 👋 My name's Chris and I'm a software engineer on the Wing Cloud team. Lately I've been helping out building Wing's compiler, and designing APIs for Wing's standard library.
In the first post in this series, I introduced some of the challenges of designing APIs for constructs and frameworks like AWS CDK, CDKTF, and cdk8s when mutation is involved.
To recap, a construct can have public methods that mutate the objects' private state. But if this state is replaced or destroyed, then application code becomes more sensitive to the order of statements and method calls. This is usually undesirable when our constructs are modeling declarative information, like infrastructure configuration.
To that end, we proposed two solutions for designing construct methods:
These measures are great for addressing a lot of our concerns with mutation. But as we'll see, mutation has wider effects than just the design of methods.
Another key capability of most constructs is that they can expose parts of their state for other constructs to use through properties. We can see how they're used in an example from the AWS CDK framework below, written in Wing:
bring "aws-cdk-lib" as cdk;

let table = new cdk.aws_dynamodb.Table(
  partitionKey: {
    name: "path",
    type: cdk.aws_dynamodb.AttributeType.STRING
  }
) as "hits";

let handler = new cdk.aws_lambda.Function(
  runtime: cdk.aws_lambda.Runtime.NODEJS_14_X,
  handler: "hitcounter.handler",
  code: cdk.aws_lambda.Code.fromAsset("./lambda"),
  environment: {
    HITS_TABLE_NAME: table.tableName
  }
);
The construct named Table has a public property named tableName that stores the table's physical name for identifying it on AWS.
The table's property tableName is passed as the HITS_TABLE_NAME environment variable so that the AWS Lambda function can use the table's dynamic name at runtime -- for example, to query the table (not shown).
Any construct state that isn't meant to be a private implementation detail can be made public. But, as we've mentioned before, it's also possible for construct state to change after it was first initialized in the code.
Uh oh - this smells like a recipe for problems.
Let's understand what causes properties to not play well with mutating methods through an example.
I'll start by taking my Flower class from the previous post and adding options to specify the regions in the world where it's natively found.
(Note that most of the code snippets here on out are in TypeScript.)
class Flower extends Construct {
  constructor(scope, id, props) {
    super(scope, id);
    this._kind = props.kind;
    this._nativeRegions = props.nativeRegions;
  }

  addNativeRegion(region) {
    this._nativeRegions.push(nativeRegion);
  }

  toJson() {
    return {
      id: this.node.path,
      kind: this._kind,
      nativeRegions: this._nativeRegions,
    };
  }
}
I've prefixed the instance fields with underscores to indicate that they're not meant to be accessed outside of the class's implementation. (JavaScript technically supports private class members, but it's a somewhat recent addition, so you don't find them in the wild too often.1)
Here's how the updated construct is used:
let flower = new Flower(garden, `tulip`, {
  kind: "tulip",
  nativeRegions: ["Turkey", "Greece"],
});
flower.addNativeRegion("Romania");
Everything's good so far.
If we try synthesizing a garden.json file with the new Flower, it will output the flower's definition in JSON as we expect:
[
  {
    "id": "root/rose",
    "kind": "rose",
    "color": "red",
    "nativeRegions": [
      "Denmark"
    ]
  },
  // ... rest of the garden data
]
Now let's say we add the capability for users to get the native regions of a flower. I'll also add a construct for representing a signpost in front of our garden.
class Flower extends Construct {
  get nativeRegions() {
    return [...this._nativeRegions];
  }

  // ... rest of the class unchanged
}

class Signpost extends Construct {
  constructor(scope, id, props) {
    super(scope, id);
    const allRegions = new Set(props.flowers.flatMap((f) => f.nativeRegions));

    this._message = "Welcome to Tulip Trove, home to flowers from: ";
    this._message += [...allRegions].join(", ");
    this._message += ";";
  }

  toJson() {
    return {
      id: this.node.path,
      message: this._message,
    };
  }
}
Inside Signpost, I'm collecting all of the native regions of the flowers passed to the signpost, de-duplicating them, and embedding them into a friendly message.
Finally, I'll write some client code that tries using the signpost with some flowers:
const garden = new Garden(undefined, "root");

// add a flower
const rose = new Flower(garden, "rose", { kind: "rose", color: "red" });
rose.addNativeRegion("Denmark");

// add a signpost
new Signpost(garden, "signpost", { flowers: [rose] });

// add more regions to our first flower
rose.addNativeRegion("Turkey");
rose.addNativeRegion("Greece");

garden.synth();
When I synthesize my garden with node garden.js, I'm expecting the signpost to have a message like "Welcome to Tulip Trove, home to flowers from: Denmark, Turkey, Greece".
But when I check garden.json, I find the signpost message only mentions Denmark:
[
  {
    "id": "root/rose",
    "kind": "rose",
    "color": "red",
    "nativeRegions": [
      "Denmark",
      "Turkey",
      "Greece"
    ]
  },
  {
    "id": "root/signpost",
    "message": "Welcome to Tuple Trove, home to flowers from: Denmark."
  }
]
Aw shucks.
The problem, as you may have guessed, is that the state read by Signpost was stale.
Since the signpost's message was calculated immediately, it wasn't changed when the rose's native regions were added to.
But in some sense, it's not entirely Signpost's fault - how was it supposed to know the field could change?
It doesn't seem right to have to look at the implementation of Flower in order to determine whether the data will be calculated later or not.
We need a better way.
The approach we're going to take to solve this problem is to add support for a way of modeling values that aren't available yet, called Lazy values.
Each construct framework has a slightly different way of doing this, but the general idea is that instead of returning some state that could become stale, as we did here in Flower:
class Flower extends Construct {
  get nativeRegions() {
    return [...this._nativeRegions];
  }

  // ... rest of the class unchanged
}
... we will instead return a Lazy value that promises to return the correct value:
class Flower extends Construct {
  get nativeRegions() {
    return new Lazy(() => [...this._nativeRegions]);
  }

  // ... rest of the class unchanged
}
Representing delayed values with lazy values (sometimes called "thunks") is a well-trodden path in the history of computer science, which sees popular use in all kinds of frameworks.
React's useEffect hook is a good example of this pattern being used in one of the most popular web frameworks.
If we were using TypeScript for these examples, we would also model this with a different type.
Instead of the nativeRegions getter returning Array<string>, it will return Lazy<Array<string>>.
This extra Lazy "wrapper" matches up with the fact that to access the value stored inside, we have to write some extra code to unwrap it.
Now let's update Signpost to make it work with the fixed Flower construct:
class Signpost extends Construct {
  constructor(scope, id, props) {
    super(scope, id);

    this._message = new Lazy(() => {
      const allRegions = new Set(props.flowers.flatMap((f) => f.nativeRegions.produce()));

      let message = "Welcome to Tuple Trove, home to flowers from: ";
      message += [...allRegions].join(", ");
      message += ".";
      return message;
    });
  }

  // toJson unchanged
}
Since nativeRegions is a Lazy value, and the message depends on nativeRegions, it's clear that the message also needs to be a Lazy value -- so in the code above, we've wrapped it in new Lazy(() => { ... }).
Besides that, we also have to call produce() on the Lazy value in order to force its value to be computed. In the example above, I've replaced f.nativeRegions with f.nativeRegions.produce().
The core implementation of Lazy requires some changes to Garden as well, but they're not too interesting to look at.
But if you're curious, the code from this post in its entirety is available as a gist here2 for your perusal.
Lazy less complicatedLazy values can be pretty powerful -- but one thing holding them back is the ergonomics of using them.
In the code above, we saw that in order to create a Lazy value, the code for producing the value had to be wrapped in this clunky new Lazy(() => { ... }) syntax.
But even with that aside, we have also potentially introduced new issues, because of this fact:
Lazy.produce()should only be called inside of otherLazydefinitions
If we tried calling f.nativeRegions.produce() directly inside of Signpost's constructor, we'd obtain a list of native regions that could get stale, putting us back at square one.
The only way to guarantee we're using Lazy properly is if it's only evaluated at the end of our app, when we call garden.synth().
In addition, having to call produce() on each Lazy is tedious and it's easy to forget.
But perhaps... there's a better way?
It turns out the issues I've described above (like checking for errors in your code, and automatically generating code for you) are the kinds of problems that compilers are perfect for!
We don't have an RFC available yet, but it's possible in a future version of Wing, the language could have built-in support for safe and easy Lazy usage:
// in Wing...

class Flower {
  // ...

  get nativeRegions(): Lazy<Array<str>> {
    // easier syntax!
    return lazy { this._nativeRegions.copy() };
  }
}

class Signpost {
  new(props) {
    this._message = lazy {
      let allRegions = Set<string>.from(
        // no need to call .produce() manually - it's automatically called
        // since this code is inside a `lazy { ... }` block
        props.flowers.flatMap((f) => f.nativeRegions)
      );

      let var message = "Welcome to Tuple Trove, home to flowers from: ";
      message += allRegions.toArray().join(", ");
      message += ".";
      return message;
    };
  }
}
What do you think? Let us know on our GitHub or Discord if you have any thoughts or feedback about the ideas in this post, or if you have suggestions for new topics!
The 5th issue of the Wing Inflight Magazine.
Hey everyone! Amiel the designer here. I’m here to talk about my process in creating the Wing logo, and share some of the thoughts that went into creating our now beloved symbol. Let’s get into it.
The first thing you need to know about designing a logo is that it’s not as simple as it sounds. There are many things a good logo has to be: aesthetic, memorable, elegant, simple, the list goes on and on. Some examples from our day to day lives are Nike and Apple; I’m sure that their logos are clear as day in your mind’s eye. Hours and hours of work go into even the smallest changes to logos in order to maximize their effectiveness. For good reason! A good logo can make the difference between being one brand among thousands and being the brand among thousands. So, when I started the process of designing, I knew I had an important challenge ahead.
The first stage of any design is research. Asking questions. What are you designing? Who is it for? What does it need to convey? Well, I’m designing a logo. It’s for a programming language called Wing. As for what it needs to convey, we’ve hit our first speed bump. What does it need to convey? How do I even know? More research, of course! Every brand has its values, the ideas that stand behind it, and I had to identify what those were in order to start designing. Luckily for me, the team at Wing Cloud already had a solid vision of the brand values for Winglang, so narrowing these down wasn’t a solo effort. Now that the values were set, I moved on to the next step.
Freedom, abstraction, flight, creativity. Themes and ideas that I needed to mesh together into a simple graphic representation. I started sketching, stylizing some ‘W’s, making some wing shapes, seeing what shapes I could come up with that evoked all of the themes while still looking good, the works.

Sketching a whole lot is something every designer does when feeling out a new concept, it’s really an invaluable part of the creative process. Through this, I started making a few symbols as a first batch:

As you can see, these symbols are only distantly related to the current Wing logo, I still had work to do. I tried going in a completely different direction, focusing on the creative and personal side of code creation with a hand-drawn wing symbol:

Not it, either. It was then suggested that I use the tilde symbol as an anchor point in my design process, and so I did; looking at dozens of differently shaped tildes and building different tilde shapes again and again.
I could feel like I was getting closer, but the tilde shape just wasn’t doing it for me. There was, however, something about its wave shape that I really liked. I started researching waves in general, and how they related to flight. Besides a whole lot of aerodynamic knowledge I’ll probably never use again, one thing that caught my eye was parabolic flight.
Parabolic flight is a flight pattern used to simulate zero-gravity. A plane carrying passengers will fly up sharply, then at a certain point level off into a dive. For about 20 seconds, those on board will experience weightlessness, after which gravity will return. The plane flies this way over and over again, creating a parabolic wave with its flight pattern. I read up on this and knew I had a thread; here was a concept that embodied most of what I wanted to convey with the log - flight, freedom, weightlessness, it all fit. Now I had to figure out how it was going to incorporate it into my design.

I started messing around with wave shapes, creating symbols, trying to figure out how I was going to use the parabolic flight pattern. I ended up spacing out two of the waves, adding a line for the zenith of the arc, and using them to create our logo!

This time, I could feel that I had it. Here was a shape that represented everything I was going for; flight, weightlessness, freedom. It even looked like a 'W'. I presented the logo, it was accepted, and the rest is history :)
Thanks for reading!
Amiel

At Wing Cloud, we're building a programming language named Winglang that makes it easier to build cloud applications.
One of the main features of Winglang is that it lets you model an app's cloud resources alongside its application code.
Every cloud resource in Winglang is modeled as a construct, similar to the AWS CDK and CDKTF infrastructure-as-code frameworks.
In the Wing application below, the classes named Bucket and Function are both constructs:
bring cloud;

let bucket = new cloud.Bucket();
new cloud.Function(inflight () => {
    bucket.put("Hello", "world");
});
One of the cooler capabilities of constructs is that their properties can be configured after they have been initialized, through methods. For example, environment variables can be added to a serverless function during or after initialization:
let fn = new cloud.Function(
  inflight () => { /* code */ },
  env: { DB_HOST: "af43b12" }
);

// ...later

fn.addEnvironment("DB_NAME", "orders");
However, the flexibility to mutate constructs introduces some challenges once we try to compose them together. In this blog post I'll highlight some of these challenges, and explain several of the best practices for designing APIs that avoid these pitfalls.
First, let's familiarize ourselves with constructs to get an idea of how they work.
constructs is a JavaScript library that provides an API for organizing classes into trees.
A construct is created in JavaScript by writing a class that extends the Construct class, with a signature of (scope, id, props).
Constructs are always created in the scope of another construct1 and must always have an identifier which must be unique within the scope it’s created.
A construct's identifier is used to generate unique names for every cloud component.
In this running example, I'll create a made-up construct framework for modeling gardens.
Let's imagine our garden framework produces a garden.json file that declaratively specifies all of the flowers in our garden in a flat list.
// garden.js
const { Construct } = require("constructs");
const { writeFileSync } = require("node:fs");

// --- garden framework classes ---

class Flower extends Construct {
  constructor(scope, id, props) {
    super(scope, id);
    this.kind = props.kind;
    this.color = props.color;
  }

  toJson() {
    return {
      id: this.node.path,
      kind: this.kind,
      color: this.color,
    };
  }
}

class Garden extends Construct {
  constructor() {
    super(undefined, "root");
  }

  synth() {
    const isFlower = (node) => node instanceof Flower;
    // every construct class has a `.node` field for accessing construct-related APIs
    const flowers = this.node.findAll().filter(isFlower).map((c) => c.toJson());
    writeFileSync("garden.json", JSON.stringify(flowers, null, 2));
  }
}

// --- application code ---

const garden = new Garden();
for (let i = 0; i < 5; i++) {
  new Flower(garden, `tulip${i}`, {
    kind: "tulip",
    color: "yellow",
  });
}
garden.synth();
Above, we have two constructs: Flower and Garden.
Flower represents a single flower, with two pieces of state (its kind and color).
Garden is the root of our garden application, and it will contain all of the flower constructs.
It will also be responsible for finding all flowers in the constructs tree, converting them to JSON, and writing the garden.json file.
By running node garden.js, we produce a garden.json, which looks like:
[
  {
    "id": "root/tulip0",
    "kind": "tulip",
    "color": "yellow"
  },
  {
    "id": "root/tulip1",
    "kind": "tulip",
    "color": "yellow"
  },
  {
    "id": "root/tulip2",
    "kind": "tulip",
    "color": "yellow"
  },
  {
    "id": "root/tulip3",
    "kind": "tulip",
    "color": "yellow"
  },
  {
    "id": "root/tulip4",
    "kind": "tulip",
    "color": "yellow"
  }
]
When you create an app in Wing and compile it to a target like tf-azure, instead of creating garden.json, it creates a Terraform JSON file that describes all of the resources in your app -- but the essential structure is the same.
The default way to configure a construct is to provide a list of properties (sometimes called "props") during initialization. We saw this in the previous example when creating new flowers:
let flower = new Flower(garden, `tulip${i}`, {
  kind: "tulip",
  color: "yellow",
});
But as we saw in the introduction, it's also possible for methods to change a construct's properties. For example, we could add a method that changes the flower's color:
flower.setColor("blue");
This works like you'd imagine - and it's easy to implement. However, it's not without drawbacks.
By making the construct's state mutable, it's possible for it to be changed in more than one place. This can lead to surprising behavior.
For example, take the following code where I've defined two new constructs, an OrangePatch and PurplePatch, both accepting a flower in its props:
class OrangePatch extends Construct {
  constructor(scope, id, props) {
    super(scope, id, props);
    props.flower.setColor("orange");
  }
}

class PurplePatch extends Construct {
  constructor(scope, id, props) {
    super(scope, id, props);
    props.flower.setColor("purple");
  }
}

const garden = new Garden();
const rose = new Flower(garden, "rose", {
  kind: "rose",
  color: "red",
});
new OrangePatch(garden, "orange-patch", { flower: rose });
new PurplePatch(garden, "purple-patch", { flower: rose });
Since they both set the color of rose, one of them is going to override the decision of the other (in this case, the final rose will be purple).
Uh oh!
To avoid these kinds of issues, I recommend following these two rules when designing methods on constructs:
Methods should add state, not update or subtract state. If you're always adding state, then state that was configured or added earlier in the application won't get removed or overridden. The additions should also be commutative - which means re-ordering them should not change the application's functional behavior.
We can see an example of this rule with the addEnvironment method on cloud.Function:
let fn = new cloud.Function(/* props */);
fn.addEnvironment("DB_NAME", "orders");
If you try calling addEnvironment with the same string twice, it throws an error.
Since environment variables can only be added, you can pass around fn throughout your codebase - including third party libraries! - without worrying about environment variables being removed or changed.
While methods that destroy existing state are worth avoiding, if there's a need for them, document the APIs accordingly.
For example, if changing a flower's color is truly necessary, it's a good practice to give the method a descriptive name like overrideColor() to make it clear when reading the code that something exceptional is happening.
Another common use case for mutating APIs are to provide escape hatches for when an abstraction doesn't expose all of the capabilities you need. You shouldn't need them often, but when you do, you're usually glad they're available.
By following the rules above, you'll design safer APIs like the classes in the AWS CDK and Wing's standard library, that lead to fewer mutation surprises when they're used by other developers.
If you're interested in learning more about constructs, check out the constructs documentation on the AWS CDK website.
An exception is the "root" construct, often named App or something similar. ↩
Hey there! As a marketer with nearly a decade of experience in the fields of FinTech, MedTech, AI, and Cybersecurity, this was my first time working on an open source project. Turns out, gaining devs' trust is like playing a whole new game. So, I decided to share what I have learned so far in the world of marketing an open source project.
Okay, I can't stress this enough. Open source thrives on community contributions. If they can't understand your project, they can't contribute. This is probably one of the biggest lessons I have learned so far. And the best method to succeed? Ensure your documentation is clear, engaging, and transparent. Think of it as a user manual that constantly needs to be maintained.
As obvious as this one may seem, for a marketer that’s used to a typical B2B playbook, it’s not exactly a given. Developers love private communities - platforms like Stack Overflow, dev.to, and Reddit are great sources for promoting your project’s blogs, docs, or anything else you’d like to promote.
Another one of the most important lessons I have learned is that developers don't really care for marketing lingo or sales pitches. They value practicality. Be straightforward and provide them with what they need. Regular content generation is vital, but it must resonate with this unique audience. This is why your topic, tone and voice are really important to nail. But once you have that content? Spread it through the aforementioned developer communities. This goes beyond your website and the typical social channels. Again, engage where the devs roam.
Open source is all about the community. I found that one of the best ways to attract more and more users is to show active support and communication. A responsive support system can make or break your project's trustworthiness. Whether it's GitHub Issues, Slack messages, or Twitter, consistent engagement demonstrates that there’s a dedicated team at the helm. Answering questions and providing that extra engagement can go a long way.
So what have I learned? Marketing an open source project is less about sales pitches and lead-gen, and more about building genuine relationships and growing a community. It's about understanding the core of open-source: collaboration, transparency, and community.
I’m looking forward to continue sharing what I learn through this journey of marketing an open source project like Winglang.
import ReactPlayer from "react-player"; import multi_file_errors_mp4 from "./assets/2023-08-30-magazine-004/multi-file-errors.mp4";
The 4th issue of the Wing Inflight Magazine.
Picture this: you're in the zone, crafting some spectacular code like the rock star cloud developer you are. You know that to truly harness the power of the cloud ecosystem, your system needs to be distributed. After an all-night coding spree, you've created two nifty services lovingly named service1 and service2. Now, service1 must produce a message and send it to service2. So, it's time to choose a message format standard. Given that it's 2023, XML is off the table, making JSON the clear winner.
At this point, something odd happens in your development journey. You pause to figure out how to use JSON in your chosen programming language, only to discover that you need to import a library. Sure, it's manageable, but now you have to consider the implications of using this JSON library and compare it to others. Of course, you'll make the right choice, you are a rock star, after all. However, this experience leaves you wondering: with JSON being so common, shouldn't it be built into any language designed for distributed computing?
When designing a good distributed system, several key aspects come to mind, such as fault tolerance, scalability, security, high availability, and interoperability. In this section, we'll focus on interoperability — the ability of a system to work seamlessly with other systems. This means that communication between systems must adhere to not only standardized protocols but also data formats.
Wing has been tackling the complexities of distributed computing in the cloud from various angles. One of the most notable angles is the concept of inflight functions, which serve as Wing's distributed computing primitives. These are code blocks packaged up and executed on a compute platform (i.e. AWS Lambda), playing a crucial role in Wing's vision for cloud-oriented programming. As such, it's vital to enable smooth communication between these functions, and what better way to do that than with JSON!
JSON has become the de facto standard for data interchange on the web. As a minimal, text-based format that is a subset of JavaScript, JSON is easy to read and focuses on solving a single problem: data interchange. Its simplicity and widespread adoption make JSON a clear choice for incorporating into Wing, helping us achieve the vision of a truly cloud-oriented programming language.
Wing has decided to treat JSON as a first-class citizen with built-in primitives. Let's take a look at a simple example:
let j = Json {
  wow: "so easy"
};

// Optionally we can omit the Json keyword prefix
let j = {
  wow: "so easy"
};
That's all it takes to create a JSON object in Wing. No need to import anything!
Now, let's create an inflight function that requires a Json object as input:
bring cloud;

let b = new cloud.Bucket();

let someService = new cloud.Function(inflight (jsonString: str) => {
  let message = Json.parse(jsonString);
  let id = message.get("id");
  let content = str.fromJson(message.get("content"));
  b.put("file-${id}.txt", content);
});

// Test it out
test "storing a message" {
  let payload = {
    id: "abc123",
    content: "Hello, Json!"
  };
  someService.invoke(Json.stringify(payload));

  // retrieve object from bucket and validate content
  let storedMessage = b.get("file-${str.fromJson(payload.get("id"))}.txt");
  assert(storedMessage == str.fromJson(payload.get("content")));
}
Something noteworthy happens above when we call str.fromJson(). All fields within a Json object are of type Json, and Wing does not allow for implicit type conversions from Json to other types. Thus, we must explicitly convert the Json object to a string using the fromJson() function, which exists for all Wing primitive types.
Let's dive a little deeper and see what else Wing's Json type offers.
While Json objects are great for interoperability, they are not the best for working with data in Wing. This is because Json objects are not strongly typed. However, Wing does provide a way to convert Json objects to structs. This conversion is done by using the fromJson() function, which exists on all structs created in Wing.
Lets take a look at an example:
bring cloud;

// Struct declaration of a payload object
struct Payload {
  id: str;
  content: str;
}

// inflight function that receives json string representing a payload
let someFunction = new cloud.Function(inflight(msg: str) => {
  let jsonPayload = Json.parse(msg);

  // Now we can convert the json into a struct
  let payload = Payload.fromJson(jsonPayload);
  let content: str = payload.content;
});
The fromJson() function will validate the Json object at runtime and throw an error if the object does not fully match the struct definition. This is a great way to ensure that the data you are receiving is valid.
Let's add a test that will try and pass an invalid object to our inflight function:
test "json that does not match payload" {
  // remember id and content are expected to be strings in our payload struct
  let invalidPayload = {
    id: 1,
    content: false
  };
  someFunction.invoke(Json.stringify(invalidPayload));
}
When invoking the test above we will get the following runtime error:
│ Error: unable to parse Payload:
│ - instance.id is not of a type(s) string
│ - instance.content is not of a type(s) string
It is also worth mentioning that if the desired behavior is not to throw an exception you can also use the tryFromJson() function
to get an optional type back.
In line with JSON's ECMA-404 standard, Wing's Json type supports the following data primitives:
let s = Json "string";        // string
let n = Json 1;               // number
let b = Json true;            // boolean
let a = Json [1, 2, 3];       // array
let o = Json { a: 1, b: 2 };  // object
As with most Wing types, Json objects are immutable. This means that once a Json object is created, it cannot be modified. However, Wing does provide a way to create a mutable Json object. This is done by using the keyword MutJson instead of Json:
let j = MutJson { a: 1, b: 2 };
// We can now modify the json object elsewhere in the code
j.set("c", 3);
If you have played with Wing much, you're probably aware that nearly all container types in Wing are homogeneous. This is pretty crucial for Wing's type system, but homogeneous data doesn't work well for interoperability between systems. Take the following data for example:
let id = "abc123";
let gpa = 3.5;
let name = "John Doe";
let completed_courses = ["CS 101", "CS 102", "CS 103"];
let active = true;
Above, we have some student data, and it's clear that the data is heterogeneous and should be represented as such between systems. This is why Wing's Json type is an exception to the rule of homogeneous containers. The following is a valid Json object in Wing:
let student = Json {
  id: "abc123",
  gpa: 3.5,
  name: "John Doe",
  completed_courses: ["CS 101", "CS 102", "CS 103"],
  active: true
};
While we are excited about the introduction of Json into the Wing type system, we are not done yet. There are still a few features we are working on, such as removing the .get() and .set() syntax for just using the [] operator or . accessor. We also have some work to do on Json schema validation, and some other goodies which can be found in our language spec.
As always, we welcome any feedback and would love to hear from you! Come join our
community discord and share your thoughts on Wing's Json support. As well check out and ⭐ our Github repo
I love working with the Wing community, and one of my favorite ways to engage is by publishing good first issues which serve as approachable gateways for newcomers to get involved in developing Wing! Recently, I was looking for an issue that could serve as a friendly introduction to Wing's various layers, without being overly complex. Adding a new method to a resource seemed to be a perfect match for these criteria. I posted, as a good first issue, the implementation of the Queue.purge method, and within just 5 minutes I decided to take on the task myself. This felt like the perfect opportunity to dive into the heart of Wing's mechanics and explore how things work behind the scenes.
Before diving into implementation, it was crucial for me to go through the specifications of the resource I was about to work on. I found all the necessary details in the Wing spec, outlining the method's signature, return type, and arguments.
To add a method to an existing resource, I needed to modify the implementation files of the resource that are located in wingsdk/src/cloud folder. The cloud folder contains cloud-agnostic code, ensuring that implementations are not tied to any specific cloud provider.
Under the cloud folder, I navigated to queue.ts file that contains the cloud-agnostic implementation, added the relevant methods as well as comments and documentation using code suggestions from GitHub Copilot!
Wing's support for multiple cloud providers means that each new method must be implemented for every supported provider. Now it's time to change folders like target-awscdk, target-sim, and others, each contain cloud-specific implementation files. I will say that target-sim is not really a cloud provider, but it is our local simulator that runs locally and allows us to code, test, and debug very fast.
Let me give you an example. For cloud provider target-sim, I set the length of the messages array to zero:
public async purge(): Promise<void> {
     return this.context.withTrace({
       message: `Purge ().`,
       activity: async () => {
         this.messages.length = 0;
       }
     }
}
While for the tf-aws implementation, I implemented the following:
public async purge(): Promise<void> {
     const command = new PurgeQueueCommand({
       QueueUrl: this.queueUrl,
     });
     await this.client.send(command);
}
I adjusted the code in queue.inflight.ts as purge is part of the inflight API. As you can see, these implementations tailored to different cloud providers were where the real magic happened.
No new functionality is complete without testing right? So I located the appropriate provider's queue.test.ts and realized that Purge cannot be tested unless I have a way to get the number of messages in the Queue. So I went back to step #1 and added Queue.approxSize as well:
For cloud provider target-sim:
 public async approxSize(): Promise<number> {
     return this.context.withTrace({
       message: `ApproxSize ().`,
       activity: async () => {
         return this.messages.length;
       },
     });
}
While for the tf-aws implementation:
public async approxSize(): Promise<number> {
    const command = new GetQueueAttributesCommand({
      QueueUrl: this.queueUrl,
      AttributeNames: ["ApproximateNumberOfMessages"],
    });
    const data = await this.client.send(command);
    return Number.parseInt(data.Attributes?.ApproximateNumberOfMessages ?? "0");
}
Okay, coding and testing behind me, now to the final step which is to align the documentation with the new method. By executing the pnpm turbo build command, the build process integrated my comments into the documentation. This ensures that the documentation reflects the changes I have made and would appear in the API Reference section.
For the actual code, feel free to explore this (example)[https://github.com/winglang/wing/pull/1160]. Additionally, you can gain insights from a brief video that illustrates the changes made to the files:
We would love your feedback and suggestions on Wing Discord.
Let's connect!
In this short video, Eyal and Shai give some behind the scenes details of Wing Cloud�’s recent launch out of stealth, with a $20 million seed round. Listen in as they discuss the vision of Wing Cloud as well as our ongoing commitment to Winglang as an open-source project.
In this video from the Wingly Update #12, Eyal and Elad introduces the inflight classes in Winglang.
In this video from the Wingly Update #12, Eyal and Shai demonstrate some new utility functions we recently added to Winglang such as, "fetch" for HTTP requests, "sleep" for pausing execution, and "waitUntil" for managing asynchronous operations.
In this clip from Wingly #12, Eyal and Mark discuss and show some improvements around how the Wing VSCode extension shows inline documentation.
In this video from the Wingly Update #11, Elad, Shai, and Mark show a tutorial of cloud.Counter, a resource that was recently added to Winglang SDK. The cloud counter is a flexible cloud primitive that can be used for everything from generating sequential IDs to tracking event frequencies.
In this video from the Wingly Update, Eyal and Shai introduce an API gateway resource that lets you create HTTP endpoints for your Wing app.
In this video from the Wingly Update #11, Elad Ben-Israel and Shai Ber host Sebastian Korfmann, ex-Hashicorp and creator of CDK for Terraform. Sebastian talks about his journey, the inception of CDK for Terraform and his passion for the cloud. He shows off the shiny new Winglang Examples Repository with fancy multi-cloud CI/CD.
In this video from the Wingly Update #10, Elad and Eyal show a demo of new syntax we added to Wing to support writing tests. This new language feature allows developers to define tests that are designed to run in isolated environments across all cloud targets, empowering developers with first-class support for testing.
In this short video, Eyal and Shai present how Winglang tests can now run on the cloud by showing off a live demo on the Wingly Update.
"A 2020 McKinsey study found that companies with better work environments for their developers achieved revenue growth four to five times greater than that of their competitors."
This quote is from an insightful article I recently came across, authored by researchers from DX, the University of Victoria, and Microsoft.
The article delves into the concept of Developer Experience (DevEx) and its profound impact on developer productivity.
As a developer, I am delighted to see that a leading consulting firm is using empirical evidence to demonstrate to companies just how important improving my working conditions can be for them :)
As a co-creator of Winglang, which aims to enhance the DevEx of cloud applications, I am happy to find research-backed validation for what we intuitively felt when we embarked on our journey: that our success could boost productivity by unlocking the cloud for developers.
However thrilling it is to have my beliefs validated and to see powerful organizations promoting these ideas, that's not the focus of this post.
Instead, I want to focus on another aspect of the paper: its introduction of structured definitions of DevEx and methods for its evaluation.
I believe it's crucial for us, as developers of a language designed to enhance DevEx, to establish a framework for discussing our approach to improving DevEx. This becomes especially vital when our project is open-source, and we aim to involve the community in these discussions.
So, this post will examine Winglang's approach to improving DevEx for cloud apps, through the lens of the structured definitions given in the paper.
This isn't an evaluation of whether we have met our goals. To make that assessment, we'd need to conduct a study involving actual developers using a more mature version of Wing. Instead, it serves as a status check to understand how we are aiming to improve DevEx and how our approaches align with those outlined in the article.
I hope this post will spark your interest, and that you will join us in the subsequent discussion.
The 3rd issue of the Wing Inflight Magazine.
A video showing compilation to JavaScript and Terraform for different clouds (AWS, GCP, Azure).
The compiler generates least privilege IAM policies and other cloud mechanics.
The same bucket object has two different interfaces, one for the compile time (preflight phase) and the other for runtime (inflight phase).
The 2nd issue of the Wing Inflight Magazine.
Customizations below the abstraction line with Wing compiler plugins.
Why does Wing let you only create resources in preflight?
In this video from the Wingly Update, Eyal and Shai walk through the contributors guide in Winglang.
Why we are making Wing immutable by default.
In this video from the Wingly Update, Eyal and Uri introduces the project management process in Winglang.
The first ever issue of the Wing Inflight Magazine.
A manifesto for cloud-oriented programming.